Xbox Music is the new music app in
Windows 8; it’s also accessible from Microsoft’s Xbox 360 game console
and Windows 7/8 phones. In this article, author Michael Miller shows you
how to use Xbox Music to manage your own music collection and to listen
to and purchase new music online.
Every recent version of Windows has included some
sort of music player application, such as Windows Media Player. Windows
goes one step further, however, in including both a music player app
and a music download/subscription service.
Windows 8’s music player/service is called Xbox Music. (Microsoft is
obviously playing off their successful Xbox videogame brand.) Xbox Music
is both a media player for music stored on your PC or network and an
online service for purchasing, downloading, and even streaming music
tracks. It’s a full-screen (Metro or Modern-style) app you can use if
for pretty much all your music-related activities in Windows 8.
Understanding Xbox Music
Windows 8’s Xbox Music isn’t just one thing. It’s a music player,
it’s a music store, it’s a streaming music service – in short, a central
hub for all (or at least most) of your music-related activities. You
use the Xbox Music app to play music stored on your PC or network, to
purchase and download new music, and (if you choose to subscribe) to
stream millions of tracks to your computer over the Internet.
On the PC platform, Xbox Music is available only if you’re running
Windows 8; if you have a Windows 7 or Windows Vista computer, you’re out
of luck. However, Xbox Music is also available to anyone using an Xbox
360 videogame console or Windows 7/8 smartphone. The service works
similarly on all devices.
On a Windows 8 PC, you launch Xbox Music from the Start screen; just
click or tap the Music tile. The main screen is divided into four
sections that you can click to view additional content:
- My Music. This is your own personal music
library, those files stored on your PC or shared over your network.
This includes tracks you’ve ripped from your own CDs or downloaded from
the web – not just from the Xbox Music Store. Your newest music is
featured on the main screen; click or tap an album cover to play that
album. To view your entire music collection, click or tap the My Music
header. Or, if you want to listen randomly, click or tap the Play All
Music tile.
- Now Playing. This is where you listen to music
now. The currently selected track is shown in the main tile; tap or
click to pause or resume playback. You can also opt to play music from a
specific artist, play a playlist, or start a new Radio session– enter
the name of an artist and the Xbox Music assembles a “station” of
similar music.
- All Music. The tiles in this section are of
artists that Xbox Music thinks you might be interested – or, more
likely, those artists being promoted this week. Tap or click the All
Music header to enter the Xbox Music store, where you can search for or
browse for music by category.
- Top Music. This section hosts the most popular
music on the Xbox Music service – sort of. You see the top albums and
artist in the tiles on the main screen, but when you tap or click the
Top Music header, you’re just taken (once again) to the Xbox Music
store.
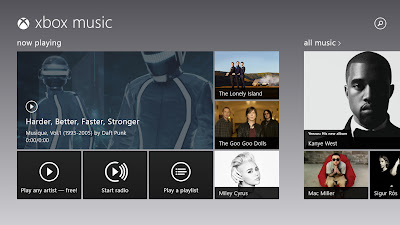
The Windows 8 Xbox Music app
That basic navigation out of the way, let’s look at how you can use Xbox Music to perform specific tasks.
Using Xbox Music to Play Your Own Music
All the music you’ve purchased and downloaded online, as well as
music you’ve ripped from your own CDs, is stored in the Music library on
your computer’s hard drive. To play any of these tracks, just launch
the Xbox Music app and then click or tap the My Music heading.
You now see all the music stored on your computer. There are a number of ways to display and play your music.
Viewing your personal music library with the Xbox Music app
The default view displays all your music by the date you added I –
that is, the newest albums or tracks are listed first. To display your
music in a different order, tap or click the Arranged By control. You
can then opt to display your music in alphabetical (A to Z) order, or
by artist, release year, or genre. Click the appropriate link in the
left column to display albums, artists, songs, playlists, or Radio
stations. (Xbox Music’s Radio automatically creates online “stations”
designed to appeal to fans of a particular artist, by assembling tracks
based on the artist you select.)
To play an album, track, or list, just click or tap it. Xbox Music
now displays a large tile for that item. You can now choose to play the
album or track, add the item to your now playing list or to a new
playlist, display more information about the artist, or create a Smart
DJ station based on this artist.
Playing a track in the Xbox Music app
Playback controls are displayed in the Options bar at the bottom of
the screen. (If/when the Options bar disappears, just right-click screen
to redisplay it.) From here you can pause or resume playback, go to
the next or previous track, or even choose to “shuffle” the tracks in
random order.
Downloading New Music from the Xbox Music Store
The Windows 8 Xbox Music app also enables you (actually, encourages
you) to purchase more music online. You can purchase individual tracks
or complete albums from Microsoft’s Xbox Music Store.
(One of my beefs with the Xbox Music app as it now exists is that it
pretty much defaults to the store mode; you have to work at playing your
own music.)
The Xbox Music Store is Microsoft’s competitor to Apple’s iTunes
Store. Microsoft offers more than 18 million tracks, which is pretty
good. All downloads are in 256kbps MP3 format.
Both the All Music and Top Music sections of the main Xbox Music
screen link to purchasing opportunities. Click or tap an individual tile
to purchase that item. Click or tap either the All Music or Top Music
headers to view more items for purchase.
What you see next is a collection of featured albums. You can browse
these featured albums by genre by clicking or tapping the appropriate
genre along the side of the screen. Switch between Featured, New
Releases, and Top (bestsellers) by clicking the down arrow under the
New Music header. Or click the Search (magnifying glass) icon to search
Xbox Music for specific items.
Browsing music for sale in the Xbox Music Store
When you find an item you want to buy, click or tap it. You now see a
tile for that item; you can then opt to view artist details, play a
preview of selected tracks, or buy the album.
If you decide to make a purchase, you’re prompted for your password
and then shown the Confirm Purchase screen. If you haven’t yet entered a
credit card number, you’re prompted to do so. Once your credit card
info is entered, confirm your purchase and wait for the tracks to
download to the Music library on your PC.
Streaming Music from the Xbox Music Pass Service
Downloading music is old school these days; streaming music is where
it’s at. To that end, Microsoft offers its own streaming music service
tied into the Xbox Music app. The service is called Xbox Music Pass,
and its available in both free and paid versions.
Xbox Music Pass streams its music using the Windows Media Audio (WMA)
codec, encoded at 192kbps. That’s not bad, but it doesn’t sound quite
as good as what you get from competing services. (Spotify Premium, in
comparison, streams at 320kbps in the Ogg Vorbis format.)
One of the drawbacks of the free version of Xbox Music Pass is the
ads. These aren’t your basic run-of-the-mill audio advertisements, but
rather full-screen video ads. (Quite annoying, in my opinion.) The free
service also limits you to 10 hours of music a month – after the first
six months, anyway.
Xbox Music Pass Premium doesn’t have these restrictions. Pay your
$9.99/month (or $99.90/year) and you get rid of the ads and get
unlimited music streaming. One subscription applies across all your
compatible devices – Windows 8 PC, Windows 8/RT tablet, Windows 7/8
phone, or Xbox 360 game console. (Actually, a single description is
good for up to five devices – and if you want to use it with your Xbox
360, you need an Xbox LIVE Gold subscription first.)
Whether you’re using the free or paid versions, streaming music via
the Xbox Music app is a snap. When you select an album or track, just
tap or click Play or Play Album. This starts the streaming, in real
time.
You also get real-time streaming when you select the Start Radio
option at any point. An Xbox Music Radio station is constructed from
tracks stored in Microsoft’s digital library and streamed live to your
PC or other device.
Even better, you can download music from the Xbox Music Pass service
to your PC for offline listening. Click or tap Add To > My Music and
the track or album is downloaded to your computer for playback when
you’re not connected to the Internet. It’s also “matched” in the cloud
for playback from your other devices.
How does Xbox Music Pass compare to Spotify and similar streaming
music services? The cross-device compatibility is nice, the selection is
good, and the audio quality is okay. Pricing is comparable, and the
option of downloading tracks for offline use is a plus. If you have a
Windows 8 PC – or an Xbox 360 console or Windows 7 or 8 smartphone –
it’s certainly worth considering.
What Xbox Music Doesn’t Do
So Xbox Music is good for playing digital music stored on your
computer, downloading new music, and even streaming music from the Xbox
Music Pass service. What’s it
not good for?
Unfortunately, the Xbox Music app does not play physical CDs. Nor
does it let you rip those CDs to digital files, or burn your digital
files to CDs. For these tasks, you’ll need a different music player –
such as Windows Media Player, which still exists in Windows 8 (albeit
relegated to the virtual wasteland of the Windows Desktop).
For everything else, however, the Windows 8 Xbox Music app – and the
accompanying Xbox Music Store and Xbox Music Pass service – offer a ton
of options for both casual and serious music lovers. You should give it
a try.


 10:12 PM


 Posted in:


