

 10:12 PM

Windows presents a lot of different
ways to personalize the look and feel of your system, and this chapter
teaches you some of the ways you can do this.
When you first turn on your new computer system, you see the Windows
Start screen as Microsoft (or your computer manufacturer) set it up for
you. If you like the way it looks, great. If not, you can change it.Windows presents a lot of different ways to personalize the look and feel of your system. In fact, one of the great things about Windows is how quickly you can make Windows look like your version of Windows, different from anybody else’s.
Personalizing the Start Screen
Let’s start by learning how to configure your own personal Start screen. As you know, the Start screen, shown in Figure 5.1, is your own personal home base in Windows 8; it consists of a number of tiles that you use to open apps and files. You can change the background color of the start screen, as well as determine which tiles are displayed—and how.
The Windows 8 Start screen.
Changing the Background Color
When you configured Windows when you first turned on your new computer, you were asked to choose a color scheme. This color scheme is what you see when you display the Windows Start screen.Fortunately, you’re not locked into your initial choice. You can change the color scheme for your Start screen (and various subsidiary screens) at any time. Just follow these steps:
- Display the Charms Bar and click or tap Settings to display the Settings panel.
- Click or tap Change PC Settings to display the PC Settings page,

- Personalizing the Start screen color scheme.
- Click or tap Personalize in the left column.
- Click or tap Start Screen in the right panel.
- Drag the background color slider to the color you want.
- Click or tap the desired background pattern.
Making a Tile Larger or Smaller
The Start screen is composed of dozens of individual tiles, each representing an app, program, operation, or file. There are several ways to personalize the Start screen by changing how these tiles are displayed.
For instance, tiles can be either one- or two-column width. To change the width of a given tile, follow these steps:
1. Right-click the tile (or press and hold it on a touchscreen) you want to change. This adds a check mark to the tile and displays the pop-up bar at the bottom of the screen
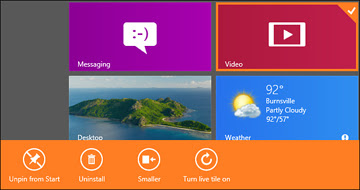
- Changing the size of the Video tile.
- Click or tap Smaller to make a large tile smaller; click or tap Larger to make a small tile larger.
Rearranging Tiles
If you don’t like where a given tile appears on the Start screen, you can rearrange the order of your tiles. To move a tile, use your mouse (or, on a touchscreen display, your finger) to click and drag a given tile to a new position.
Removing a Tile
You might find that there are one or more tiles on your Start screen that you never use. You can remove unused tiles to get them out of your way and make room for additional tiles. Follow these steps:
- Right-click the tile (or press and hold it on a touchscreen) you want to delete. This adds a check mark to the tile and displays the pop-up bar at the bottom of the screen.
- Click or tap Unpin from Start.


Adding a New Tile
If you accidently remove a tile from the Start screen, or you want to add a tile for an app that isn’t already there, you can do so. To add a new tile, follow these steps:- Press the Windows key to display the Start screen.
- Right-click anywhere on the Start screen (or press Windows+Z) to display the Options Bar at the bottom of the screen.
- Click or tap All Apps.
- When the Apps screen appears, right-click the item you want to
add (or press and hold it on a touchscreen); this displays the Options
Bar at the bottom of the screen

- Adding a new tile to the Start screen.
- Click or tap Pin to Start.
Turning On or Off a Live Tile
Many tiles are “live,” meaning that they display the current information or a selected document for that app. For example, the Weather tile displays the current weather conditions; the Photos tile displays a slideshow of photographs stored on your computer.
To turn off a live tile—that is, to display the default tile icon—follow these steps:
Right-click the tile (or press and hold it on a touchscreen) you want to change; this adds a check mark to the tile and displays the pop-up bar at the bottom of the screen

- Turning “off” the live Weather tile.
- Click or tap Turn Live Tile Off.
 Posted in:

0 comments:
Post a Comment