How to expand the wireless network by WDS function for the AP?
Product line: Wireless Question category: Function configurations
Q: why do we need to expand the wireless coverage?
A:
Sometimes the wireless router is too far from the wireless clients or
the wireless signal strength is too low, you need expand wireless
network range to make sure that the wireless client can scan the
wireless signal and connect to it.
The Topology is as below:
 Key Points:
1. The main wireless router should support WDS function.
2. The Channel and Extend Channel should be exactly the same in the main wireless router and the A3.
3. The SSID、the
wireless security mode and the Wireless password (Key Words) should be
exactly the same in the main wireless router and the A3.
The Steps are as below:
Ⅰ. Settings in main wireless router (Set Tenda W308R as an example)
1) open
a web browser in PC1 which connects to R1, and in the address bar
please type in 192.168.0.1, and then “Enter”, Then you will be in the
management page of R1.

2) click on the “Advanced Settings” in the right upward,

3. Then in the main menu, please select Wireless settings. In the Wireless Basic Settings, please choose Wireless Access Point as the Wireless Working Mode. Then please change the primary SSID,
which should be the same with the one of A3 if we have set a password
for the wireless network, for example WDS_A3. And select a Channel, e.g. channel 1(then the Extension Channel will be selected automatically).
4. Click on Wireless SettingsàWireless Security, and then please disable to disable the WPS Settings. If you want to set a password for the wireless network, please choose WPA-PSK as the Security Mode, AES as the WPA Algorithms, in the box of Key, please type the password for your wireless signal (the Key words should be at least 8 numbers or letters). Remember to click Apply to save the settings.
 Ⅱ. Settings in the AP
1. Login to the home page of the AP through typing http://192.168.0.254 in the address bar.
How to login to the homepage of the AP?
Ⅱ. Settings in the AP
1. Login to the home page of the AP through typing http://192.168.0.254 in the address bar.
How to login to the homepage of the AP?
2. After login successfully, the following page will appear. Please click on Advanced Settings.
3. In the homepage, please click Wireless Settings, then click Wireless Basic Settings, you can find two options in the list of Wireless Working Mode. Please choose “Network bridge (WDS)”, change the SSID、Channel and Extend Channel to the same with the main wireless router.
Below
On the bottom of this same page, please click on Open Scan, then you will find some SSIDs. Please tick the SSID of the AP, and then click OK.

4. In the homepage, please click on Wireless SettingsàWireless Security, please choose WPA-PSK as the Security Mode, AES as the WPA Algorithms, in the box of Key,
please type the password for your wireless signal (the Key words should
be at least 8 numbers or letters and be the same with the one of the
main wireless router). Remember to click Apply to save the settings.
Ⅲ. Go back to the homepage of the main wireless router (W308R).
In the main menu of W308R, please select Wireless settings. In the Wireless Basic Settings, please change Network Bridge(WDS) as the Wireless Working Mode. On the bottom of this same page, please click on Open Scan, then you will find some SSIDs. Please tick the SSID of the AP, and then click OK.

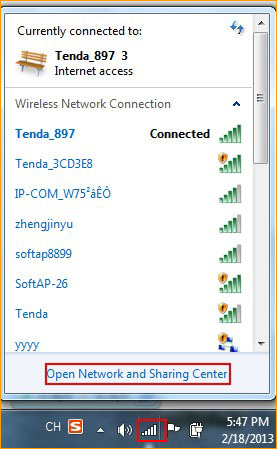
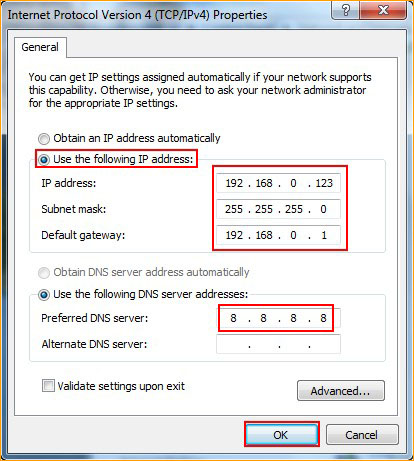
 Now
you can go to your PC3 to check whether it can obtain a correct IP
Address from the Router1. If PC3 can get a correct IP address, then you
can connect to the Internet.
Now
you can go to your PC3 to check whether it can obtain a correct IP
Address from the Router1. If PC3 can get a correct IP address, then you
can connect to the Internet.


 10:41 PM


 Posted in: Wifi