Showing posts with label Exchange Server 2013. Show all posts

Jun 8, 2013

New features in Exchange Server 2013

Microsoft introduces a lot of new features in Exchange Server 2013 and we will discuss the notable new features here. So when it got released? General availability of Exchange 2013 released on December 3rd, 2012.
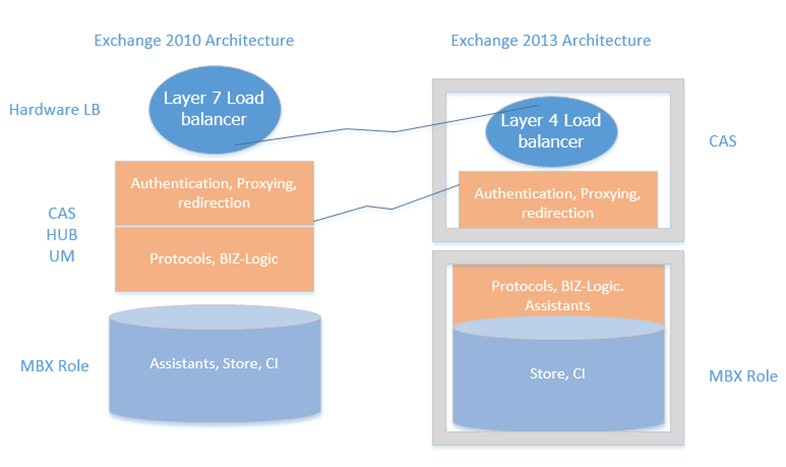
Exchange Server 2013 Architecture

Exchange Server 2010 and Exchange Server 2007 have 5 server roles like Mailbox Server, Client Access Server, Hub Transport Server, Unified Messaging Server and Edge Transport Server. On the new release of Exchange Server 2013, we have only two server roles, the Mailbox Server Role and the Client Access Server Role.
Only two Server roles in Exchange 2013 don’t mean that the Hub Transport and Unified Messaging Roles are completely removed on the release, those roles functionality are now incorporate or merged with the existing server role. In simple, we are now back to Exchange Server 2003 architecture by having a Backend and frontend architecture
The Edge Transport Server Role for Exchange 2013 is not released with Exchange 2013 RTM, but it may be available with Exchange 2013 Sp1. Also, we have the option to use Exchange Server 2010 SP2 or later Edge Transport Server with Exchange Server 2013
Exchange Admin Center

Exchange 2013 has a new web based management tool named Exchange Admin Center. Using EAC, we can perform most of the tasks as we did in Exchange Management console, but few of the tasks can only be done via Exchange Management Shell. EAC can be accessed using https://ClientAccessServer/ecp
Exchange Management Console is not available with Exchange 2013, Exchange Management Shell and Exchange Tools are available in Exchange 2013.
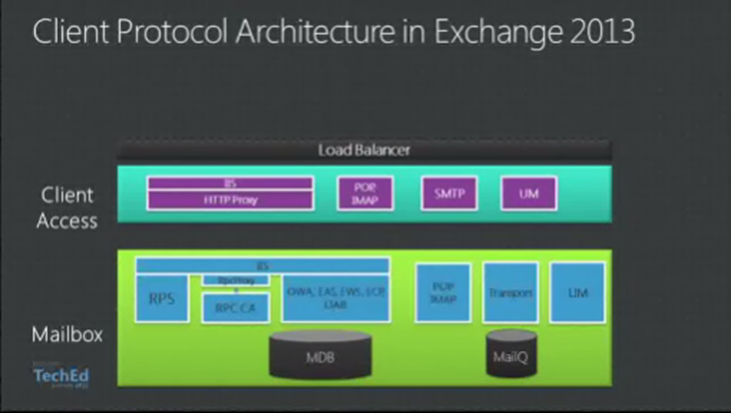
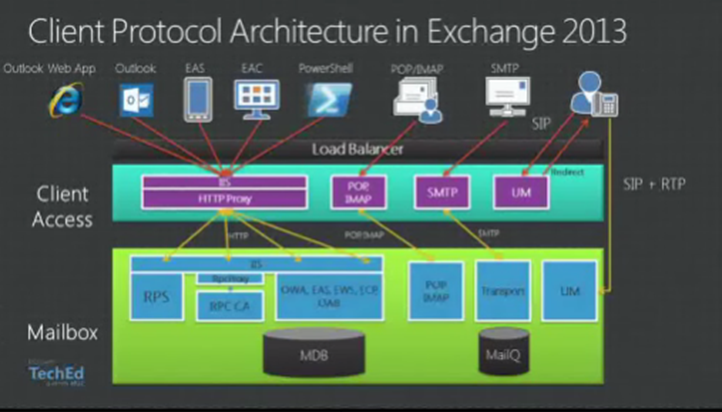
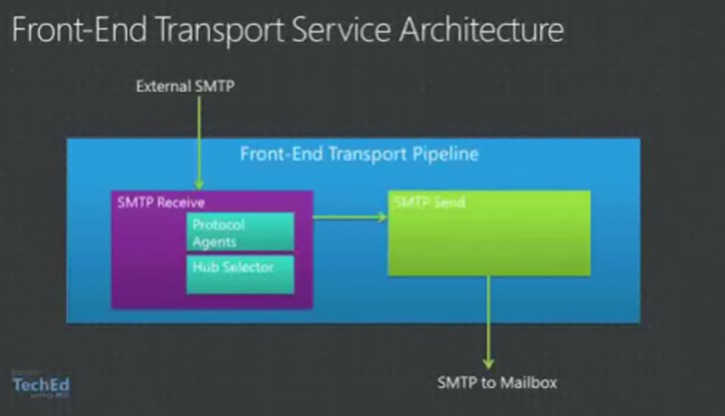
Mail Flow

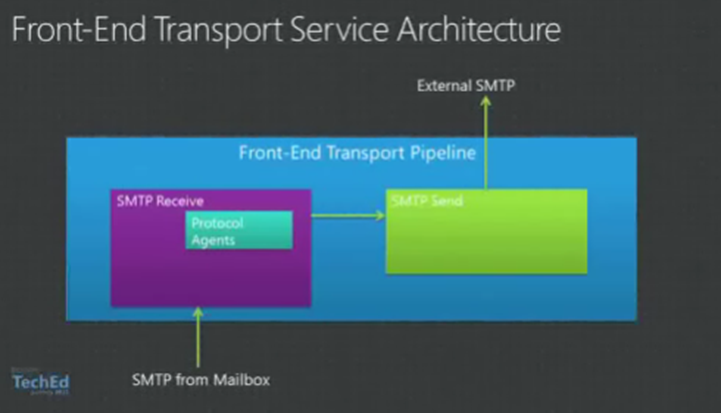
With the architecture changes by having two server roles in Exchange Server 2013 has a new Mail flow architecture in Exchange Server 2013. The Transport Pipeline in Exchange 2013 is made up of different services.
  • Front End Transport Service
  • Transport Service
  • Mailbox Transport Service
The Client Access Server Role has a Frond End Transport Service which will send\receive emails from the external domain. The Mailbox Server role has two services, the Transport Service and the Mailbox Transport Service.
The Transport Service is similar to Hub Transport Server role in previous version of Exchange, which handles all SMTP traffic for the organization and performs the categorization etc.
Mailbox Transport Service responsible to handle SMTP traffic for inside Exchange Organization. Mailbox Transport Service has two services, the Mailbox Transport Submission Service and Mailbox Transport Delivery Service.
Unified Messaging

Unified Messaging Server Role functionality is now inbuilt with Exchange 2013 Mailbox Server Role. All the features of Unified messaging in earlier version of exchange is available in Exchange 2013 with some additional new features.
Public Folders

Public Folders are continued in Exchange Server 2013, where the Public Folders can be created on a special type of mailbox named Public Folder Mailbox. This allows the Public Folders to be highly available with DAG functionality and the Public Folder Database and its replications are removed in Exchange 2013
Site Mailbox

Site Mailbox is a new concept in Exchange 2013 which will allow users to access the emails and the SharePoint documents from the same interface like Outlook 2013
Database Availability Group

DAG is the high availability option available in Exchange 2013 for Mailbox Servers, which will allow having 16 member servers as like previous version of Exchange but there is a limitation to have only 50 Databases per server.
Batch Mailbox Moves

Exchange 2013 allows performing mailbox moves on large batch and there is an option to provide an report the mailbox move status as emails
Anti-Malware

Exchange 2013 has a new inbuilt antimalware protection which scans all the emails send or received by the exchange organization.
Lot more new features are there and we will discuss all of them on the coming posts.

Jun 6, 2013

Step by Step Guide on Exchange Server 2013 Installation

In this post we will see the step by step guide on Exchange 2013 installation. I have a test environment with this configuration and below are some of the assumption which was not shown on the step by step guide
Domain Controller:

  • Computer Name: LE-DC-1
  • Operating System: Windows Server 2012 Standard Edition
  • IP Address: 10.10.0.4\255.255.255.192\10.10.0.1 with DNS IP as 127.0.0.1
  • Domain Name: LearnExchange.in
  • Forest and Domain Functional Level: Windows Server 2012
Exchange 2013 server:

  • Computer Name: LE-EX-1
  • Operating System: Windows Server 2012 Datacenter Edition
  • IP Address: 10.10.0.5\255.255.255.192\10.10.0.1 with DNS IP as 10.10.0.4
Assumption: Domain Controller configuration is completed as mentioned above, where the DNS Server role is installed and configured on the LE-DC-1 server during the DC promotion. Also the Exchange 2013 server operating system is installed.
Step by Step Guide on Exchange 2013 Installation

Step 1: Configure the Computer Name as LE-EX-1 and set the IP Address as 10.10.0.5\255.255.255.192\10.10.0.1 with DNS IP as 10.10.0.4
Step 2: Add the LE-EX-1 server to domain
Step 3: Install the ADDS server roles -> From Server Manager -> Add Roles and Features -> Click Next-> Select the Active Directory Domain Services role -> Click Add New feature on the new prompt ->Click Next and complete the installation
Step 4: Add the below additional Windows features that are required for Exchange server 2013 installation. Open Windows Powershell and enter the below shell command
Install-WindowsFeature AS-HTTP-Activation, Desktop-Experience, NET-Framework-45-Features, RPC-over-HTTP-proxy, RSAT-Clustering, RSAT-Clustering-CmdInterface, Web-Mgmt-Console, WAS-Process-Model, Web-Asp-Net45, Web-Basic-Auth, Web-Client-Auth, Web-Digest-Auth, Web-Dir-Browsing, Web-Dyn-Compression, Web-Http-Errors, Web-Http-Logging, Web-Http-Redirect, Web-Http-Tracing, Web-ISAPI-Ext, Web-ISAPI-Filter, Web-Lgcy-Mgmt-Console, Web-Metabase, Web-Mgmt-Console, Web-Mgmt-Service, Web-Net-Ext45, Web-Request-Monitor, Web-Server, Web-Stat-Compression, Web-Static-Content, Web-Windows-Auth, Web-WMI, Windows-Identity-Foundation
On the completion of above features installation, restart the server and login to server with Domain Administrator Credential
Step 5: Install the below additional software prerequisites required for Exchange Server 2013 installation. You can download the software from internet and install it in Exchange 2013 server
  • Microsoft Unified Communications Managed API 4.0, Core Runtime 64-bit
  • Microsoft Office 2010 Filter Pack 64 bit
  • Microsoft Office 2010 Filter Pack SP1 64 bit
On all the above perquisites are installed then restart the server.
Step 6: Schema Preparation
Active Directory schema preparation is required for Exchange Server 2013 installation, so prior the exchange 2013 installation updates the schema and verifies whether the schema preparation is replication to all the active directory sites. We can run the schema preparation using the below command
Exchange installation file directory>Setup /PrepareSchema /IAcceptExchangeServerLicenseTerms


Step 7: Active Directory Preparation
Active Directory preparation can be done by running the below command, We can skip the schema preparation and directly run the active directory preparation which will update the schema first and run the active directory preparation
Exchange installation file directory>Setup /PrepareAD /IAcceptExchangeServerLicenseTerms /OrganizationName:LearnExchange

 Active Directory preparation creates the Microsoft Exchange Security Group object which will have the below default security groups


Domain preparation can be done if we have multiple domains. Since this is a test environment, I’m leaving this step which will be done automatically during the Exchange 2013 installation
Step 8: Install the Exchange 2013 Server
Double click on the Exchange 2013 installation file and on the Check for Update and Introduction Window read the information and click next


 On the License Agreement window click I Access… and click next to continue

 On the Recommended Settings windows choose the option which you want and click next

 On the Server Role Selection window, select all the server roles and click next. If we have not installed the server roles properly, the Automatically Install Windows Server roles and features… option install the required features

 On the Installation Space and Location window, choose the right directory in which we need the Exchange installation and click next

 On the Exchange Organization Give a name and click next, if we are already completed the active directory preparation, this option will not appear

 Exchange Server 2013 has a new Malware Protection which will be installed and configured by default, if we are having different software for Malware protection then we can disable this one, and if needed we can enable this feature later after the installation.

 If the prerequisites that are required for Exchange Server 2013 is not met the Readiness Checks window will prompt you with the error message and the actions to be done to resolve this issue. Once all the prerequisites required for Exchange 2013 is completed, you will have the option to click install.


Exchange 2013 installation is a 15 steps process and it will take some time to complete.


Above screen shows the successful completion of Exchange Server 2013 installation. We can reboot the server once and work on the New Exchange Management Console named the Exchange Admin Center using https://ClientAccessServerName/ECP
Let us know if you are having any issue in installing Exchange Server 2013. We will assist you for sure.

Exchange 2013 Server Roles Installation Order

We all know that we have only two server roles in Exchange Server 2013 and this is like front end and backend architect server role in Exchange Server 2003. In this post will discuss on which Exchange Server 2013 server role to be installed first.
In Exchange Server 2010 and 2007 installation, if it is a typical installation which will install the CAS, HUB & Mailbox server roles together on a single machine, then there is no need to look on the server roles installation order, but if we planned to deploy each role on a different servers, then Microsoft recommends to install the server roles in below order
  1. Client Access Server Role
  2. Hub Transport Server Role
  3. Mailbox Server Role
  4. Unified Messaging Server Role
  5. Edge Transport Server
Lot of Architecture changes in Exchange Server 2013 which was released only with two server roles. Again if we are deploying both the server roles are on same server then there is no need to worry about which role to be installed first, but if we are separating server roles, then Microsoft recommends installing the roles in below order
  1. Mailbox Server Role
  2. Client Access Server Role
Also to have a proper functionality of Exchange Server 2013 both the server roles to be deployed in an Exchange Server organization and if we are deploying a Mailbox Server Role in an Actie Directory Site, then the Client Access Server role has to be deployed.

Exchange 2013 Server Roles in short note

We all know Microsoft Exchange Server 2013 released with only two server roles as Mailbox Server Role and Client Access Server. Other server roles components from Hub Transport Server and Unified Messaging Server are now included with MB and CAS server roles. In this post we will see those Server roles functions in short note.
Mailbox Server Role:

Mailbox Server Role in Exchange server 2013 has the components like Client Access Protocols, the mailbox database, the transport service and unified messaging components. So the Mailbox Server role in Exchange 2013 now functions as a legacy Mailbox Server Roles, Hub Transport Server Role, Unified Messaging Server Role and part of Client Access Server role. Mailbox Server Role in Exchange Server 2013 perform the below functions
  1. Provides Client Access features for Exchange 2013 clients
  2. Responsible for all means of Internal Mail flow and process the external inbound\outbound emails to Front End Transport Service in Client Access Server
  3. Hold the Mailbox Databases and Public Folder Mailboxes
  4. Responsible for Unified Messaging functionality (CAS redirects the SIP traffic from incoming emails to Mailbox Servers
Note: if we are separating the server roles installation then the mailbox server role has to be first server role which has to be installed first.
Client Access Server Role:

The Client Access Server provides authentication, limited redirection and proxy services to all client Access Protocols like http, pop and imap, and SMTP. The client access wont process any emails, it is a thin and stateless server which won’t do any data rendering and it won’t queue or store any emails in CAS server.
As mentioned above Client Access Server role has 3 components
  • Client Access Protocols
  • SMTP
  • UM Call Router
CAS server is an Exchange aware Proxy Server and it supports the Proxy and Redirection logic for Client Protocols.

Types of Recipients in Exchange Server 2013

In this post we will see the type of recipients and its functions in Exchange Server 2013. Below are the types of recipients available in Exchange 2013. So what is a Recipient? Recipient is an mail-enabled active directory object to which Microsoft Exchange can deliver emails.
Mailbox

Mailbox is an Exchange object which is used to send or receive emails and to store messages, appointments, tasks, notes and documents. In Exchange 2013, we have the below types of Mailboxes
  • User Mailbox: User Mailbox is an exchange object that is assigned to a user in your Exchange organization. We can create a new mailbox by creating an active directory user account or we can enable mailbox for an existing user account
  • Shared Mailbox: Shared Mailbox is a mailbox which will be accessed by group of users. Shared mailbox will not be primarily assigned to a user account. Shared Mailbox will be added as an additional mailbox and accessed by users. For example, Human Resource can use a shared mailbox, where employees can send their common queries as email to that mailbox. Any one from HR team will access the mailbox and reply to that emails.
  • Room Mailbox: Room mailbox is a resource mailbox used to booking conference rooms etc. By default, the active directory account for Room Mailboxes is disabled and the user having full access permission can add this mailbox or the calendar to as additional Mailbox or shared calendar. By default room mailbox will accept the room bookings, we can set a moderator whether to accept or decline meeting requests.
  • Equipment Mailbox: Equipment Mailbox is similar to Room Mailbox, where the equipment mailbox will be used for booking equipment like Projects and White Boards etc.
  • Linked Mailbox: Linked Mailbox is a special type of mailbox created in your exchange organization for user in different organization, where a trust has been established between those forests.
  • Legacy Mailbox: Mailbox available in your exchange organization which is created from the previous version of exchange servers.
Special Mailboxes

  • Public Folder Mailbox: Public Folders Databases are now discontinued in Exchange 2013, but public folders exist. Public Folder in Exchange 2013 can be created using a special mailbox called Public Folder Mailbox. First created Public Folder Mailbox maintains the Public Folder hierarchy and the permission as like previous versions.
  • Site Mailbox: Site Mailbox is a new concept is Exchange 2013 which will allow a user to access the email and SharePoint documents from a single interface like Outlook 2013
Distribution Groups

Distribution Group are the active directory object which is used to send emails to a group of users.
  • Dynamic Distribution Group: This is a distribution group that uses recipient filters and conditions to derive its membership. For example, we can created a distribution group with the condition that if the department equals sales, where it will find all the users with the department name as sales and make them as member of the distribution group
  • Mail Universal Distribution Group: Mail Universal Distribution Group is mail enabled active directory group which is used only to distribute the emails.
  • Mail Universal Security Group: Mailbox Universal Security Group is a mail enabled security group which is used for setting permission for group users on a resource in the active directory and also to distribute emails to the users as members of the distribution group.
Contact

  • Mail Contact: Mail Contact is a mail-enabled active directory object which has the information about the users that exists outside of your exchange organization. Mail contact will have external emails addresses and the emails sent to mail contact are routed to external domains.
  • Mail User: Mail user is similar to Mail contact, where the Mail User will have an user account which can be used to login to your exchange organization but the mail user will have their mailbox on different exchange organization.
System Mailbox

  • Arbitration Mailbox: Arbitration mailbox is a system mailbox used for approval work flow. For example arbitration mailbox used for handling moderated recipients and distribution group member approval
  • Discovery Mailbox: Discovery mailboxes are created by default which is used to perform in place ediscovery search in Exchange 2013.
Other Mailbox

  • Disconnected Mailbox: It is a mailbox which is disabled/removed in exchange organization, based on the deleted mailbox retention settings in the mailbox database, the disconnected mailbox will be in disconnected state. If required it will reconnected to the same ad account or different account.

Exchange Server 2013 Quick Installation Steps


In this post we will see the steps on how to quickly install Exchange Server 2013.
Step 1: Prepare your Active Directory Domain and DNS infrastructure, where the domain and the forest functional level has to be Windows Server 2003 or later
Step 2: Install the Operating System and configure the IP Address, Windows Updates etc
Step 3: Install the Exchange Server 2013 prerequisites
Install Active Directory Domain Services Roles using below Shell command
Install-WindowsFeature RSAT-ADDS
Install the Windows Features that are required for Exchange Server 2013 using the below Shell Command
Install-WindowsFeature AS-HTTP-Activation, Desktop-Experience, NET-Framework-45-Features, RPC-over-HTTP-proxy, RSAT-Clustering, RSAT-Clustering-CmdInterface, Web-Mgmt-Console, WAS-Process-Model, Web-Asp-Net45, Web-Basic-Auth, Web-Client-Auth, Web-Digest-Auth, Web-Dir-Browsing, Web-Dyn-Compression, Web-Http-Errors, Web-Http-Logging, Web-Http-Redirect, Web-Http-Tracing, Web-ISAPI-Ext, Web-ISAPI-Filter, Web-Lgcy-Mgmt-Console, Web-Metabase, Web-Mgmt-Console, Web-Mgmt-Service, Web-Net-Ext45, Web-Request-Monitor, Web-Server, Web-Stat-Compression, Web-Static-Content, Web-Windows-Auth, Web-WMI, Windows-Identity-Foundation
Install the below three additional prerequisites for Exchange 2013
Microsoft Unified Communications Managed API 4.0, Core Runtime 64-bit
Microsoft Office 2010 Filter Pack 64 bit
Microsoft Office 2010 Filter Pack SP1 64 bit
Step 4: Prepare the Active Directory Schema using below command
CD Drive\Setup.exe /PrepareSchema /IAcceptExchangeServerLicenseTerms
Step 5: Prepare the Active Directory using below command
CD Drive\Setup.exe /PrepareAD /OrganizationName:OrgName /IAcceptExchangeServerLicenseTerms
Step 6: Prepare the Domain using below command
CD Drive\Setup.exe /PrepareDomain AllDomains
Step 7: Install Exchange Server 2013 using below command
CD Drive\Setup.exe /Mode:Install /Roles:ClientAccess, Mailbox, ManagementTools /t D:\Program Files\ExchSrv /IAcceptExchangeServerLicenseTerms
above are the 7 easy steps to complete the Exchange Server 2013 installation on a new Exchange Infrastructure. Inform us if you are facing any issue in installing Exchange Server 2013

May 29, 2013

Exchange Server 2013 Toolbox

In this post we will see the Exchange Tools that are available in Exchange Server 2013 installation. Many of the tools that are available on the legacy version of Exchange Management console are not available now and Exchange 2013 toolbox has only 4 Tools, which is Details Template Editor, Remote Connectivity Analyser, Queue Viewer and Tracking Log Explorer
In earlier version of Exchange, the Exchange Management console has the below tools available for use
Configuration Management Tools
  • Best Practices Analyser
  • Details Template Editor
  • Public Folder Management Console
  • Remote Connectivity Analyser
  • Role Bases Access Control User Management
Mail Flow Tools
  • Mail Flow Troubleshooter
  • Message Tracking
  • Queue Viewer
  • Routing Log Viewer
  • Tracking Log Explorer
Performance Tools
  • Performance Monitor
  • Performance Troubleshooter
Unified Message Tools
  • Call Statistics
  • User Call Logs
But the Exchange 2013 Toolbox has only the below Tools


 Tools like queue viewer, Message Tracking, Public Folders management and Role Based Access Controll are still managed using the Exchange Management Shell. Performance Monitor can be used with the available perfmon tool.

Exchange Server 2013 Deployment Assistant

Exchange Server 2013 Deployment assistant is an online guide which will help the IT Professionals to deploy Exchange Server 2013 infrastructure. Currently Exchange 2013 Deployment Assistant tools provides a guidance to deploy Exchange 2013
On-Premise – Install Exchange 2013 in your Organization
Hybrid Deployment – Exchange Deployment with part of Exchange Mailboxes in your Exchange Servers and few mailboxes will be in cloud Office 365
Cloud Only – Take your Exchange deployment to the cloud in Office 365
Note: Microsoft will update this Deployment Assistant online tool with the option to upgrade earlier versions of Exchange Servers to Exchange Server 2013
How to use the Exchange 2013 Deployment Assistant

Click on the link and select Exchange 2013 Deployment Assistant – http://technet.microsoft.com/en-us/exchange/jj657516.aspx
Below option will provide an option to selection the deployment that you are interested -> Select the option -> It will prompt to provide few details and the Exchange 2013 deployment assistant will provide the instructions for your Exchange Server 2013 deployment

 Below shows a sample output of On-Premise Exchange 2013 deployment

 Read the information on what you have to do and prepare the Exchange 2013 infrastructure and a have successful issue free Exchange 2013 deployment.

OWA 2013 Emails Stuck in Drafts folders

f you install Exchange Server 2013 for the first time and if you try to send a test emails from OWA, the emails may stuck in drafts folder.
As usual, If we check the Exchange Server related services, all the services will run as normal and there won’t be any issue which cause this mail flow issue.
Fix: If you add the second exchange 2013 server, the mail flow will work as normal. Not sure what is causing the Emails when the second Exchange Server is installed.
Another Fix: Configure the DNS lookup to use your DNS servers IP Address.

Login to Exchange Admin Center -> Select the Server -> Click on the Edit option

 On the Edit Option -> Click on the DNS Look -> Internal DNS Lookup -> Custom Settings and Add IP address of your DNS Server and Click Save
Restart MSExchangeTransport Server and send a test email. Let us know if any issues.

Recipients Management in Exchange Server 2013

In this post we will have a look on how to manage recipients in Exchange Server 2013. Before going to the topic, below are the Recipients that are available in Exchange Server 2013.
  • User Mailbox – Normal Mailbox created for humans
  • Linked Mailbox – Mailbox created for the active directory account on the resource forest
  • Shared Mailbox – Common Mailbox accessed by group of user who are having permission on it.
  • Resource Mailbox (Room and Equipment Mailbox) – Mailbox created for booking Meeting Rooms and Equipment in a company
  • Groups (Distribution Group, Security Group and Dynamic Distribution Group) – Active directory object that hold many users as members and the email sent to a group will be distributed to all the member of the group
  • Contacts (Mail Contacts and Mail Users) – Accounts created for the users from the external domain to show up in Global Address Book.
  • Public Folders – Used to store documents and calendars which can be publically accessible to user having permission on it.
We will see the recipient management options like how to create a recipient, edit a recipient, delete\disable a recipient, connect a disconnected mailbox, perform a search on a recipient and add\remove columns on the Exchange Admin Center
How to create the above recipients in Exchange Admin Center

Login to Exchange Admin center -> Click on the Recipients Options as shown below


To create a Mailbox or distribution group, click on the respective option, and then click on the + symbol to create a New Mailbox or Groups. For Example, to create a User Mailbox, Click on the Mailbox and Click on the + symbol and then Select the User Mailbox, on the new window enter the required details and click ok.
Below window will asking for the new recipient details and we have to input the details for successful recipient creation.


How to edit the Recipient In Exchange Server 2013 using Exchange Admin Center

If you want edit an option for a recipient using EAC, Login to Exchange Admin center -> Click on the Recipients option -> Select the required Recipients and it will show few of the quick action on the right hand side and to see the full editable options, select the edit icon

 Below window will open up and you will have all the options that can be editable using the Exchange Admin center on a recipient.


How to Delete or Disable a Recipient in Exchange Server 2013

Login to Exchange Admin center -> Click on the Recipients option -> Select the required Recipients and click on the Delete Option to select whether to delete or disable the recipient, it will ask you to confirm whether the delete or disable, click on ok


How to search a Recipient in Exchange Server 2013

Login to Exchange Admin center -> Click on the Recipients option -> Select the required recipient tab and select the search icon to perform a search. We will have an option called FIND in Exchange Management Console for the earlier version of Exchange 2013.

How to connect a disconnected Mailbox in Exchange Server 2013 using Exchange Admin Center

Login to Exchange Admin center -> Click on the Recipients option -> Select the Mailboxes option and click on the … option to get the more options and click on Connect a Mailbox
 Also on the more options, we have lot of options like Advance Search, Export the Mailbox report as a CSV file and add\remove columns for the Exchange Admin Center. Above mentioned options will help you to walk through on a recipient management options on Exchange Server 2013 using the Exchange Admin center. Having any query? Please leave your comments.

HUB and UM Server Roles removed in Exchange 2013?

In Exchange Server 2007 and Exchange Server 2010 we have 5 Server roles and below are the functions of those 5 Server Roles
  • Mailbox Server Role – Hold the Mailbox Database and Public Folder database
  • Client Access Server Role – All the Clients will connect to the Client Access Server to access the Mailbox content
  • Hub Transport Server Role – Used to transfer the emails within the Exchange Organization
  • Unified Messaging Server Role – Provides a unified mailbox, which has the email, fax and voice mail on the same mailbox
  • Edge Transport Server Role – Provide a protection using the anti-spam agent for the internal and external emails transfer
In Exchange Server 2013, we have only two Server Roles named Mailbox Server Role and Client Access Server Role, you will have a question like what happened to other server roles in Exchange 2013?
Those server roles HUB and UM are not completely removed in Exchange 2013, those Server Role components are incorporated into Mailbox and Client Access Server Roles. So the functionality of the HUB and Unified Messaging still available in Exchange Server 2013 and it didn’t go anywhere 
So why Microsoft combined the Mailbox, Client Access, HUB and Unified Messaging Server Roles into two server role like Mailbox and Client Access Server Roles?

Microsoft feels that, having 5 different server roles to provide the Exchange functionality will lead to complicated deployment and to make ease of deployment by combining the server roles will ease the administrator to deploy Exchange Server 2013
Load balancing functionality for the client access server requires a Layer 7 load balancer and this will increase the cost to customers, with two server roles Exchange Server 2013 supports Layer 4 load balancers and reduces the cost
When Server roles are deployed in a separate high performance servers, most of resource on the servers are not used fully. Again this leads customers to buy more number of servers, so if only two server Roles are available, there will be reduction on the cost to the customer and the resources on the servers are fully utilized
And to provide a deployment simplicity and cost effective solution to their customers, Microsoft combined the server roles together and comes up with the two server roles in Exchange 2013

Exchange 2013 Error: Load Balancing failed to find a valid Mailbox Database

If you are in Exchange Server 2013 and when you create a new Mailbox, you may get an error as Error: Load Balancing failed to find a valid Mailbox Database as shown below


Below are the options that you need to check to resolve the issue.
  • Check whether all the Exchange Server related services are running on the Server. You can use the Shell command Test-ServiceHealth –Server ServerName to check that.
  • Check whether the Mailbox Databases in your Exchange Server 2013 are mounted. If you install the Exchange Server 2013 for the first time, all the Exchange 2013 related services will run, but the mailbox database may be in dismounted state. Mount the database and check the status. You can use the Get-MailboxDatabase –Status | FT Name, Mounted to confirm the database mount status
  • If Exchange related services and the Mailbox Databases are in mounted state, then you may need to consider to manually specify the mounted mailbox database as shown below 
 Let us know if any details needed on this error message.

May 14, 2013

Deploying Exchange Server 2013 (Part 1)

In this article series the author explains how to deploy Exchange Server 2013 RTM in a brand new environment.
If you would like to read the next part in this article series please go to Deploying Exchange Server 2013 (Part 2).
Exchange Server 2013 is bringing a lot of exciting new features which deserve several articles to describe each one of them in detail. If you haven’t had a chance to look at this new release, I will be listing my favorite top 4 enhancements/changes, as follows.
  1. New ArchitectureThere are only two roles now: Mailbox and Client Access. The new Mailbox role will contain all components of CAS/HUB/Mailbox and UM comparing with Exchange Server 2010 roles and it will handle all processes for any given mailbox. The new CAS will proxy, authenticate and redirect requests. Just by doing this change the future upgrades will be easier, since there is no translation work being done at CAS. The NLB is much simpler as well, because we need only Layer 4 level on our Load Balancers.
  2. Management ToolsExchange Management Console is gone, the two ways that we have to manage the product is using either Exchange Management Shell or the web interface EAC (Exchange Admin Center).
  3. Outlook client
    Because of the architectural change, the product has changed how the clients will connect to the server. The decision was to remove MAPI and use only Outlook Anywhere (RPC over HTTP).
  4. Public Folders and Collaboration
    They are back and with cool new features, such as: new replication method using a single-master replication model. In this new release we will also have a Site Mailbox which is a feature that will integrate Mailbox and SharePoint information in a single location for the end-user.
In order to have the transition in place we must have Exchange Server 2010 Service Pack 3 installed on all servers before installing the first Exchange Server 2013. When Exchange Server 2013 CU1 (Cumulative Update) is released then you can join an Exchange Server 2013 in an existent organization.
If you are old-school Exchange admin you may be asking, how am I going to install CU1 to have the integration if I have to install RTM and then apply CU1, right? I understand you but we are wrong! Starting with Exchange Server 2013 the CU1 will contain the full bits of the products, and we are going to install the Exchange Server 2013 CU1 version for that transition.
For now we are going to work in a brand new environment in order to show you the step by step how to deploy the new Exchange Server 2013. Just to make sure that we are clear do not use your production environment and wait for the CU1 and documentation that will follow before that.
The hardware requirements to deploy Exchange Server 2013 are similar to the current Exchange Server 2010 and the following key points can help you build a test lab. However, I recommend building your Exchange Server 2013 lab using the latest versions or at least most updated versions of Active Directory and Operating System.
  • The minimum requirement for Active Directory at this point is the forest functional level set at least to Windows Server 2003
  • The Domain Controllers must be running at least Windows Server 2008
  • The Schema can be running even on Windows Server 2003 SP1
  • Like the other versions, it’s highly recommended to deploy Exchange Server 2013 as a member server
  • Exchange Server 2013 is supported on Windows Server 2012 and Windows Server 2008 R2 Service Pack 1 or higher
In this article series we are going to focus on the new platform (Windows Server 2012), and we are going to use a simple scenario (Figure 01) where we will have a Domain Controller (UYDC01) and two (2) Exchange Servers (UYEX01 and UYEX02). Each one will host one of the roles. The Active Directory domain and forest will be running in Windows Server 2003 native mode.   
Image
Figure 01

Installing the pre-requisites on Windows Server 2012 Operating System…

In this section we are going to cover the basic requirements to install Exchange Server 2013 on top of a Windows Server 2012. The first step after installing the Operating System is to make sure that we have all Windows Updates installed (Figure 02).
Also, there are a couple of pre-requisites such as: server must be part of a domain, static IP address (recommended) and that the time zone is configured properly.
Image
Figure 02
After having the updates in place, we need to download some software that will be required during the installation process. Here is the list that can download to save installation time:

Installing Windows Server 2012 features…

We have a couple of ways to get stuff done before starting the Exchange Server 2013 setup. The traditional (documented) way is to go to PowerShell and install all features required by Exchange Server 2013 based on its role. We have a set of features for CAS and another set of features for Mailbox and CAS Roles in the official documentation. To be honest with you, if you compare the features you will find out that the only difference is the RSAT-Clustering-CmdInterface feature between CAS and Mailbox/CAS role and that feature basically allows cmdlets to manage the cluster. So, if you are not that worried about this feature being added on both roles you can keep consistency and leave it there as default for either deployment.
Another consideration about this feature is the RSAT-ADDS that is required when we are going to prepare the schema, and it’s not too bad since sometimes the Exchange Administrator wants to manage users from the server console.
Long story short, I would add the only two discrepancies in the cmdlet to have it as standard on my environment and here is the full version of the cmdlet that you can run on the PowerShell logged on as an administrator:
Install-WindowsFeature AS-HTTP-Activation, Desktop-Experience, NET-Framework-45-Features, RPC-over-HTTP-proxy, RSAT-Clustering, Web-Mgmt-Console, WAS-Process-Model, Web-Asp-Net45, Web-Basic-Auth, Web-Client-Auth, Web-Digest-Auth, Web-Dir-Browsing, Web-Dyn-Compression, Web-Http-Errors, Web-Http-Logging, Web-Http-Redirect, Web-Http-Tracing, Web-ISAPI-Ext, Web-ISAPI-Filter, Web-Lgcy-Mgmt-Console, Web-Metabase, Web-Mgmt-Console, Web-Mgmt-Service, Web-Net-Ext45, Web-Request-Monitor, Web-Server, Web-Stat-Compression, Web-Static-Content, Web-Windows-Auth, Web-WMI, Windows-Identity-Foundation, RSAT-Clustering-CmdInterface, RSAT-ADDS
The cmdlet action is shown in Figure 03.
Image
Figure 03
Note:
If you want to run the cmdlets for CAS, based on Microsoft documentation you need to remove RSAT-Clustering-CmdInterface and if you are not going to prepare Active Directory then remove RSAT-ADDS from the cmdlet.
After adding all features on the server the only remaining steps are Microsoft Unified Communications API 4.0 and Filter Pack installation. You can check them out in step 3 and 4 of our next section because in either scenario we are going to share the same steps.


Installing Windows Features using Exchange Server 2013 Setup Wizard

If you don’t want to type in too much information in PowerShell, you can use this lazy approach that will have the same result:
  1. Install Desktop Experience on the server by running the following cmdlet:
    Add-WindowsFeature Desktop-Experience (Figure 04)
    Note: This feature is a requirement to install Microsoft Unified Communications Managed API 4.0
Image
Figure 04
  1. Restart the server (if you are still in PowerShell just type in Restart-Computer)
  2. Install the Microsoft Unified Communications Managed API 4.0 as shown in figure 05 (just leave the default settings)
Image
Figure 05
  1. Finally install Filter Pack and its Service Packs. You may want to restart for a fresh Exchange Server 2013 installation.
We are going to explain Figure 06 in our next article of this series but I would like to show how the features that we haven’t installed manually (if you opted for the lazy approach) will be installed during the deployment process. First of all, you don’t need to remember anything during the GUI phase, because the option Automatically install Windows Server roles and features that are required to install Exchange Server is selected by default, but that is going to be the option that will provide all features during the setup process.
Image
Figure 06

Microsoft Filter Pack and Exchange Server 2013…

Finally, we have the Microsoft Filter pack dilemma and it has changed in this new version. Exchange Server 2013 uses a new search engine however the Filter Pack is still required when you want to use Transport Rules for either Office OneNote or Publisher files.
It’s up to you as it doesn’t hurt to install it. I would recommend going ahead and installing it on Exchange Server 2013 that will have the Mailbox server role deployed.
The installation is a straight forward process and the only decision making is during the license agreement portion of the package which is not challenging at all.

Exchange Server 2013 and IPv6

That is another common topic among Exchange Administrators; some of us like to disable IPv6 in the registry of the server hosting Exchange Server 2010, and in this new version Microsoft recommendation is to leave there even if you are not using IPv6.
Bear in mind that some features do not support IPv6 such as: IP Allow and Block List Provider and Sender reputation in the Protocol Analysis agent.

User Account Settings and Exchange Server 2013 deployment…

Just a follow up in this area, if you use UAC (User Account Settings) make sure that you right-click on the setup.exe installation from Exchange and run it as Administrator (Figure 07).
Image
Figure 07
On other hand, if you don’t want to use this security feature now is the time to disable it, and there are a couple of ways to do that. A simple one is to open msconfig, then go to the Tools tab, and select Change UAC Settings item, and then click Launch. In the new window (Figure 08), set the bar to the bottom (Never Notify) and click OK and restart your server.

Figure 08

Conclusion

In this article we went over the process to install all Exchange Server 2013 pre-requisites on windows Server 2012 and covered questions about some topics including Filter Pack, IPv6 and features to be installed on the server.

Deploying Exchange Server 2013 (Part 2)

If you would like to read the first part of this article series please go to Deploying Exchange Server 2013 (Part 1).

Introduction

In the first article of this series we went over the process to install the Exchange Server 2013 pre-requisites while, in this article we are going over the installation process using two methods: GUI and command-line.
The most important thing is to make sure that all pre-requisites were configured properly and if you haven’t read the first article of this article series, please go over that to make sure that your Windows Server 2012 is ready to support the Exchange Server 2013 deployment.

Installing Exchange Server 2013 using GUI

If you haven’t download it yet you can do that from the following address and the download will be a file called Exchange-x64.exe. After finishing the download, we need to double click the executable and extract the contents to a folder. In this article let’s create a folder called EX2013.
After extracting the contents, open the same folder and double click setup.exe (the last file from the list).
The new installation process has a couple of new features besides of the new design. The first one is that now the setup is able to check on the Internet and validate the last rollup, security and language packs available and this option allows the setup itself to be updated.
The first stage of the setup wizard is to connect to the internet and search for new updates. These are the main steps of the first stage:
  1. In the Check for Updates page (Figure 01). Let’s use the default setting and click on Next, this process may take some time.     
Image
Figure 01

  1. On the Downloading Updates page. Wait for the Next button to be available and then click it (Figure 02)
Image
Figure 02

The setup will take some time to copy files (In the Preview version we had a next button but it was removed in this final version). Now, the Introduction page is shown and the real deployment will start. The following steps can be used to finalize the deployment:
  1. On the Introduction page (Figure 03). That’s our official welcome page, on this page we can find a couple of links about Exchange Server 2013, let’s click Next.
Image
Figure 03

  1. On the License Agreement page. After reading the license agreement and if you agree with it, please select I accept the terms in the license agreement and then click Next.
  2. On the Recommended Settings page (Figure 04). We can decide if we are going to provide usage feedback to Microsoft and also check online for a solution when an error occurs. Let’s leave the default settings (Use recommended settings) and click Next.
Image
Figure 04

  1. On the Checking Required Software page. If all required software is installed the Next button will be available, if you take more than 10 seconds to take an action the wizard will move forward to the next page automatically.
  2. On the Server Role Selection page (Figure 05). In this page we have the first big change in Exchange Server 2013 where our 5 (five) roles that were introduced in Exchange Server 2007/2010 are replaced by just two roles: Mailbox Roles and Client Access Role. Based on our scenario we are going to install the Mailbox server (UYEX01) using GUI and the other server will be based on the command-line. Click Next.
    Bear in mind that we still have the option Automatically install Windows Server roles and features that are required to install Exchange Servers which will install all Operating System components to support the selected roles.
Image
Figure 05

  1. On the Installation Space and Location page. In this section we can validate the disk available and the amount required to deploy Exchange Server 2013 and define the installation location for the product. Let’s leave the default settings and click Next.
  2. On the Exchange Organization page (Figure 06). Since we are building our environment from scratch a new organization will be required. The Exchange organization boundary is our Active Directory forest. Let’s name our Organization and click Next.
    Note:
    if you want to split permissions where the Exchange Administrators won’t be able to manage Active Directory objects then the option Apply Active Directory split permissions security model to the Exchange Organization should be selected.
Image
Figure 06

  1. On the Malware Protection Settings page (Figure 07). That is a new feature of Exchange Server 2013, where we have Malware protection and this option can be managed through Exchange Administration Center or Exchange Management Shell afterwards. Let’s leave the default settings and click Next.
Image
Figure 07

  1. On the Readiness Checks page (Figure 08). In this section we will have a summary of all pre-requisites and if the server is ready to receive Exchange Server 2013. If we have missed any software component we will be notified at this stage and we need to fix it before moving forward. If all testing went fine, then the Install button will be available and we can proceed to the next step.
Image
Figure 08

Note:At this point all the required features were installed on the server. Just run Get-WindowsFeature in a PowerShell session and you will notice that all features are shown as installed.
Note #2:In some cases the readiness can display that all features are not installed, if that is the case run a Get-WindowsFeature and if you see the features required by Exchange showing as InstallPending, just restart the server and run the setup again and you will be fine.
  1. On the Setup Progress page (Figure 09). The process may take some time depending on your hardware configuration and it is divided in 13 stages (Yes, the bar goes 1 to 100% for each stage). If everything goes well we will receive information that the Setup has completed and the Complete button will be available. In this release there isn’t an option to open Exchange Management Console because it doesn’t exist anymore. From now on, our admin interfaces will be through Exchange Admin Center and Exchange Management Shell.
Image
Figure 09


Installing Exchange Server 2013 using command-line

The installation process is similar to what we have in Exchange Server 2007/2010 where it is done by setup.exe from the main folder of the Exchange Server 2013 installation folder. We can run the setup.exe only to find out the available switches but in order to install a Mailbox role we can run the following command: .\Setup.exe /role:ClientAccess,ManagementTools /IacceptExchangeServerLicenseTerms as shown in figure 10.
Image
Figure 10

Troubleshooting the installation process...

Exchange setup process has been improved with each new release and the readiness check will clear most of the possible issues before the installation process starts, however, if you are still having issues you can always check the log files generated by the setup process. These log files can be found in C:\ExchangeSetupLogs and each file contains log information that allows us to track down the steps being performed by the setup process (Figure 11).
Image
Figure 11

You can check the logs to track all steps performed during the setup process, in the ExchangeSetup file (Figure 12) we can check all testing being performed for the setup process.
Image
Figure 12

Conclusion

In this article, we installed Exchange Server 2013 using both the graphical user interface and the command line. In the final article of this series we will go through the process of setting up an initial configuration on the new Exchange Server 2013.

Microsoft Exchange 2013 Architecture explained

The exchange 2000 and 2003 was a very basic model for exchange. There was a basic exchange which included everything and which administrator had to configure everything as per the organization’s requirements. It also relied on third parties for data redundancy.

With the 2007, continuous replication was introduced including data and server redundancies to the picture for the first time. Also, separation of server roles which eased management and deployment flexibility. With the 2010 version of exchange, separate HA solutions were introduced along with database availability control. Role based access control and hybrid deployment were also introduced with this version. The issues with previous versions of exchange were that the deployments process was complicated. Load balancing was difficult and needed expensive solutions. They also required too many namespaces.

With the new release of Exchange, that is the exchange 2013, we can see an extensive use of building blocks t facilitate deployment at all scales- from self hosted small organizations to office 365. With that the server role and network layer have improved. Versioning and inter op principles have been introduced. All these changes will result in

  • Improved Hardware efficiency
  • Simplified Deployment process
  • Cross version inter-op
  • Failure Isolation
The building block structure explains the architecture of exchange as constituted by two building blocks, the Client Access server and the Mailbox server. A Group of client access servers are called the client access array. A group of mailbox servers are called the DAG. Both these blocks are loosely coupled in terms of

  • Functionality
  • User Partitioning- We can upgrade the client access servers independently of the mailbox server maintaining the version functionality. It also facilitates deploying the same namespace.
  • User Partitioning
  • Geo Affinity
In exchange 2013, every server can be considered as an island. We can separate each of the server functionality into three components as access, data logic and storage. Unlike in exchange 2010, in exchange 2013 each of the components can communicate with another server only through its corresponding component in the other server. Which means that cross communication is not allowed. This kind of a structure gives us failure isolation, server isolation, functionality isolation etc.

Functional Layering

In Exchange the functional layer consisted of Hardware Load Balancer, Client Access Hub transport and finally mailbox server. With 2013, the load balancer layer was reduced to load balancers with tcp affinity (layer IV load balancer instead of Layer VII) which is cheaper and easier. Middle Layer was split into multiple layers. Authentication and Proxy redirection capabilities from CAS were separated. The rest of the middle layers, like protocols, were merged with the mailbox layer.


Client access server role in Exchange Server 2013

Now we will discuss about Client access server role in Exchange Server 2013. CAS is an internal forest domain joined machine. It is a light weight protocol proxy consisting of 3 main components, namely, the Client access protocol (HTTP, IMAP, POP), the SMTP and UM Call router. It is used as an exchange aware proxy server, which means that it understands requests from different protocols like outlook web app, EAS etc. Exchange can then properly route the request to a mailbox server. It also support legacy server with redirect or proxy logic and contains logic to route specific protocol requests to destination end-point.

A group of CAS servers is a Client access server array. It provides load balanced connection to the clients. Similar to exchange 2010, CAS array provide unified end point for client connectivity and authentication.


Architecture consists of a load balancer upfront, which is a layer 4 load balancer. Client access has ISS which is for the http proxy components. It also have POP, IMAP, SMTP and UM components. Mailbox consists of IIS, Remote Power Shell- for configuration objects and mail queue. It also consist primary UM stack, SMTP stack and protocols like OWA and the mailbox database.

Internet Apps like outlook web app, exchange active sync, EAC and remote power shell communicate to the mailbox server through the client access first (through the load balancer) via http and then to the mailbox through proxies via the http.

POP/IMAP and SMTP also connect to the mailbox server in the same way. UM connects through a different method. It first sends a SIP request to the UM call router in the CAS which answers the request and sends a SIP redirection to the caller who can now connect to the mail box via SIP and RTP directly.


OUTLOOK CONNECTIVITY IN EXCHANGE 2013

In exchange 2013, RPC over TCP has been disabled. All outlook communications are now through RPC over HTTP (Outlook Anywhere). This unifies the CAS protocol methods and provides a stable and reliable connectivity network between clients and server and between CAS and Mailbox Server. It also reduces the number of namespaces required. It also eliminates end user interruptions. Hence moving mailboxes around in DAG and moving mailboxes between mailbox databases are now easy.

Namespace Simplification

Exchange 2013 has also made the namespaces simpler. It no longer requires multiple namespace for site resilient solutions or site specific scenarios. Recovery of CAS and mailbox has been separated. This allows us to set up a single worldwide namespace.

Advantages of new Architecture

  • Simplifies the network layer- layer 4 load balancer used
  • Reduces the number of namespaces required
  • Enables deployment flexibility
Front End Transport Service

Another component in the CAS in exchange 2013 is front end server which handles all the inbound and outbound mails of the exchange organization. It does not however, queue any mail locally and is stateless. No storage is available. It redirects the mail. It also functions as a layer 7 proxy inside the software having full access to protocol conversation.

Front End Transport Service Architecture

It has a very simple architecture consisting of SMTP Receive component containing the protocol agents and a Router component containing the hub server which determines the recipient of the message.

SMTP message is received by the SMTP Receive module which performs operations like content filtering, recipient filtering etc. It then runs through the Protocol agents and subsequently the HUB selector so as to determine the recipient of the message. It then passes the message to the SMTP Send module which then directs the message to the corresponding mailbox.


When a message is coming in from a mailbox the message goes through the protocol agents and then to the SMTP send module which is then redirected to the external SMTP server.


Delivery Groups

The HUB selector finds out the destination of the SMTP message with the help of Delivery Groups. This feature was present in the Exchange 2010, only without a defined name. There are various types of delivery groups namely

  • Active Directory Site- Uses active directory topology to successfully send the message to its destination based. These are employed for messages that are not a part of any DAG and messages that are from 2010 and 2007 mailbox server.
  • Mailbox- If a collection of mailbox server are available and the message is not a part of any DAG and messages that are not from 2010 and 2007 mailbox server then the recipient is selected as the closest mailbox server.
  • DAG- if the mailbox is in a DAG that will be the used routing group. One of the DAG members having the recipient address is chosen so that the message can be proxied to that server. It is based on the recipient. If a message has only a single mailbox recipient, mailbox within the DAG based on proximity of the AD site is chosen. If there are multiple mailbox recipient, Mailbox server in closest DAG is chosen, factoring in site proximity. If there are no mailbox recipients (like distribution group) then a random mailbox server, considering the local AD site, is chosen.
Front End Transport Service Benefits

  • Gives centralized, load balanced place of egress and ingress for SMTP as in hub and edge transport.
  • It also enables Sender/Recipient/Connection protocol filtering
  • It eliminates unwanted hops as it is not a store and forward proxy.
  • It scales based on the number of connections.
Mailbox Server Role

The mailbox server role hosts everything related to data. It contains all the components that process, render and store the exchange data. This means all the above mentioned functions are not performed in CAS but in mailbox server.

Only CAS servers can connect to the mailbox server. All clients except the UM connections are connected to the CAS. Also, connectivity to the mailbox is provided by the mailbox database hosting the active database copy.

Database Availability Group

It is pretty much the same as in exchange 2010. It is a collection of up to 16 mailboxes severs using continuous replication and backend failover clustering. It can also be extended to multiple sites.

Upgradations that are made in DAG are in the storage, resilience and HA sections of the DAG.

Mailbox Related Changes

Some of the major changes made to the mailbox are

  • Managed Store
  • IOPS reduction
  • Larger mailbox support
  • Modern Public Folder
  • New search infrastructure
Managed Store

It is the totally revamped version of the information store in exchange (store.exe). It uses the worker process model. It contains a service controller process and a worker process for each of the database mounted on the system. With the worker process, exchange 2013 failure isolation in database level.

The store services are a controller process managing the lifecycle of worker process. As databases are mounted and dismounted, the store service runs or terminates worker processes.

The worker process is responsible for their corresponding database, performing services to the database.

ESE Cache management

With the server store worker model, on requirement is the proper management of ESE Cache. Instead of the dynamic buffer model in exchange 2010, the ESE management algorithm allocates memory for store worker process based on RAM. It is allocated based on the number of local database copies and the maximum active database value. The cache allocation is not done however, dynamically.

IOPS Reduction

Exchange 2013 dropped IOPS roughly 50%-70% compared to what Exchange 2010 used and around a 95.5% reduction from Exchange 2003 to Exchange 2013.
With changes in the store schema, namely

  • Usage of blobs to store data, especially message properties
  • Reduced use of long value records
  • Changes in passive copy IO like higher checkpoint depth and improved ESE logging to preserve cache during failover.
Elimination of Scheduled Maintenance

With the new exchange, the need for scheduled maintenance, have been thoughtfully eliminated. The exchange now employs Time based assistance which based on the time and available resources perform maintenance.

Background maintenance period has been extended to 4 or 5 weeks in Exchange 2013.

Modern Public Folders in Exchange 2013

Modern Public folders have been made completely optional as exchange 2013 supports outlook 2007 or later which do not require public folders. The public folder in exchange 2013 is based on mailbox architecture. There is no default public folder database or public folder tree. Public folder mailboxes are created instead if the user requires. The first mailbox thus created is the hierarchy mailbox. This is where the writeable copy of the public folder tree is stored. Each of the subsequent public folder mailboxes is called the content mailbox which is created as required. All content mailboxes will also contain a copy of the hierarchy.

The advantage of the mailbox model is that higher levels of availability can be achieved through continuous replication. However, all these changes do not affect the end user appearance.

Working with public folders
in Exchange 2013

  1. User connects to the public folder mailbox.
  2. That mailbox then responds with where the queried content is.
  3. All content operations are then redirected to that mailbox containing the required content.
  4. All folder hierarchy changes are intercepted and written to the writeable copy of the hierarchy contained in the primary public folder mailbox.
  5. All public folders are then updated about the hierarchy changes.
  6. Once the public folder is filled up, a new public folder can be created.
New Search Infrastructure

The Microsoft search engine has been removed from the new version of the exchange. Now, exchange uses the FAST search engine. This reflects in the query performance and the indexing performance.

The FAST consists of two primary components- the Content Transformation Service (CTS) and the Interaction Management Service (IMS).

The CTS receives the incoming documents, run them through filters and store the content in the FAST core. The IMS takes in the queries, parse them and reconstruct the query and retrieve the required information from the FAST core.

Twitter Delicious Facebook Digg Stumbleupon Favorites More

 
Design by Computer Tricks and Tips