Showing posts with label Window Server. Show all posts

Aug 10, 2013

How to Create Users and User Templates in Windows Server 2008 Active Directory

You probably already know that a User Account in Active Directory is an Active Directory Object, or simply said, a record in an AD database. Most of the time we create user accounts for people, however user accounts can also be created for applications or processes.

User accounts allow a person to access resources on a network. But we can just as easily deny access to certain resources on the network through the user account. That’s why, User Account Objects are quite important and very useful.

Today I’ll show you how easy it is to create a new user account, create a user template and how to use a template in Server 2008 Active Directory. Next week we’ll discuss User Groups and Organizational Units. Now, let’s get started with creating a user account.

How To Create a New User Account in Active Directory

1. To start let’s go ahead and open up Server Manager

 2. Next we will open up the Roles section, next to Active Directory Users and Computers section and finally the Active Directory Users and Computers. You should now see your domain name.

 3. We are going to click on our Users section where we are going to create a new User Account. To do so, right-click on the blank section, point to New and select User.

4. In this window you need to type in the user’s first name, middle initial and last name. Next you will need to create a user’s logon name.
In our example we are going to create a user account for Billy Miles and his logon name will be bmiles. When done, click on the Next button.

5. In the next window you will need to create a password for your new user and select appropriate options.
In our example we are going to have the user change his password at his next logon. You can also prevent a user from changing his password, set the password so that it will never expire or completely disable the account.
When you are done making your selections, click the Next button.
 6. And finally, click on the Finish button to complete the creation of new User Account.

How To Create a User Template in Active Directory

A user template in Active Directory will make your life a little easier, especially if you are creating users for a specific department, with exactly the same properties, and membership to the same user groups. A user template is nothing more than a disabled user account that has all these settings already in place. The only thing you are doing is copying this account, adding a new name and a password.
You may have multiple user templates for multiple purposes with different settings and properties. There is no limit on the number of user templates, but keep in mind that they are there to help you, not to confuse you, so keep in mind less is better.
To create a user template, we are going to create a regular user account just like we did above. A little note here, you may want to add an * as the first character of the name so it floats at the top in AD and is much easier to find.
1. To start out, right-click on the empty space, point to new, and select User.
 2. Type in the user’s name (with asterisks if so desired) and click Next.
 3. Create the template’s password and do not forget to check the box next to the Account is disabled option. When ready, click Next.

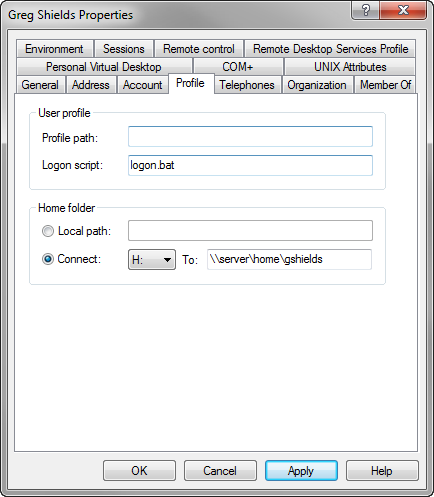
 4. Once the account is created, you can go ahead and add all the properties you need for that template. To do so, double-click on that account and navigate to a specific tab. Once done click OK.

How To Use a User Template in Active Directory

1. Now in order to use that user template, we are going to select it, copy it and add the unique information such as user name, password, etc.
We can do that for as many users as needed. Let’s start by right-clicking on the template and selecting Copy.
 2. Next we are going to enter the user’s name, login and password information while making sure the checkbox next to Account is disabled is unchecked.

 3. Once we finish, our new user account is created with all the properties of the template account. Now wasn’t that easy!

Jun 9, 2013

Configuring Windows Server 2008 Server Core Basic Networking Settings

In my previous articles (see list below) I have written about how, in Windows Server 2008, Server Core installation does not include the traditional full graphical user interface (GUI). Therefore, once you have configured the server, you can only manage it locally at a command prompt, or remotely using a Terminal Server connection.


Like any other server, Server Core machines must be properly configured to be able to communicate on your network. Some of these settings include:
  • Configuring an IP address
  • Configuring an administrator's password
  • Configuring a server name
  • Enabling remote MMC snap-in management
  • Enabling remote RDP connections
  • Enabling remote Windows Firewall management
  • Enabling remote shell management
  • Activating the server
  • Joining a domain
  • Configuring Windows Updates
  • Configuring error reporting
  • Adding server roles and features
And other tasks.
Before you start, you need to configure the server's IP address.

To set the server with a static IP address

  1. At a command prompt, type the following:
    netsh interface ipv4 show interfaces
  2. Look at the number shown in the Idx column of the output for your network adapter. If your computer has more than one network adapter, make a note of the number corresponding to the network adapter for which you wish to set a static IP address.
  3. At the command prompt, type:
    netsh interface ipv4 set address name="" source=static address= mask= gateway=
    Where:
    • ID is the number from step 2 above
    • StaticIP is the static IP address that you are setting
    • SubnetMask is the subnet mask for the IP address
    • DefaultGateway is the default gateway
  4. At the command prompt, type:
    netsh interface ipv4 add dnsserver name="" address= index=1
    Where:
    • ID is the number from step 2 above
    • DNSIP is the IP address of your DNS server
  5. Repeat step 4 for each DNS server that you want to set, incrementing the index= number each time.
  6. Verify by typing ipconfig /all and checking that all the addresses are correct.

To set the administrative password in Windows Server 2008

  1. At a command prompt, type the following:
    net user administrator *
  2. When prompted to enter the password, type the new password for the administrator user account and press ENTER.
  3. When prompted, retype the password and press ENTER.
Next, you might want to change the computer's name, as the default name is a random-generated name (unless configured through an answer file)

To change the name of the server

  1. Determine the current name of the server with the hostname or ipconfig /all commands.
  2. At a command prompt, type:
    netdom renamecomputer  /NewName:
  3. Restart the computer by typing the following at a command prompt:
    shutdown /r /t 0

To manage a server running a Server Core installation by using the Windows Remote Shell

  1. To enable Windows Remote Shell on a server running a Server Core installation, type the following command at a command prompt:
    WinRM quickconfig
  2. Click Y to accept the default settings. Note: The WinRM quickconfig setting enables a server running a Server Core installation to accept Windows Remote Shell connections.
  3. 3. On the remote computer, at a command prompt, use WinRS.exe to run commands on a server running a Server Core installation. For example, to perform a directory listing of the Windows folder, type:
    winrs -r: cmd
    Where ServerName is the name of the server running a Server Core installation.
  4. You can now type any command that you require, it will be executed on the remote computer.

To activate the server

  1. At a command prompt, type:
    slmgr.vbs –ato
    If activation is successful, no message will return in the command prompt.

To activate the server remotely

  1. At a command prompt, type:
    cscript slmgr.vbs -ato
  2. Retrieve the GUID of the computer by typing:
    cscript slmgr.vbs -did
  3. Type
    cscript slmgr.vbs -dli
  4. Verify that License status is set to Licensed (activated).

To join a Windows 2008 server to a domain

  1. At a command prompt, type:
    netdom join  /domain: /userd: /passwordd:*
    Where:
    • ComputerName is the name of the server that is running the Server Core installation.
    • DomainName is the name of the domain to join.
    • UserName is a domain user account with permission to join the domain.
    Note: Entering * as the password means you will be prompted to enter it on the command prompt window in the next step. You can enter it in the initial command, if you wish to. Note: Note that the word "passwordd" has 2 d's in it…
  2. When prompted to enter the password, type the password for the domain user account specified by UserName.
  3. Restart the computer by typing the following at a command prompt:
    shutdown /r /t 0

To remove the Windows 2008 server from a domain

  1. At a command prompt, type:
    netdom remove
  2. Reboot the computer.

To configure automatic updates

  1. To enable automatic updates, type:
    cscript C:'Windows'System32'Scregedit.wsf /au 4
  2. To disable automatic updates, type:
    cscript C:'Windows'System32'Scregedit.wsf /au 1
    BTW, in order to view your current settings you can type:
    cscript C:'Windows'System32'Scregedit.wsf /au /v

To configure error reporting

  1. To verify the current setting, type:
    serverWerOptin /query
  2. To automatically send detailed reports, type:
    serverWerOptin /detailed
  3. To automatically send summary reports, type:
    serverWerOptin /summary
  4. To disable error reporting, type:
    serverWerOptin /disable

May 11, 2013

IP Address Management (IPAM) in Windows Server 2012

To us Windows systems administrators, the term “TCP/IP network infrastructure” typically brings the following technologies to mind:
  • IP addressing strategy (IPv4 and IPv6)
  • Dynamic Host Configuration Protocol (DHCP)
  • Domain Name Service (DNS)
  • Active Directory Domain Services (AD DS)
  • (Optionally) Network Policy Server (NPS)
Historically, Microsoft hasn’t had a great deal of integration among the various Microsoft network infrastructure tools. Sure, Microsoft DHCP has the ability to automatically update DNS records. However, how can we, for instance, monitor IP address utilization at a glance? How can we maintain compliance with industry or internal regulations by auditing IP addressing and configuration changes?
Microsoft has given us an excellent suite of TCP/IP infrastructure administration tools in Internet Protocol Address Management (IPAM). IPAM is a new feature of Windows Server 2012 (currently known as Windows Server 8 Beta) that makes network infrastructure maintenance spreadsheets (!) or expensive enterprise solutions like Microsoft System Center irrelevant, at least with regard to IP address management.
In this blog post we will dive right into the IPAM setup workflow. After that we will examine some of the business use cases of this technology.

Installing IPAM

We install IPAM on our management server by using either Windows PowerShell or the Add Roles and Features Wizard from Server Manager. As you can see in the following figure, IPAM is officially classified as a feature.
Installing IP Address Management (IPAM)

Provisioning IPAM

In order to link our network infrastructure servers with our centralized IPAM solution, we must either configure settings manually on each server, or use Group Policy Object (GPO)-based provisioning. Obviously, the latter technique is preferred because it is largely automated.
NOTE: Trust me, you do NOT want to configure the IPAM provisioning steps manually. Talk about tedious!
The Provision IPAM Wizard deploys separate GPOs for provisioning IPAM on your DHCP servers, DNS servers, domain controllers, and NPS servers. In addition, the Provision IPAM Wizard creates the required network shares and security groups as well as creates the necessary Windows Firewall network traffic exceptions.
The Provision IPAM Wizard
NOTE: You cannot configure IPAM on a domain controller. I promise you that IPAM provisioning will fail if you try to do so.

Configuring and starting Server Discovery

During the IPAM server discovery step, we instruct IPAM to scour our Active Directory domain in search of network infrastructure servers.
As you can see in the following screen shot, we can simply select the domain(s) to discover and then click OK to continue.
Configuring IPAM Server Discovery
To actually start server discovery, we click Start server discovery in the IPAM Server Tasks pane in Server Manager. Once discover completes successfully, we can proceed.
Performing Server Discovery

Adding servers to manage

From Server Manager, we can click Select or add servers to manage and verify IPAM access to continue our journey of IPAM initial configuration.
We need to grant our IPAM server permission to manage my network infrastructure server(s) by using GPOs. To do that, we can run the Invoke-IpamGpoProvisioning Windows PowerShell cmdlet. In the following example, we specify dc01 as our network infrastructure server, ipamgpo as our GPO prefix, and nuggetlab.com as our AD DS domain.
Invoke-IpamGpoProvisioning –Domain nuggetlab.com –GpoPrefixName ipamgpo –IpamServerFqdn dc01.nuggetlab.com
In addition to the IPAM access status displaying as Unblocked for your infrastructure servers, you will also want to open the Group Policy Management Console and verify that the GPOs have been created for your managed TCP/IP network services.
Verifying IPAM GPOs in Group Policy Management Console

Retrieving data from managed servers

In the IPAM Server Inventory list, we can right-click an infrastructure server and select Retrieve All Server Data to query the system and, well, retrieve all server data that is related to the network service(s) that it hosts.
As you see in the following screenshot, a properly configured IPAM server offers the administrator a wide variety of centralized management and monitoring information, all within easy reach.
IPAM admin tasks
IPAM admin tasks

Conclusion

So there you have it! IP Address Management is intended to make TCP/IP network service management easier for us busy Windows systems administrators. I hope that you now have a clear picture of what IPAM is and how to configure the service in Windows Server 2012. Please feel free to leave any questions or remarks in the comments portion of this post.

Windows Server 2012 DHCP High Availability

One of the new features I really wanted to check out in Server 2012 was the ability to setup a highly available DHCP server.

Prior to Windows 2012 if you wanted to setup a highly available DHCP solution, you only had a couple of options.

1.  You could setup up a split scope, which required you to setup identical DHCP scopes on two servers, and then adding exclusion ranges on each of them so they didn’t both hand out the same IP Addresses.  Usually this was done in an 80/20 fashion.

2.  Introduce windows clustering, which required shared storage and sharing IP Addressses, let alone the additional licenses that would need to be purchased for an Enterprise version of Windows Server.

3.  Create a standby server, where the DHCP configurations were the same on two servers, but the standby server didn’t have an activated scope.  During a failure, the standby server could quickly be activated.

Introducing Server 2012 DHCP Failover
windowsserver2012

Now with Server 2012 you can setup multiple DHCP Servers very quickly, and set them up in either a load balanced configuration or a hot standby config.  In both configurations, the two DHCP servers are sharing their database updates so that they are both up to date and in sync!

DHCP Load Balancing

If you setup load balancing, you can configure something similar to split scopes, where each DHCP server is handing out a percentage of the IP Addresses.  The difference between this setup and old split scope setup, is this uses a hash value.  So if the MAC address of the client machine requesting an IP, has a hash value of 1 Server 1 hands it an IP address and similarly for Server 2.
In the event that one of the DHCP Servers is down, this hash value is no longer used and the available server hands out the IP Addresses for all clients.

DHCP Standby

The DHCP Hot Standby configuration works just like you’d expect it to.  You specify one server as the Active server and the other as a Passive server.  The Active server hands out all of the IP Addresses unless a failure occurs.  If the active server is down, the passive server begins handing out all of the IP addresses.

Setup

After you configure your normal scope settings, right click on either the IPv4 or IPv6 server and choose “Configure Failover…”
failover1


If you have multiple scopes, you can either choose all of them or only some of them.

failover2


Add the server that will serve as your secondary DHCP Server.
failover3


Choose what kind of failover mode you want to use.  In my example we’re using load balancing with a 50/50 split.
failover4


As always with wizards, review your settings and click finish.
failover5


When the setup is finished, you’ll get a list of things that were done and if any of them failed.
failover6


If you look at your scope settings now, you can modify your settings for failover if necessary.
failover7


That’s it!  Very easy to configure.

If you for whatever reason need to undo your DHCP failover, all you need to do is choose the “Deconfigure Failover” option and it undoes everything.  It’s very simple.
failover8


This is a very good way to copy your DHCP settings to a new server as well.  It beats backing up and restoring from the old days.

Installing And Configuring DHCP With Windows Server 2012

Installing and configuring DHCP with Windows Server 2012 is thankfully pretty easy, and doesn’t take much longer than 15 minutes if you’re starting with a fresh network.  For this tutorial, you’ll learn how to configure basic DHCP services only – future tutorials will include more advanced DHCP configuration.  Keep reading to learn how to install and configure DHCP on Microsoft Server 2012.


First things first, you’re going to want to start with as fresh of a server as possible, but if you’re using a machine that’s already in production, that’s fine as well.  You also want to start this process with an end goal in mind, keeping in mind exactly what you are trying to accomplish with this DHCP installation.  Perhaps you want to consolidate as much network management as possible in one area, keep better track of your network addresses, or even configure some sort of high availability scenario.  One of the great things about Microsoft Server 2012 is that it makes all of these scenarios incredibly easy to accomplish, so let’s start with the first step – installing the bare-bones DHCP server.
Start off by opening up the Add Roles and Features area, and installing the DHCP services.
Click next through the wizard to install DHCP, and accept the defaults as shown below.  Proceed through the wizard, skipping the installation of additional features for now.
Installing And Configuring DHCP With Windows Server 2012
Add Roles For DHCP Server


After reading through the prompts carefully, go ahead and click Install.
Installing And Configuring DHCP With Windows Server 2012
Installing DHCP Server


Now click on the DHCP menu – you’ll notice that more configuration is required.  Microsoft Server 2012 is pretty good about showing you a “call to action” when it’s necessary with the yellow highlight bar.  Click on the “tasks” area to finish the post deployment configuration.
Installing And Configuring DHCP With Windows Server 2012
Post Deployment DHCP Configuration

This part works similar to the dcpromo tool, which has you first install the role, then start configuring options and option settings.  Because you may have multiple sites or separation of duties, the wizard will have you create special Security Groups for delegation purposes.  This is also handy for junior level admins to cut their teeth on, without having the ability to crater your network.  A poorly configured DHCP server has the ability to absolutely nuke a network, so it’s best to stop a moment at this point and think about exactly who will have the ability to make changes.
After pondering for a moment, use a sufficiently privileged account to authorize the DHCP server.
Installing And Configuring DHCP With Windows Server 2012
DHCP Post Install Wizard


Now commit the changes to create the appropriate Security Groups and authorized users, and restart either the service or the server when prompted.
Installing And Configuring DHCP With Windows Server 2012
Restart DHCP Service

Now you can launch the DHCP snap-in from the Administrator tools, and get to configuring your DHCP scope.  What’s a DHCP scope?  It’s simply a range of IP addresses that the DHCP server is authorized to manage.  Note : make sure to use a different scope outside of your normal subnet IF you already have an existing DHCP server in place.  Having two DHCP servers on the same scope is a no-no and can lead to a lot of headaches once they start fighting over leases.
Expand the scopes and configure your IPV4 scope first.  Right click on IPV4, and select New Scope.
Installing And Configuring DHCP With Windows Server 2012
New DHCP Scope


I like to use the first 10-20 IP addresses of the scope for devices that I know will need a static IP, but that I will not want to manage with DHCP reservations.  Firewalls and edge devices are a good example of devices that should just have static IPs, as opposed to being managed by the DHCP server.  I’m also going to go with a /20 allocation ( 4 24′s ) to give myself some breathing room on IP’s for the time being.
Installing And Configuring DHCP With Windows Server 2012
IP Address Range

Now set your exclusions as mentioned previously.  You can add IP addresses individually, or whole ranges at once depending on your needs.
Installing And Configuring DHCP With Windows Server 2012
Add DHCP Exclusions

The default lease time of 8 days is fine for most scenarios.  If you have a network that has a large amount of mobile devices, you may want to consider creating a separate scope with a lower lease time, or creating a scope with more IP addresses.
Installing And Configuring DHCP With Windows Server 2012
DHCP Lease Reservation

Next you get to configure your options for this particular DHCP scope.  DHCP scope options are simply an additional function of DHCP, which at its most basic form simply assigns IP addresses.  Without scope options, a DHCP server would basically be a glorified way of handing out APIPA addresses.  In other words, it would be useless ;)
Set your default gateway :
Installing And Configuring DHCP With Windows Server 2012
Set Default Gateway

Now your name servers :
Installing And Configuring DHCP With Windows Server 2012
DNS Servers

And finally, activate your scope.
Installing And Configuring DHCP With Windows Server 2012
Activate Your Scope


At this point your DHCP server is authorized to handle IP address requests to DHCP enabled clients on your network.
Congratulations on installing and configuring DHCP with Windows Server 2012!
In coming posts, I’ll be walking you guys through the process of configuring more advanced DHCP scope options, reservations, and other aspects of DHCP.

Window Server 2012 New Features - DHCP failover

While replacing my 2 Domain Controllers today I also took the opportunity to clean up DHCP and DNS and DHCP which led me to one of my favorite new features in Windows server 2012 DHCP Failover. My only question is was there any reason beyond the lawsuits over giving away free software to end users that we didn’t have this years ago. If you haven't used Windows Server 2012 with DHCP failover, you are missing out.. I know we had Split DHCP and DHCP Clusters with Windows Server 2008 R2 but this is much cooler.
DHCP failover: This feature provides the ability to have two DHCP servers serve IP addresses and option configuration to the same subnet or scope, providing for continuous availability of DHCP service to clients. The two DHCP servers replicate lease information between them, allowing one server to assume responsibility for servicing of clients for the entire subnet when the other server is unavailable. It is also possible to configure failover in a load-balancing configuration with client requests distributed between the two servers in a failover relationship. For more information about DHCP failover, see Step-by-Step: Configure DHCP for Failover
In Windows Server 2008 R2, there are two high availability options available for DHCP Server deployment. Each of these options is associated with some challenges.
1.DHCP in a Windows failover cluster. This option places the DHCP server in a cluster with an additional server configured with the DHCP service that assumes the load if the primary DHCP server fails. The clustering deployment option uses a single shared storage. This makes the storage a single point of failure, and requires additional investment in redundancy for storage. In addition, clustering involves relatively complex setup and maintenance.
2.Split scope DHCP. Split scope DHCP uses two independent DHCP servers that share responsibility for a scope. Typically 70% of the addresses in the scope are assigned to the primary server and the remaining 30% are assigned to the backup server. If clients cannot reach the primary server then they can get an IP configuration from the secondary server. Split scope deployment does not provide IP address continuity and is unusable in scenarios where the scope is already running at high utilization of address space, which is very common with Internet Protocol version 4 (IPv4).
DHCP failover in Windows Server 2012 enables administrators to deploy a highly resilient DHCP service to support a large enterprise without the challenges of the options discussed earlier. The main goals of the feature are the following:

Provide DHCP service availability at all times on the enterprise network.
  • If a DHCP server is no longer reachable, the DHCP client is able to extend the lease on its current IP address by contacting another DHCP server on the enterprise network.
image
1. Right-Click on the Scope you want to enable failover from, Choose Configure Failover
2. Choose the Network that you want to provide Failover for or Select All, Click Next
image
3. Either enter the name of your Partner server or Click on Add Server to choose from other DHCP Servers on you network, Click OK, then Click Next
image
4. You can choose from 2options from the Mode Dropdown, we left the default “Load balance” but you can also choose the alternate “Hot standby”
image
5. You can also choose the interval between State Switch Failover Interval. Last, as mentioned earlier review the options available in the drop-down menu next to Mode. You can choose Load balance or Hot standby. By default, Load balance mode is chosen. Click Next verify your settings., and Click Finish
image
6. Once Completed Verify Success, and Click Close.
image
Note: When you choose the DHCP Fail Over Partner the partner should not have the Network you are going to be using to Fail over configured as part of any scope..

May 2, 2013

Mapping Drives in Logon Scripts Is There a Better Way

It sure seems like there should be. Mapping drives for users has been a task IT has needed to do since the first network drive. Yet getting those drives correctly provisioned to users isn't a task that's come easily ' even with today's newer technologies like PowerShell and Group Policy Preferences. In fact, some of those newer technologies might even be more difficult than our old friend the net use command, depending on what you need to accomplish.
Considering how mapped drives exist in companies everywhere, you'd think a super-simple solution would exist right inside Windows itself. Without help from third-party solutions, you'll be surprised to find that'well'there isn't.
Let's take a look, however, at what you can do. I'll start by looking at some of the ways people have provisioned mapped drives to users in the past. I'll bet the very first solution you found was inside each user's object. Even back before Active Directory, each individual user could be assigned a single mapped drive as their 'Home Directory' (now called 'Home Folder') in their user environment profile.

Figure 1: User profile.
You can see in Figure 1 how each user profile has a place to connect a single home drive. Home drives are great, and you probably use them for network storage of user data, but home drives aren't enough when you've got additional network drives that need to get mapped. If you need to map two or more drives, you've got to look elsewhere for a solution.

Mapping the Drive


It's for this reason why many people's second approach to mapping drives is achieved through logon scripts. Logon scripts extended the single drive limitation of home drives frankly because they're completely malleable. You can create a logon script to accomplish whatever tasks you want, as long as your scripting prowess can handle the task.
You've surely created or modified a logon script before. With batch scripting, creating a mapped drive requires just a single line:
net use S: \\server\shared\finance
VBScript requires only one additional line to accomplish the same thing:
Set objNetwork = CreateObject("WScript.Network")
objNetwork.MapNetworkDrive "S:" , "\\server\shared\finance"

PowerShell, everyone's favorite new scripting language, brings us back to a single line, but oh what a line it is!
(New-Object -ComObject WScript.Network).MapNetworkDrive("S:", '\\Server\shared\finance')
While each of these three languages indeed maps the drive you're looking for, each has their own problems and limitations that limit how effective they really are.
Remember that in order to use any of these, you'll first have to accomplish a few things. First, you'll have to actually create that script you want to deploy. Your script will probably include additional configurations over and above any drive mappings. Maybe you'll set a few environment variables or pop up a dialog box with an acceptable use statement. All of these extra things you'll need to add into that script and test to your satisfaction before you can use it.

Installing the Logon Script


Once created, deploying the script to users most often happens as a function of Active Directory Group Policy. Because you want these scripts to run at Logon, you'll typically need to configure them in the User Configuration | Policies | Windows Settings | Scripts (Logon/Logoff) | Logon section of whatever Organizational Unit you're interested in. Figure 2 shows the console where you'll add a non-PowerShell script.

Figure 2: Logon properties.
Adding your batch or .VBS file to this location only creates a pointer to your logon script. You've also got to upload the script itself into Active Directory's replicated SYSVOL folder by clicking the Browse button after choosing to Edit the properties of the script.
You've absolutely got to be careful if you haven't tooled around much with SYSVOL. Too much or the wrong kind of file manipulation in this location can have deleterious effects on your Active Directory. Even more challenging is the pathing that Active Directory uses to simply get you to the right location. My script needed to be uploaded to
company.pri\SysVol\company.pri\Policies\{846E224F-25CF-4516-BAA0-57AA19533EC9}\User\Scripts\Logon. Your path will be similar, but with a different domain and another very different GUID in place of mine.
Once installed and replicated around your Active Directory, your users should start mapping their drives as soon as their computer picks up the new Group Policy Object.

Decisions in Mapping Drives ' The 'In the Script' Way


You're probably having a minor 'a-ha!' moment at this point. 'Yes, Greg,' you might be thinking, 'mapping a drive or two still isn't that difficult a procedure, but my needs are more complex than just a simple mapped drive. I have some users who need some drives some of the time. I also have other users who need other drives, but only in certain circumstances. Mapping drives for me isn't an all-or-nothing situation!'
Here's where you'll find the true challenges in scripting solutions for mapping drives. Indeed batch, VBScript, PowerShell, and even the non-Microsoft languages like KIX and others have built-in capabilities for creating conditional statements. But what if the entire concept of a conditional statement sends shivers up your spine. How are you to make decisions in your logon scripts if your decisions are more complex than are your abilities in scripting?
Let me help you out with some of those complex script routines that might scare you. It's this kind of complexity that keeps many administrators in fear of scripting itself. That said, with what I show you, it is possible to make at least some decisions in your drive mapping logon scripts.
One of the easiest ways to get users to unique drives is by naming the drives after their username. This is easy because the variable %username% automatically maps to a user at the time of their logon. This means that with batch scripting you could potentially map a unique drive with:
net use S: \\server\shared\finance\%username%
This is great if you're looking for mapped drives that relate to usernames. Also, any environment variable that's native or otherwise present at the user's desktop could be used to map a drive. %username% is always available, but as you can imagine it's of limited use.
I'll bet that what you're looking for is somewhat different. Many admins instead want to assign drive mappings based on group membership. That's a task that requires a bit more scripting. You can accomplish this in VBScript with a few additional lines:
Set objNetwork = CreateObject("WScript.Network")
Set objUser = CreateObject("ADSystemInfo")
Set objCurrentUser = GetObject("LDAP://" & objUser.UserName)
strGroup = LCase(Join(objCurrentUser.MemberOf))
If InStr(strGroup, lcase("Finance")) Then
objNetwork.MapNetworkDrive "R:", "\\server\shared\finance"
End If

At the point of logon, the script above takes a look through all the groups in which the user is a member. If that user is in the Finance group, then the script will map the R: drive to the
server\shared\finance share. You can add additional mapped drives by adding more If-Then statements. This script checks for finance, accounting, and IT group membership, then maps the corresponding R:, S:, or T: drive.
Set objNetwork = CreateObject("WScript.Network")
Set objUser = CreateObject("ADSystemInfo")
Set objCurrentUser = GetObject("LDAP://" & objUser.UserName)
strGroup = LCase(Join(objCurrentUser.MemberOf))
If InStr(strGroup, lcase("Finance")) Then
objNetwork.MapNetworkDrive "R:", "\\server\shared\finance"
End If
If InStr(strGroup, lcase("Accounting")) Then
objNetwork.MapNetworkDrive "S:", "\\server\shared\accounting"
End If
If InStr(strGroup, lcase("IT")) Then
objNetwork.MapNetworkDrive "T:", "\\server\shared\IT"
End If

Both of these are neat little scripts, but they're also not terribly scalable. If you've got only two or three different groups in your Active Directory that require attention, you can probably replicate this code a few times and accomplish what you need. But if you've got more than a few (and who doesn't), you can imagine the level of complexity that scales as the size of the script grows. More importantly, as your number of mapped drives grows in number you can see how drives might begin conflicting with each other.

Decisions in Mapping Drives ' The 'How It's Applied' Way


To combat these conflicting problems some scripters take a different tactic. Rather than adding the logic into the script directly, they create separate scripts that get applied based on the rules of Active Directory. This alternate way I'll call the 'how it's applied' method rather than the 'in the script' method.
Remember that any logon script can be applied based on the Organizational Unit of either the user or the computer. In the case of users, logon scripts are applied based on where in Active Directory a user's account is located. If the user's account is part of the Finance OU, you'll assign their logon script to the Finance OU and know that they'll get their assignments.
Scripts can also be assigned to OUs full of computers, even though such scripts are Startup and Shutdown scripts rather than Logon and Logoff scripts. In a perfect world, adding a startup script would allow drives to be mapped based on which computer the user is logging in. However, be aware that startup scripts don't operate that way. A startup script runs as the computer 'starts up', before any user has attempted to login. Thus, you can't easily use a startup script to map drives in this way, although other startup activities that aren't user-centric are possible.
As you can imagine, this combination of users, computers, logons, and startups can immediately create a complex web of conditional statements. A user who is a member of multiple groups could have an overlap of drive letters. Different users logging into the same computer won't get the same mapped drives. Chaos ensues!

Figure 3: Group Policy Preferences Item Level Targeting
By itself Active Directory deploys scripts based on that user's or computer's OU membership. You've got options based on user, or computer, but not necessarily both at the same time. Active Directory Group Policy Preferences get around some of these limitations through their use of Item Level Targeting, seen in Figure 3. There a Group Policy Preference that's been targeted to a specific OU won't actually be invocated unless the items resolve as true. In Figure 3, the drive mapping won't be applied unless the user is a member of the Finance Users group. Remember that even Item Level Targeting is constrained by the OU where your configurations are located.

Active Directory + Scripting = Complex


Complex, eh? Absolutely, and they get even more challenging as your environment ages and inserts more and more scripts to keep things running. If your requirements for mapped drives are anything beyond the simple, consider taking a look at alternative solutions. You might find that the constraints placed upon you by Active Directory might not solve the business problems you actually have.

How to Create Multiple Users in Server 2008 with PowerShell

Creating users through the AD Users and Computers snap-in is a very easy process, but you’ll frequently face the situation where you need to create accounts for a whole group of people at once. There’s no need for this to be a time consuming process for you though, and we’ve done all the heavy lifting so you don’t have to.
We’ve just got a list of new employees from the HR Department, and they’ve been kind enough to give it to us in an excel format.
001
The first thing we are going to do is save the file as a .csv, and to do that, we click on the Office Button and select Save As.

We’re going to name our file users.csv, and make sure that we pick CSV (Comma delimited) in the Save as type box, and then click Save.

Next we’ll create a new text document on the server where we’ll be doing the user creation.

We’ll then copy the following into our new text document:
$objOU=[ADSI]“LDAP://OU=People,DC=sysadmingeek,DC=com”
$dataSource=import-csv “users.csv”
foreach($dataRecord in $datasource) {
$cn=$dataRecord.FirstName + ” ” + $dataRecord.LastName
$sAMAccountName=$dataRecord.FirstName + “.” + $dataRecord.LastName
$givenName=$dataRecord.FirstName
$sn=$dataRecord.LastName
$sAMAccountName=$sAMAccountName.ToLower()
$displayName=$sn + “, ” + $givenName
$userPrincipalName=$sAMAccountName + “@sysadmingeek.com”
$objUser=$objOU.Create(“user”,”CN=”+$cn)
$objUser.Put(“sAMAccountName”,$sAMAccountName)
$objUser.Put(“userPrincipalName”,$userPrincipalName)
$objUser.Put(“displayName”,$displayName)
$objUser.Put(“givenName”,$givenName)
$objUser.Put(“sn”,$sn)
$objUser.SetInfo()
$objUser.SetPassword(“P@assw0rd”)
$objUser.psbase.InvokeSet(“AccountDisabled”,$false)
$objUser.SetInfo()
}
In the first line, make sure that you enter the correct information for your domain and the OU where you are creating the users.

We then want to save the file as a PowerShell script, so we change the Save as type: to All Files (*), and name it PSusersScript.ps1.

Now we need to prep PowerShell to run scripts. You can launch PowerShell by clicking on the shortcut in the taskbar, or by typing PowerShell in the quick search box.

We need to change the Execution Policy to allow scripts to be run remotely, so we type
set-executionpolicy remotesigned
When prompted, we type Y and then hit enter to execute.

Now that we’ve allowed the script to be run, we need to place both the users.csv and the PSusersScript.ps1 files in our folder for execution. Since the PowerShell prompt naturally comes up to the root user folder, and we are logged on as Administrator, we are going to place them in the C:UsersAdministrator folder. When both files are in the folder, we right-click on the PSusersScript.ps1 file and choose Run with PowerShell.

If we take a look in AD Users and Computers, you will now see all those new users you just created.

The new users will be created in the lastname.firstname format, but the script could easily be altered to your need. Now that you’ve already created the script, all you have to do in the future is to place your list of users in the C:UsersAdministrator folder and run the PowerShell script. Easy!

Twitter Delicious Facebook Digg Stumbleupon Favorites More

 
Design by Computer Tricks and Tips