Showing posts with label Internet. Show all posts

Mar 24, 2013

NanoStation 2 WiFi Setup


photo courtesy of Titan Wireless, click photo to see this at their site.

I think it is one of the better solutions for sailors to get an amplified WiFi antenna for use on their boat, and reasonably inexpensive at $80 street retail (click photo above). It has about a 60˚ coverage horizontally and 30˚ coverage vertically, and gives you a 10dB gain. Wiring it is simple, since the unit uses a single ethernet cable for both power and data.

However, several people have been having issues setting it up... so I thought I'd write a bit about how to do so for the non-geek.

The NanoStation 2 has a default LAN (hardwired ethernet) IP address of 192.168.1.20. You need to set your computer's Ethernet card to a 192.168.1.xxx IP address so you can talk to the NS2. Depending on what OS you're running, this can be fairly simple to do. On most Windows boxes, you can right click the network interface and select properties, and set it in there.

Once you've got it and your laptop talking, and you've got the information you need for the access point in question: the SSID or network ID and the WEP or WPA Pre-shared key password/encryption key, then you can configure the NS2 fairly easily. If the WiFi network isn't secured, you can often use the SSID of "any" to connect to it.

I'd recommend you go to the NanoStation Wiki, located here, which gives you the setup step-by-step. These instructions are based on the step-by-step instructions in the Wiki.

In Step 2, you'll want to set it up in "Bridge" mode, with a "DHCP" IP address most of the time. Most WiFi networks use DHCP to simplify IP address management. If you go with a static address, and they're using DHCP, you're likely to get stepped on when someone else gets assigned the IP address you've statically encoded.

In Step 3, you'll want to set it up with the SSID you were given for the network (called an ESSID in the NS2).

In Step 4, you'll just want to select the Country Code to match where you're located. Different countries have different regulations on WiFi radio spectra and also may have different ranges assigned to it. In the US, there are 11 bands or channels assigned, in other countries there may be up to 14. Leave the rest as default, unless you know the access point is an 802.11g vs. 802.11b access point.

In Step 5, pick the security mode, usually WEP, or better WPA or WPA2. They may not have security, but IMHO you're better off it is activated. Enter the Encryption Key or Pre-shared key as required. WEP is pretty worthless as security goes, as it can be cracked in under a few minutes with enough data passing through the wireless network.

Follow Steps 6 & 7.

BTW, if your e-mail service allows you to use SSL or other encryption, you should use it, otherwise your username, server password and e-mail are all sent in CLEARTEXT... and anyone else on the WiFi network can see it with the right software. I know that Gmail, dotMac and many of the other larger e-mail providers support this, if yours doesn't, you should write to them and complain.

You should also always use the "https://" version of your financial institution's website, which is the SSL-encrypted version, when logging in, for similar reasons, rather than the "http://".

The NS2 interface is actually rather easy to use, once you're used to it and understand it.

Mar 19, 2013

How to setup Bridge mode on R6300?

Image
The R6300 Wi-Fi Router can be configured in Bridge mode. To configure the router in Bridge mode, you need two R6300 routers—one configured as the router and the other as a bridge.
Image
For a Gigabit Wi-Fi connection for your home entertainment center, install the first R6300 router, then set up the second R6300 in Bridge mode near the home entertainment center and connect via Ethernet your Smart TV, DVR, game console or Blu-ray® player. The R6300 Bridge connects at 802.11ac Wi-Fi speeds to the R6300 Wi-Fi Router, providing you a gigabit Wi-Fi connection to your home entertainment center.
Benefits of Installing the R6300 Router as a Bridge:
• Enables you to take advantage of Gigabit speeds on current devices.
• Utilize Gigabit speed for applications like video and gaming by putting this next to your home entertainment center.
• Connect using Gigabit Ethernet cable on multiple devices like Smart TV, NeoTV, Blu-ray Player, game console to the R6300 bridge.
• The R6300 bridge connects wirelessly  at Gigabit Wi-Fi speeds to the R6300 router.

How to Set Up Bridge Mode on the R6300 Router
Make sure that the base router (the router that the R6300 will connect to) is operational and able to connect wireless devices. Make a note of the following items: SSID, security mode, wireless password, operating frequency (either 2.4 GHz or 5 GHz)
  1. Log in to the second R6300 Router by typing routerlogin.net on an Internet browser's address bar.
  2. Go to Advanced tab > Advanced Setup and click Wireless Settings.
    Image
  3. Click Use other operating mode and select Enable Bridge mode. Image
  4. Click Setup bridge mode wireless settings and configure the following items on the pop-up window.
    a. Click the drop-down menu to choose the wireless network frequency (2.4 GHz or 5 GHz) of the router you are connecting to. Please choose 5GHz to setup in 802.11ac mode.
    b. Type the wireless network name (SSID) of the router you are connecting to.
    c. Select the security mode of the router you are connecting to.
    d. Type the passphrase of the router you are connecting to.
    e. Click Apply. Image
  5. Click Apply again on the Wireless Settings screen.
    Congratulations, you've finished! The R6300 router will reboot and connect to the base router in a few minutes.

Configuring a network with a wireless bridge


  • LAN: Local Area Network.
    Your local network
  • WAN: Wide Area Network.
    The larger network your LAN connects to. The first step on the path to the Internet.
  • DHCP: Dynamic Host Configuration Protocol
    A server that assigns IP Address, Subnet Mask, Default Gateway and DNS Server values to your TCP-IP system.
  • DNS: Domain Name System
    DNS is what translates Google into googles IP address.
  • Router: A network device with two interfaces; one side WAN, the other side LAN. They must be on different networks, or there is nothing for the router to do.
  • Bridge, Wireless Bridge, Client: A device with two network interfaces that connects to an AP or Wireless Router. A bridge does the same thing as a USB WiFi adapter, or a wireless PCI card. The difference is that the bridge has an ethernet connector that allows the output to be shared by all of the computers on a wired network. A printer, scanner or DVR ( digital video recorder ) on a wired network with a bridge is effectively a wireless device.

The router inspects network taffic and decides: Local ( PC to printer ) or Long Distance ( PC to Internet ) and sends the traffic out the appropriate interface.

You have 4 values to deal with in TCP - IP:
  • IP Address. Think phone number.
  • Subnet Mask. Works with IP address. Must be the same on all equipment in your network. Different subnet mask = different network.
  • If these two are good, you get local connectivity; your in house network equipment communicates.
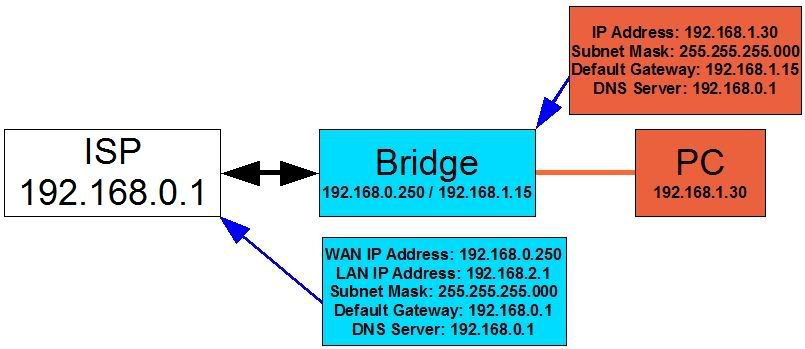
  • Default Gateway: Think Dial 9 for an outside line. The default gateway is an IP address on your network that is the LAN side of a router that connects to a bigger network. The other side of that router is the WAN side of that router. Think of your network as a tree. The default gateway in every unit points to a bigger part of the tree. Twig, branch, bigger branch, trunk. The default gateway points to the closest junction with a larger part of the tree. In the diagrams below, the blue arrows point to the next default gateway in the chain. If you traceroute your network, you will see a list of default gateways from your PC to the IP or URL you tracerouted to.
  • DNS Server. The address of a DNS server. Frequently multiple choice. One of these choices should be the IP address of your ISP.

A simple wireless bridge setup:

A network consisting of a wireless bridge router connected to a WISP, feeding a PC: ( The ISP is actually a generous neighbor )


Note that:
  • Default gateway changes in each unit;
  • DNS server stays the same.
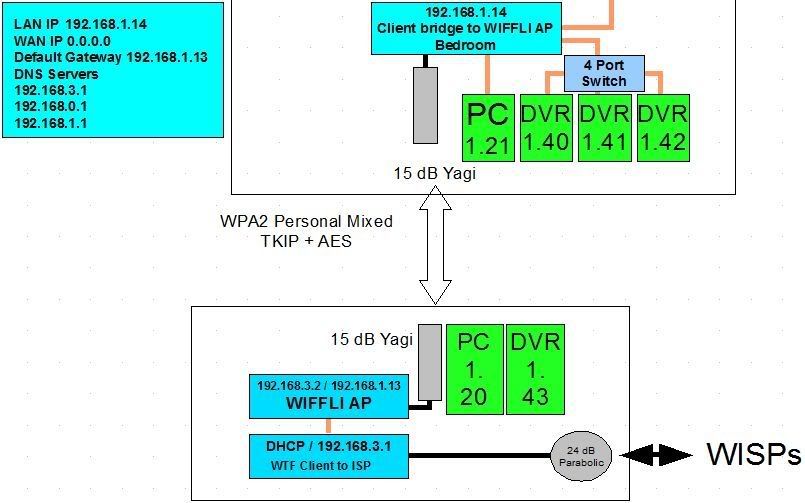
The same network with an AP added. An extra network has been inserted betwen the AP and the bridge router. This was necessary to get the AP to route traffic out the routers WAN port:


A more complicated system:

The scenario:

1) You live near a city park. Three organizations have hotspots feeding this park. You can see these hotspots from a motorhome in your backyard, but not from the house. You want to access these connections from the house.

2) You want access to the house network from the motorhome

3) There are computer science majors in the neighborhood. The kind who have no social life and hack into everything. Is there another kind?

You need:

1) A client in the motorhome that connects to the hotspots. This must not have wireless security enabled, because the hotspots are open.

2) A wireless router in the motorhome to relay the signal into the house. This will have the best security available enabled.

This requirement of secure on one end but not the other keeps us from using a WDS repeater.

3) A client in the house. This client will be configured as a Client Bridge; a client to the wireless router in the motorhome.. It needs the same security settings as the wireless router.


The difference: A client bridge connects two halves of one network together. The same network on both sides. The 192.168.1.14 client in the image below us a client bridge. The 192.168.1.X network can be connected to on the switch side of the WIFFLI AP. It can not be seen from the ISP.

Three DNS servers are listed: The client to the ISPs, and the two most common WISP IPs.

Last edited by Mark Oney; 06-14-2009 at 10:05 PM.. Reason: Added a client bridge
Reply With Quote

How to block Facebook


How to block Facebook in Internet Explorer only


1. Open Internet Explorer and click Tools
2. Click Internet Options and then click on the Content tab
3. Click the Enable button
4. Click on the Approved Sites tab
5. Enter facebook.com in the box
6. Click Never and then OK
7. In the appeared window enter and confirm your new password
8. Click on the General tab and make sure to select Users can see websites that have no ratings
9. Click OK

How to block Facebook using the Hosts file

The location of the hosts file depends on your operation system.
Windows XP, Vista and Windows 7 C:\WINDOWS\system32\drivers\etc\hosts
Note! Make a backup of the hosts file and put it somewhere safe, in case you mess up.

1. Open the hosts file using Notepad or other plain text editor.
2. Copy the following:
   # block facebook
   127.0.0.1 login.facebook.com
   127.0.0.1 www.facebook.com
   127.0.0.1 blog.facebook.com
   127.0.0.1 apps.facebook.com
3. Paste it into the Hosts file after 127.0.0.1 localhost
4. Save and close the Hosts file.
5. Reboot your computer to apply the changes.
6. Try to open Facebook in a browser.

Note! Pay attention that when you block Facebook using the Hosts file users can access Facebook through the HTTPS protocol

Note! Pay attention that Google Chrome may ignore the Hosts file.

Mar 11, 2013

How to configure my AP work in WDS repeater mode

How to configure my AP work in WDS repeater mode Note:
1. Your root router must support WDS feature.
2. Make sure your Access Point’s IP address is different from IP address of root router, but the IP address should be in same IP segment.
 
The steps are followings:
  1. Type in http://192.168.0.254 in address bar in your web browser, then press Enter.
   How to configure my AP work in WDS repeater mode
  1. Input username and password in pop-up, both of them are admin. Then click OK to login management page.
   How to configure my AP work in WDS repeater mode
  1. Change your LAN IP address of access points to avoid IP conflict.
      How to configure my AP work in WDS repeater modeHow to configure my AP work in WDS repeater mode

  1. Click Radio SettingàMode Setting in the gray menu on the left, select WDS AP Repeater as work mode
 How to configure my AP work in WDS repeater mode How to configure my AP work in WDS repeater mode
  1. Click Scan button in the main page, then the AP list appears, please find SSID of your root router, and select it, then the Mac address of your root router will be automatically filled the blanks.
  How to configure my AP work in WDS repeater mode
6. Then please keep security settings be the same with the root router. Then click Apply to save the settings.
How to configure my AP work in WDS repeater mode    

How To Set WDS (Repeater Function) on WNDR3300/WNR3500?

Below are instructions how to set the repeating function on WNDR3300.  In this example, we will be using the WNDR3300 as the Base station and we’ll use the WNR3500 as a repeater.  Please note that WNDR3300 only supports WDS on 802.11N mode.
  1. Login to WNDR3300 administration page (e.g. www.routerlogin.net or 192.168.1.1).
  2. Go to Wireless settings menu and set the following.
                - SSID (ex. 3300n)
                - Mode (ex. Up to 270 Mbps at 2.4 GHz)
                - 11N Channel (ex. 6)
                - Security options (ex. WEP or None)
                - Security Encryption key

    After applying the settings, you should have similar settings like below.
    Image
  3. Go to Wireless Repeating Function menu of WNDR3300 and set the following:
                - Select "Enable Wireless Repeating Function"
                - Select "Wireless Base Station"
                - Enter MAC address of the device you'll be using as a repeater

    After applying the settings, you should have similar settings like below.
    Image
  4. On the device that will be used as a repeater, login and set wireless settings the same as base station (See Step 2).  Below is a screenshot of WNR3500 configured as a repeater.
    Image
  5. Go to the Wireless Repeating Function menu of WNR3500 and set the following:
                - Select "Enable Wireless Repeating Function"
                - Set WNR3500 as your Repeater by selecting "Wireless Repeater"
                - Enter IP address of the device you’ll be using as a repeater.  Note: Make sure to use an IP address that is within the same range of the base station.
                - Enter the MAC address of the device you'll be using as a repeater

    After applying the settings, you should have similar settings like below.
    Image

    The wireless repeating function of the WNDR3300 (Base station) and WNR3500 (Repeater) are now set.

Feb 24, 2013

Routing with point-to-point

Point-to-point connections are typically used to connect two systems together over a wide area network (WAN). You can use a point-to-point connection to get data from your local system to a remote system or to get data from a local network to a remote network. Do not confuse point-to-point connections with Point-to-Point Protocol. Point-to-Point Protocol (PPP) is one type of a point-to-point connection that is commonly used to connect a computer to the Internet. See PPP connections for more information on how to set up and manage your PPP connections.
You can use point-to-point connections across dial-up lines, leased lines, and other types of networks such as frame relay. There are two ways that you can configure the IP addresses for a point-to-point connection: a numbered connection or an unnumbered connection. As the names imply, a numbered connection has a unique IP address defined for each interface. An unnumbered connection does not use additional IP addresses for a connection.
Numbered network connections:
On the surface, it seems that the simplest way to configure a point-to-point connection is by using a numbered connection. A numbered connection is a point-to-point definition that has a unique IP address defined for each end of a connection.
Here are some points to keep in mind when you consider a numbered point-to-point connection:
  • Each end of the connection has a unique IP address.
  • Routing statements must be added to your system to flow the traffic to the remote system.
  • Addresses on the point-to-point link must be managed by your network administrator.
  • Addresses are used up just to connect two systems.
When each point-to-point connection is defined to your iSeries(TM) server, a routing entry must be made on each end to describe how to get to any network at the other end of the connection. The routing selection process on your iSeries server depends on having an IP address for each interface. These addresses and routes must be managed by your network administrator. In a small network, these addresses are easy to keep track of and do not use many additional addresses. In a large network, however, this may use an entire subnet of addresses just to define an interface at each end.
The figure below shows a numbered network connection between two iSeries servers. A routing entry is not needed if all you want to do is communicate from AS1 to AS2. If you want to communicate with systems in the remote network (10.1.2.x), the routing entry included in the figure must be added to each system. This is because the remote network,10.1.2.x, is a part of the 192.168.1.x connection.
Numbered network connection
Unnumbered network connections:
An unnumbered connection is a more complex method of defining a point-to-point connection than a numbered connection. However, you may find the unnumbered connection a simpler and better way to manage your network.
The routing selection process in the iSeries server depends on having an IP address for an interface. In an unnumbered connection, the point to point interface does not have a unique address. The IP address of your iSeries server interface for an unnumbered connection is actually the IP address of the remote system.
Points to keep in mind while considering an unnumbered connection:
  • The point-to-point interface has an address that appears to be in the remote network.
  • Routing statements are not needed in the system.
  • Your network administration is simplified by not using up IP addresses for the link.
In the following example, AS1 appears to have an interface in the 10.1.4.x network and AS2 appears to have an interface in the 10.1.3.x network. The AS1 is connected to LAN network 10.1.3.x with an address of 10.1.3.1. This allows AS1 to communicate with any system on the 10.1.3.x network directly.

Unnumbered network connection
Also shown in the example is AS2. AS2 is connected to LAN network 10.1.4.x with an address of 10.1.4.1. This allows AS2 to communicate with any system on the 10.1.4.x network directly. Each system (AS1 and AS2) adds the remote address to its routing table as a local interface. The address is treated specially so that packets destined for that address will not be processed locally. The packets for the remote address will be placed on the interface and transported to the other end of the connection. When the packet arrives at the other end of the connection, normal packet processing is used.
Now you have a need to connect AS1 to the 10.1.4.x network and to connect AS2 to the 10.1.3.x network. If these two systems were in the same room, you would simply add a LAN adapter to each system and plug the new interface into the correct LAN. If you did this, AS1 and AS2 would not need any routing entries added. In this example, however, the systems are in different cities so you must use a point- to-point connection. Even though you are using a point-to-point connection, you would still like to avoid adding routing entries. By defining the Point-to-Point Protocol (PPP) connection as an unnumbered connection, you achieve the same results that you would have gotten if you could have used LAN adapters without adding any routing entries to your iSeries server. To do this, each system borrows the IP address of the remote system for use with route resolution.
Unnumbered versus numbered connection data flow:
The following figure shows the addresses that would be used in a numbered and unnumbered point-to-point connection. The top half of the picture shows, that with a numbered connection, the remote system address of 192.168.1.2 or 10.1.2.1 could be used to reach the remote system. This is because there is a routing entry in AS3 that directs packets for 10.1.2.1 to 192.168.1.2 as the next hop. The addresses used in the return packet are based on the received packet. The bottom of the figure shows the addresses used with an unnumbered connection. The outbound packet has a source of 10.1.3.1 and a destination of 10.1.4.1. No routing entries are needed on either system because the systems have a direct interface to the remote network by using the remote system address of the point-to-point connection.
Unnumbered vs. numbered

Feb 22, 2013

How do I configure wireless Access Point to Point to Point Bridge mode?

Definition: In Wi-Fi networking, Bridge mode allows two or more wireless access points (APs) to communicate with each for the purpose of joining multiple LANs.
Some wireless bridges support only a single point-to-point connection to another AP. Others support point-to-multipoint connections to several other APs. This article is about to setup Point to Point Bridge.
Note:
1. You need configure both of your two wireless access points (TL-WA501G/TL-WA601G) to Bridge mode by following below steps in order to setup a Bridge mode based wireless network.
2. Before the configuration, please check and write down the Wireless MAC Address of the Access Points.
In the bottom of the device, there is a label with the MAC address printed.
Configuring the access point (TL-WA501G/TL-WA601G)
Step 1 Connect your computer to TL-WA501G/TL-WA601G, and then log into the Web-based Utility by entering the IP address 192.168.1.1 into Web Browser.
If you can not log into the Web-based Utility, please follow the instruction How do I log into the Web-based Utility of TL-WA501G/TL-WA601G for a try. 
Step 2 Change the LAN IP address of the access point (TL-WA501G/TL-WA601G) to avoid IP conflict if necessary. This is due to your own network, please refer to Why & How do I change the IP address of TL-WA501G/TL-WA601G for some detailed information.
After changed the IP address of your access point, you need re-log into it by using the new IP address. And please note that the IP addresses of the two access points can not be the same in your network.
Step 3 Configure your TL-WA501G/TL-WA601G to Point to Point Bridge mode.
1. Click Wireless -> Wireless Mode on the left, select Bridge (Point to Point). And then enter the MAC address of the other access point (TL-WA501G/TL-WA601G) which you want to connect into the MAC of AP box.
Note: Very two numbers should be separated by the character ‘-‘, and please enter the correct MAC address of another access point which you want to connect into the box, otherwise, the wireless connection will be can not set up.
2. After done the configuration, enable Reboot and click on Save, the
settings will take effect after the device reboot.
After done the below procedure in both of the two wireless access
point (TL-WA501G/TL-WA601G), the Bridge mode based wireless
connection will be setup successfully.
Additional information:
There is an option called With AP Mode in the setting page, if you enable it, the access point (TL-WA501G/TL-WA601G) also can work in AP mode at the same time when it had been configured to Bridge mode. This means that you can connect other wireless clients to this access point when it had been configured to Bridge mode.
And if you do not enable it, you can not connect any wireless client to this access point when it had been configured to Bridge mode.

Feb 17, 2013

Creating Twitter and Facebook posts with symbols

Below is a listing of special characters and symbols that can be copied and pasted into your own Twitter and Facebook posts to give your posts and tweets a little more originality.
Tip: Not all third-party tools and devices that are used to read Facebook and Twitter can interpret these symbols. When these symbols are not understood they will be shown as an empty box.

Arrows and fingers
← ◄ ⇐ ☚ ☜ ↔ ⇔ → ► ⇒ ☛ ☞ ↑ ⇑ ☝ ↓ ⇓ ☟

Crosses and stars
✝ ✞ ☨ ☦ ☥ ✙ ✚ ✛ ✜ ☩ ♆ ✠ ☪ ✡ ★ ☆ ✪ ⋆ ✩ ✮ ✯ ✰ ☸

Danger and peace
☠ ☢ ☣ ☮ ✌ ☯ ☹ ☺ ☻

Flowers and snowflakes
❀ ✿ ❁ ✾ ❇ ❈ ❅ ❄ ❆ ✹

Game
♚ ♔ ♛ ♕ ♜ ♖ ♝ ♗ ♞ ♘ ♟ ♙ ♠ ♤ ♣ ♧ ♥ ❤ ❥ ♡ ♦ ◊

Lines and bars
❘ ❙ ❚

Music
♪ ♫ ♩ ♬ ♭ ♮ ♯

Office
✍ ✎ ✏ ✉ ☎ ☏ ✆ ⌛ ⌚ ✓ ✈ ✂ ✄ © ® ™ ♀ ♂ ☤ ∞

Weather
☼ ☀ ☁ ☂ ☃ ☄ ☽ ☾

Top 10 Twitter tips and tricks

Below is a listing of our top 10 favorite Twitter tips and tricks. These tips will help make your Twitter experience more enjoyable and can help increase your followers. Customize
  • Change your profile picture. Use a picture of yourself to make it seem more personalized if this is your personal Twitter account.
  • Utilize as much of the 160-character limit Twitter BIO space allows. Include keywords your followers or potential followers may be searching for.
  • Create your own background image. However, do not make the image too much like an ad or sales pitch. The background image must be less than 800k and we recommend a size of 1600x1200 for a large image or smaller if you plan on tiling the image or just having it on the left-hand side. Finally, keep in mind that smaller resolutions and monitor sizes will hide much of the background.
Third-party tools
Take advantage of the hundreds of different third-party online tools and services that enhance your Twitter experience. Below are a few of our favorites.
  • TwitPic - Take advantage of TwitPic to post pictures on your tweets. If you want to post pictures while away from the computer, use the Twitterific app.
  • Qwitter - Great service that sends an e-mail any time someone unsubscribes from your Twitter profile and mentions a possible Twitter post you made that may have caused them to leave.
  • Manageflitter - Fantastic site for managing your followers and getting an easy to read overview of people not following you back, quiet users, and inactive users.
  • WeFollow - Great website that allows you to add yourself to a listing of Twitter users by tags you find interesting.
  • SocialOomph - Another great service with a collection of free Twitter tools including the ability to schedule when a tweets gets posted.
  • Tweetbeat - An excellent site that takes the trending topics on Twitter and gives you a clearer explanation of present and past trending topics.
  • TwitterMeme - Another great location to find the hottest links on Twitter.
  • Twitter Grader - Great service that grades any Twitter account and gives you additional details and ranking information.
  • Twitter Fan Wiki Apps - Finally, this wiki has a listing of several hundred different Twitter applications and tools for users wanting more.
Use Twitter search
Take full advantage of the Twitter search tool. Below are just a few tips that can help improve your search capabilities on Twitter.
  • Search for your website or blog URL and see if others are mentioning your page.
  • Search for anything near you by adding near:"city state". For example, typing near:"Salt lake city Utah" club would return current tweets that have happened in Salt Lake City, Utah with the keyword club in them.
  • Find people who you may enjoy following by searching for keywords that interested you.
  • If you do not want tweets with links add ? -filter:links at the end of your search query.
  • Need more options, use the Advanced Twitter search.
  • Any time you get excellent results click the "Save this search" button to save that search. These searches can then be found under "Saved Searches" on the right-hand part of your profile on the old Twitter interface or under the "Searches" tab next to your timeline on the new Twitter interface.
Followers
  • Engage followers.
  • Do not follow too many people. No one is going to follow someone who is following thousands of people but only has 10 followers.
  • Retweet interesting posts.
  • Retweet and participate in conversations with people with a lot of followers.
  • Realize it is impossible for anyone to read every tweet.
  • When first joining do not follow hundreds of people, doing this may mark you as a bot.
Create useful and interesting tweets
  • Try making all your tweets informative, useful, or funny.
  • Do not post mundane posts, e.g. eating a bowl of cereal.
  • Add hastags to your tweets. For example, if your tweet is about computers, consider adding #computer in the tweet.
  • Tweet frequently. No one is going to follow someone they do not know who has not tweeted in months. Try at the very least to tweet a few times a week or daily if you can manage.
  • Do not whine or complain. Everyone will unfollow anyone who constantly whines or complains.
  • Try making your valuable tweets during the times people will most likely see them.
  • Keep some space available in your tweet in case someone retweets your post.
  • Use special characters in your tweets.
Know the lingo
Know the Twitter lingo, these are just a few examples: @reply, Direct Message (DM), Follower, Hashtag, Retweet (RT), Trending Topics, and Tweet. See the Twitter description for a full listing of Twitter terms and Lingo and related terms.
Follow the masters
Following a few of the masters of Twitter and Social Networking will give you an understanding of how to tweet better, posts to RT, and inspiration for tweets of your own. Below are the top ten Twitters we recommend following.
  • Twitaholic - A full listing of the top users on Twitter based on Followers. This is a terrific service to find and follow the top users and possibly incorporate some of the ideas they are doing on their account.
Tip: Many of the first few hundred people are celebrities on Twitaholic, if they do not interest you skip the first page.
Create and use lists
Twitter list iconTwitter lists are an excellent method of filtering filter through the people you follow. To create a list, click the Lists link and then Create a list. After creating a list visit the persons profile page you wish to add and click the list icon, as shown in the picture to the right. Our Computers and Tech list is an example of a public list we created.
Go Mobile
Apple iPhones, Blackberry phones, Android phones, Windows phone 7 phones, and most of the other smart phones have Twitter applications. Take full advantage of these applications. For users who do not have smart phones Twitter also has extensive support for SMS, which can send tweets over a text message.
Advertise
  • Mention your Twitter page as many places as you can, e.g. your business card, e-mail signatures, web page, blog, Facebook, etc.
  • Create a tweet button or at least your Twitter name on your pages, similar to the below examples.

Determine last modified date of a web page

For web pages that do not list their last modified date, you can determine the date and time when a website was last updated, modified, or changed by following the below suggestions. Keep in mind that
Internet Archive
Although this site will not give you an exact modified date, it can give you a good idea of when the page last changed and will also allow you to view the history of a page, even if it is offline. Visit the Internet Archive and enter the URL of page or website you're trying to view the modification date.
JavaScript in address bar
Insert the below JavaScript string into the address bar.


javascript:alert(document.lastModified)


Note: With dynamic generated content this will not work. Newer Internet Browsers will also not support this feature since the address bar as a search or for other features.

Quickly scroll to an item in a list or drop down

Quickly find text, an icon, or other item in a group or list by highlighting one of the icons or clicking on the list items and pressing the beginning letter of the item you're looking for. Below are some examples of how this could be used.
Internet drop down list
Instead of scrolling through a list of options in an Internet drop down list press the first letter of the option you're looking for. For example, if you wanted to get down on the below list of countries to United States you could click the down arrow and then press U to quickly move down to the first item beginning with U, which in this case is Uganda. If you continued to type United... it would continue to scroll down as long as a result was found.
Windows desktop icons
If you have a lot of icons on your desktop or in another folder highlight one of the icons and press the first letter. For example if you were looking for an icon named "test" highlight any icon and then press the "t" key. Note: you can also press the "t" key multiple times to individually highlight each icon that starts with "t".

Quickly bookmark a web page

Quickly bookmark any web page in all major browsers by pressing CTRL + D on your keyboard. Pressing these two keys together will open the bookmarks or favorites for your browser and allow you to quickly place a bookmark for the page you're currently at. For example, pressing the two keys now would bookmark this page.

Quickly zoom in on images by hovering mouse over thumbnail

 Thumbnail in Twitter zoomed with mouse hover
Many sites such as Twitter, Facebook, Amazon, eBay, and Wikipedia will show a larger image of small thumbnails images when you click them. Save yourself the time of having to click the image to view it by installing a browser extension that will show you the larger image by hovering the mouse over the image. In the picture to the right, is an example of a Twitter profile icon that is enlarged when hovering over the small icon in the Following section. Click the below link for the browser you are using to open the extension that will add this feature.
Firefox users
Chrome users

Browsing only safe Internet web pages

Concerned about the safety of web pages you or others are visiting on your computer? Consider installing the free browser add-on WOT (Web of Trust), when installed this free add-on will display a large warning across the window of any web page that has been poorly rated, contains adware, been known to fraudulently charge visitors, contains malware, or is otherwise unsafe. This add-on can be downloaded from their web page.

Create small easy to read URL's

Create easy to read and type Internet addresses from long convoluted addresses often found on popular sites such as Amazon, eBay, MapQuest, etc. by using online services that shrink the address. Below are examples of sites that allow you to copy and paste any URL into them to make them smaller.
In addition to visiting one of the above sites each time you need to make a URL smaller if you're running Mozilla Firefox there are many tinyurl and other Firefox add-ons that allow you to integrate this feature into your browser. Many other browsers such as Chrome also have similar services.

Tabbed browsing tips

With the introduction of Microsoft Internet Explorer 7 all major browsers now support tabbed browsing. Below are various tips to improve your browsing using tabs.
  1. Clicking on any link with your middle mouse button or wheel will open that link in a new tab. Alternatively you can hold down your CTRL key in IE and Firefox and click a link to open that link in a new tab.
  2. Clicking on an open tab with your middle mouse button will close that tab.
  3. Mozilla Firefox users can middle-click the back button to open a previous page in a new tab.
  4. Pressing CTRL + T will open a new tab in IE, Firefox, and Opera.
  5. Pressing CTRL + Shift + T will undo the closed tab. Alternatively right clicking on a portion of the tab bar will also display this option.
  6. Firefox and IE users can hold down CTRL and press 1 through 0 on their keyboard to open that respected tab.
  7. Right-clicking the active tab will give you an option to close all other non-active tabs.

Send a web page to a friend

When visiting a web page you may come across something you like, for those pages that don't have an e-mail option following the below simple steps can allow you to send a link to a friend.
Internet Explorer users
Send a friend the web page you are viewing by clicking File, Send, and "Page by E-mail". If you do not see the File menu press the Alt key.
Firefox users
Right-click on the page you wish to send to your friend and in the menu click Send link.
Opera users
Right-click on the page you wish to send to your friend and in the menu click Send link by Mail.
Netscape users
Send a friend the web page you are viewing by clicking File, and "Send Page"

Create a shortcut key for Internet web pages

reate a PC shortcut key to a favorite web page by following the below steps. Once a shortcut has been created, you can have the shortcuts to your favorite web pages on your Desktop or anywhere else on the computer.
Click and drag the webpage
If your browser window is maximized make it a window. Once done, click and drag the icon next to the URL in the address bar and drag it to your Desktop or other location you wish to create the shortcut. For example, in the below address bar of Computer Hope you would drag the CH icon to your Desktop or other location.
Microsoft Internet Explorer address bar
Once the shortcut has been created locate the shortcut and right-click it and click Properties. In the shortcut properties window assign a new shortcut key and click OK. Now when the shortcut key is pressed the web page will be automatically loaded.
Create a new shortcut and point to the web address
  1. Create a new shortcut on your Desktop or anyplace you want the shortcut to appear.
  2. For the location of the item, enter the full web address. For example, Computer Hope would be: http://www.computerhope.com/
  3. Enter the name of the Shortcut and click Ok. The new shortcut is now created and can be assigned a shortcut by right-clicking the shortcut and clicking Properties. In the shortcut properties window, assign a new shortcut key and click OK. Now when the shortcut key is pressed the web page will be automatically loaded.
Internet Explorer users
Users using Internet Explorer can quickly do this by right-clicking on an empty spot of a web page and click Create Shortcut. For example, right-click an empty spot on this page to see the available option.

Feb 5, 2013

Chrome

Google Chrome is an Internet browser officially released by Google December 11, 2008 that is a popular alternative to other browsers such as Microsoft Internet Explorer and Mozilla Firefox. Some of the browsers features include browser sync, tabbed browsing, translation, spell check, resize form text boxes, Omnibox, and much more.

Twitter Delicious Facebook Digg Stumbleupon Favorites More

 
Design by Computer Tricks and Tips