If you’re leaving your PC unattended for a while then locking it
(pressing Win+L) can be a sensible precaution, as it prevents others
from viewing your files or interfering with running programs.
The Windows Lock function also hides the current contents of the
screen, though, annoying if you want to leave a movie playing, or
perhaps monitor the progress of some lengthy task you’re running. And
that’s why might sometimes prefer KeyFreeze, which locks your PC but leaves the screen active, just as before.
The program is tiny – a single 341KB
executable – and portable. There are no unwanted extras here, just unzip
it and you’re ready to go.
When you need to lock your system, just launch it. You’ll see a five
second countdown, just long enough to rearrange any application windows
to suit your needs. Once the countdown hits zero then your mouse and
keyboard will then effectively be disabled, with a single exception:
pressing Ctrl+Alt+Del unlocks your system and you’ll be able to carry on
as normal.
Just launch KeyFreeze and your PC will be automatically locked within seconds
If you’re thinking this doesn’t sound too secure, then you’re right.
Leaving the screen visible in the first place means you’ll be giving
away lots of information to anyone passing, and the Ctrl+Alt+Del is
perhaps the first hotkey anyone will guess.
Then again, KeyFreeze isn’t pretending to be a security tool. It’s
not about protecting your system from attack, rather just reducing the
chance of small children, perhaps wandering pets from knocking the mouse
or keyboard and causing problems. And it does this very well.
There are small improvements which could be made here. It’s good that
the program has a countdown before locking, for instance, so that you
can prepare the system for whatever you want it to do – but 5 seconds
may not always be long enough. It would be better if user could choose
an appropriate delay.
For the most part, though, KeyFreeze is very effective, and if you need to protect your PC from curious kids then we’d give it a try.
Searching one or two plain text files is easy. Windows Search and
Notepad will probably be enough. But when you need to browse ten files, a
hundred, maybe even thousands, then you’re likely to need a little
specialist assistance. And that’s where the free-for-personal-use Depeche View Lite comes in.
Point this tiny portable program at a location and it will open every
plain text file in that folder tree (up to a maximum of 10,000 in this
build, anyway – the $40 commercial version is unrestricted). These are
all displayed in a flat view, one above the other, and that alone can be
useful as it’s easy to scroll down and browse them all.
When you do have a lot of files then
you’ll soon want to start searching, of course, and this is extremely
easy. There’s no need to open a dialog box, just start typing and the
screen immediately updates, displaying only matching files and
highlighting every occurrence of your keyword.
Should you need more searching power, your text can also include
operators like AND, OR and NOT, as well as the * wildcard. And you’re
able to define a path mask which restricts your searches to particular
files (main*.html NOT .html.old , say).
Just start typing and your search text will be found and highlighted immediately
If you prefer to keep typing to a minimum, you’ll appreciate the
program’s many mouse options. For example, just clicking a word
highlights it, and displays floating icons with more options (search,
copy to clipboard, highlight phrase, and so on). Or right-clicking a
word leaves your current window alone, and instead opens a pane on the
right hand side with the results of your search.
And if you need to keep track of the various items you’ve found,
that’s not a problem. Locations within any file can be bookmarked for
speedy recall later.
At some point you may want to edit a file, and life isn’t quite so
convenient here: unlike its commercial big brother, Depeche View Lite
doesn’t have an integrated text editor. Just pressing Ctrl+E at any
point will open the current file in Notepad, though, and you can
customise this to have the program use whatever editor you like
(Settings > Options > Search, Edit).
There are some issues with the program, and most of them relate to
the, well, quirky interface. Features don’t always work as you expect,
and it takes a while to find your way around.
Once you’ve learned the basics, though, Depeche View Lite
proves an interesting and very capable search tool. And if you
regularly work with large numbers of plain text files then it could save
you a lot of time and hassle.
Does your broadband seem a bit sluggish? If so, there may just be a simple solution.
You'll need:
A computer connected to the internet.
Follow these step-by-step instructions to find out how to speed up your internet connection
Step 1: Read our guide on How to check your internet speed and discover what speed your broad connection is actually producing.
Step 2: Find out what speed you’re paying your internet provider (ISP) for. You may have to phone them to get the answer to this. If you’ve had your broadband for some time, it may be time to upgrade.
Step 3: Check what speed is achievable in your area. This is also covered in our guide on checking your internet speed. A number of ISP’s are starting to use Optical fibres instead of copper telephone cables to offer superfast broadband and this may be available through your ISP. But it is not yet available across the whole of the UK. This type of connection can offer up to 100mb as it claims to be able to transfer data at the speed of light. However, this can still be dependent upon your phone line, so check first what speeds you can realistically expect.
Step 4: Now that you know what speed you’re paying for and what your hardware is capable of producing, there are a number of things you can do that are likely to make your internet run faster:
Check that you haven’t exceeded your monthly download allowance. Some ISPs cap internet speeds as a penalty for doing this. If possible, always use the master telephone socket for your broadband router. Don’t use a telephone extension lead with your router. If it’s unavoidable, use the shortest one you can. Make sure that all other telephone sockets in use are fitted with microfilters (see right). Not doing this can result in loss of internet speed and interference on the line.Microfilters Is your computer running any unnecessary applications in the background? This can slow things down considerably, but finding out if it’s happening can be a bit complicated. It might be best to ask an expert for help. Make sure your antivirus software is kept up to date. Viruses and adware can slow down your computer and the internet a lot. If you’re using wifi (wireless internet), make sure it’s password protected. Otherwise you could be providing your neighbours with free wifi! If you’re using a laptop with a wireless connection, try using it in a different room or consider using a network cable to connect to the router instead.
- See more at: http://digitalunite.com/guides/using-internet-0/connecting-internet/how-speed-your-internet-connection#sthash.LPJBPX9R.dpuf
Normally when you need to secure your important data from other users, then your first choice is to burn it on CD or put it to removable drive instead of hard drive. But imagine if your data size is more than 100 GB then it is not easy to burn it on CD. No worry, you can save your full drive from other users access using this trick.
Perform the given steps to hide your system data partition:
To enable this feature, you will need to be logged into your computer with administrative rights.
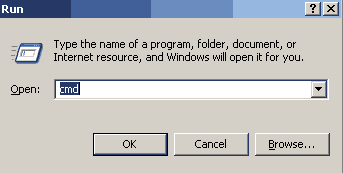
First click on Start button to open "Run" and type "CMD" (without the quotes) then press Ok button to open Command Prompt.
Now type
diskpart onthe blinking cursor and wait for 5 seconds to
appear diskpart> utility.
To show
the list of volume, type list volume command after the diskpart>
prompt,this command will show you all system drives detail.
Now first select the volume that you want to hide, for example,
if you need to hide F drive then first type select volume 2 (in this case) and press enter button
After
loading volume, type remove letter F (in this case) to hide F
drive
Now exit from command prompt and open My Computer to verify drives.
But next time, when you want to unhide the D drive, just run assign drive F command after loading volume 2.
Window Disk Cleanup is very useful tool to increase the performance of your system. You can increase also the free space on the hard disk, because Disk Cleanup utility searches many unnecessary programs and files on your hard drive that you can delete. This tool perform many useful tasks to cleanup your hard disk. For example
Delete the temporary internet files Delete the old windows programs that you are not using. Delete all temp Downloaded Program files Delete Office Setup files Delete Old Chkdsk file Delete the Recycle Bin items Delete all Setup log files Delete the windows temporary files Delete the Web Client or Publisher Temporary files. Delete all Catalog file for the content indexer You can remove the optional windows components that you are not using.
To run the Disk cleanup utility follows the given steps:
Click on Start button, Programs, go to Accessories, and go to System Tools and then click on Disk Cleanup.
Now
a window popup will appear to select the hard disk partition with option
"Select the drive you want to clean up" for example C, D drive, but you
can choose partition one by one for scanning.
Now Disk Cleanup
will takes some time to access your system then open a window to show
"You can use Disk Cleanup to free up to 112,151 of disk space on drive
C" (in this case) available after deleting temporary files. On this
window a button "View files" is used to check the detail of the files
that you are going to delete.
If you scroll down with in that window, you will get many options to choose, select the all options to clean your system in detail, and then click OK to continue.
On the same window another tab is available with the name "More Options".
Under the more options tab, there are three clean up buttons to clean
"Window Components, Installed Programs and System Restore" , select any
one of them and press OK to run it.
During data
processing some operating systems use the hard disk as memory, called
virtual memory. During processing,
operating system transfers some data
and programs from
RAM to hard disk and reloads again when required. The
data or programs are stored in hard disk in temporary file called the
swap file. This technique of swapping data between memory and hard disk
is called paging. Operating system spends a lot of time in paging
process, instead of executing the application software. But the problem
is that while working you use different software programs on computer
and page file may contain your confidential
information or stored in non encrypted format. To reduce this risk, you
can set your computer to clear out page file automatically each time you
shutdown your computer.
Perform the given steps to set your system clear
page file automatically:
To enable this feature, you will need to be
logged into your computer with administrative rights.
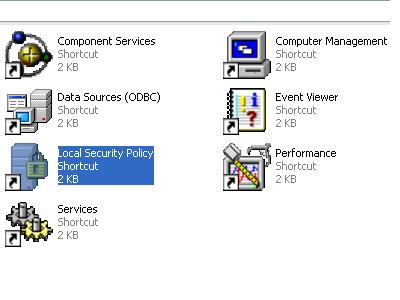
First click on start button to open control panel and then click here
on "Administrative Tools" option.
Now "Local Security Settings" panel will appear,
on lift side of this panel click on "Local Policies".
Here click on "Security Options" then double
click on "Shutdown: Clear virtual memory pagefile" option
Now small dialog box will appear with options, "Enabled or Disabled" the page file.
Select the "Enabled" radio button to set clear page file each time you shutdown computer.
Press Apply button to save settings and then click on Ok
button to finish.
USB
drives (also known as flash drive, mobile disk or pen drive) are
becoming the most popular standard in these days to store and move data.
USB support is available in PCs of both IBM-compatible and Apple
computers. USB port support hot plugging and plug & play. The USB allows
up to 127 devices to be connected to the bus via a single port. The
driver name "usbstor.sys" is used to communicate any USB drives to
the operating system.
USB drives are indeed very useful in these days but a user
can easily use to transfer any confidential information from your
computer to others and can also upload viruses affected files to your
computer by accidentally or deliberately. But you can prevent the users
to connect any USB drives in the computer by disabling the ability of
"usbstor.sys" (USB driver) to load in system. It will block the USB
storage devices only and your system USB keyboard, mouse and others USB
devices will work properly.
Perform the following steps to block the USB storage devices:
To edit this feature, you will need to be logged into your computer
with administrative rights.
First click on
Start button to open "Run" and type "regedit" then press Ok button to
open the Registry Editor.
DNS, which stands for Domain Name System, can convert the elusive
IPv4 or IPv6 addresses to meaningful names, and then translate the
characters back to IP addresses. For example, when you want to visit a
website, DNS will tell your web browser the real IP address of it, and then web browser will download the web page directly from that IP address.
As you may expect, the process of translating IP addresses to website
names will consume some time, which could cause access delay.
Particularly, if the DNS servers are down, you will not be able to visit
most websites through their URL, which isn’t uncommon.
Hence, it is necessary to make a list for mapping hostnames to IP addresses. That is what Windows HOSTS file does. On most Windows systems, the HOSTS file content is used preferentially over other methods, such as the DNS.
With the proper use of Windows HOSTS file, you can accelerate the
access speed of favorite websites, test a website locally and even
selectively block certain websites
In fact, blocking websites through the HOSTS file is an effective way
to do it because it blocks it across all the browsers (we’ve previously
discussed methods to block sites in Internet explorer and Google Chrome).
This article has some tips to manage the HOSTS file and block websites with it. The two methods I’ll discuss here are:-
How to manually edit the HOSTS file.
How to use a tool called HostsMan editor to do it easily.
1. Edit HOSTS File Manually
Windows NT platform systems including Windows 2000, Windows XP and
Windows 7 have their HOSTS file in the path
%SystemRoot%\system32\drivers\etc\ (“%SystemRoot%” is relative path,
which depends on the system-wide environment variable, it should be
C:\Windows or C:\WINNT in most cases).
Basically, you just need to type the above mentioned path in Windows
search bar (or run box) to get to the “etc” folder where you’ll find the
HOSTS file.
You can use any text editor to open the file and edit it manually.
Note: For Windows 7 users, there’s one more step. Type
“Notepad” in Start Menu search bar, and then right click on the
“Notepad” item, choose “Run as administrator”. Now you can open HOSTS
file with “File -> Open” menu in notepad.
The HOSTS file contains lines of text including an IP address and one or
more hostnames. You can add the mapping relationship of each websites.
The comment lines are indicated by a hash (#) character, which will be
ignored by system.
To block a website, simply add a line like this:
127.0.0.1 example.com
127.0.0.1 (or Localhost) is the standard hostname given to the
address of your computer. You mapped the website name to your PC, hence
you can’t visit the site any more. So if you want to block Facebook,
just add this line: 127.0.0.1 facebook.com
Launch the Nero Kwik Media™ application. The application should be installed and the burning functions should be activated as described in the tha article that focuses on installing the Nero® Burning ROM free version.
Insert a blank CD or DVD into your optical drive.
In the “Burn & Copy Disc” section, click on the “Burn a data disc” link.
Click on the “Add” button at the top navigation bar.
On your computer, locate the file or folder you wish to burn and click on the “Add” button.
Repeat steps 4 and 5 until you add all the data.
Click on the “Burn” button located in the bottom right corner.
When the burning process finishes, click the “OK” button.
Close the application. Congratulations! You have burned your CD or DVD in Windows®!
1. Open your optical drive drawer. On the front of the
computer (or side of your laptop), there will be a small "drawer," with a
rectangular button to the lower right. This is your CD-burning device
(It might be a CD or it might be a DVD, which can burn both). If you
don't see this, your computer doesn't have the capability of burning a
CD directly. However, an external CD or DVD burner can easily be hooked
up through the USB slot.
2. Get a recordable CD disc. There are two types of CDs that you can use.
A CD-R (Compact Disc-Recordable) can be burned once, and can not be
erased. This type disc is usually used for permanent storage. For
example; a music CD, a picture CD, or any other type of data that you
want to keep permanently.
A CD-RW (Compact Disc Re-Writable) is a rewritable optical disc
format. This type of disc can be burned, erased, and then burned again.
This type disc is usually used for temporary data storage.
3. Decide on the type of CD you plan to burn. There are many different types of CDs that can be burned and how you proceed depends on which type you are going to burn:
Music. This is the type of CD that is normally burned for use in a home or automobile CD player.
Data. This type of CD is most often used to store files that can be
used by a computer, and is similar to a standard hard disk. Use it to
store writing docs, spreadsheets, databases, and any other file type.
Note that while you can store music files on a data CD, you cannot use
it in a standard home or automobile CD player.
MP3. This is a data CD containing only .mp3 compressed music files.
Because it is actually a standard data CD, only CD players that
specifically support .mp3 playback will be able to play the music on
this CD. The advantage is that you can about five times as many .mp3s on
a data CD as you can on a music CD.
Disk image. A disk image file is a file that contains an exact copy
of a disk. The most common type of disk image is an .ISO image
(International Standards Organisation) , which simply means an exact
copy of the original disc, stored on your hard drive. One can then burn a
CD from the .ISO image and create a usable CD.
4. Decide on what software you will use to burn your CD.
There are many different programs that are designed to burn CDs. Some
are built into the computer's operating system, while others are
individual programs. These programs range from very simple to very
complex. Some of these are free, while others have to be purchased. As
this varies by manufacturer, it's best to check the documentation that
came with your computer to get the details from the user's guide.
5. Burn your CD.
Once you've figured out that you can burn a disc, and that you've got
the software to do it, it's time to get down to the actual burning. The
actual steps will vary depending on what software you use, but the
general process goes like this:
Open your CD drive drawer. Press on the small rectangular button on the lower right of the drive, on the front of your computer.
Place the CD-R into the tray, face up.
Press the drawer to close it.
Launch your CD-burning software.
Follow the on-screen instructions to add content to the CD-burning software.
Click the "burn" button, and wait while the computer does its CD-burning thing.
Method Two Burning a Music CD With iTunes (Mac and PC)
1. Create a playlist. From the File menu, select New>Playlist or type Command-N (Mac) or Control-N (PC). 2. Name your playlist. Then drag the songs you want to add to your CD to the playlist area.
3. Sort your playlist. From the Sort menu at the top of
the playlist's songs, choose the type of sort you want to perform. You
can choose an automatic sort order, or you can arrange the songs
manually.
When you're finished populating and sorting your playlist, click the
blue Done button shown in the top right of the Playlist window.
4. Insert a blank disc into your drive. Click on the gear icon at the bottom left of the playlist, and select Burn Playlist to Disc.
Alternately, you can select Burn Playlist to Disc from the File menu.
5. Adjust your settings. In the resulting window, set your burn speed and disc format.
Preferred speed: by default, iTunes will use the fastest speed the
burner can handle. If you have problems with the burn, try selecting a
slower speed here.
Disc format: Burn an audio CD, MP3 CD, DVD, or data CD.
Gap between songs: sets an audio gap between each song of the duration you select.
Use Sound Check. This analyzes all the tracks you've selected, and
adjusts the volume of each track so that they all are of the same
apparent volume. This is especially handy if you're burning a disc for
your car.
Include CD Text: Enable this if your CD player can display track information.
6. Click on "Burn." The playlist will be burned onto the CD. When you're notified of completion, remove your CD and enjoy!
Method Three: Burning a Data CD on a PC
Insert a blank CD into the CD/DVD drive. In the resulting dialog box, click Burn files to data disc.
Name the disc in the Burn a Disc dialog box.
If you need a disc that will play in computers with an older version
of Windows, or in media devices such as CD and DVD players that can
read digital music and video files, click Show formatting options.
Click the Next button.
Your disc will be formatted for burning using the default LFS (Live
File System) format. When finished formatting, an empty disc folder will
open.
Add content. Into the empty disc folder, drag the files you wish to burn.
You can drag the files onto the disc icon, or into the disc folder. The files are copied as you drag them.
Click Burn to Disc.
If you chose the Mastered format option, you will need to burn your
files to disc. From the toolbar, click Burn to disc. When the process is
complete, the drawer will open, and you can use your new CD.
Method Four: Burning a Data CD on a Mac
Determine if you have an optical drive on your Mac.
Many of the new models require an external optical drive connected to
the Lightning port. If you're using a tower, press the CD Open/Close key
on your keyboard (above the Delete key—an upward-pointing arrow with a
thin line below it), and the drive drawer should open up. If you have a
drive, it will be able to burn a CD.
Still not sure? From the Apple menu, choose About This Mac. Click
More Info to open System Profiler, then click on System Report.
Under the Hardware list, click on Disc Burning. If you see a drive
there, and in the CD-Write: row it says -R, -RW, then you can burn CDs.
Create a Data CD.
Place a blank disc on the tray, and close the drive either by pressing
the front face, or by pressing the Open/Close key. If you see a dialog
pop up, choose Open Finder from the pop-up menu, and select "Make this
action the default" if this is how you will usually burn blank CDs.
The disc will appear on your desktop.
Double click the disc icon.
This will open a window that you can drag files and folders into. This
will not remove the files from your computer, but will only copy them
onto the disc.
Organize your files on the CD.
Arrange and rename the files as you want them to appear when you insert
the burned CD. Once the disc is burned, the location and names of the
files cannot be changed.
Burn the disc. From the File menu, select Burn [discname], and then follow the instructions.
Windows 8 is finally here, and if you're used to previous versions of
Windows then you're going to notice that quite a bit has changed. In
fact, Windows has seen the biggest changes since the jump from Windows
3.1 to Windows 95.
Out goes the Start menu, in comes the new
touch-oriented Start screen, new apps, new interface conventions - even
experienced PC users may be left feeling a little lost.
Don't
despair, though, help is at hand with the following Windows 8 tutorial.
We've been investigating every part of Windows 8, uncovering many of its
most important tips and tricks, so read our guide and you'll soon be
equipped to get the most out of Microsoft's latest release.
1. Lock screen
Windows 8 opens on its lock screen, which looks pretty but unfortunately displays no clues about what to do next.
It's
all very straightforward, though. Just tap the space bar, spin the
mouse wheel or swipe upwards on a touch screen to reveal a regular login
screen with the user name you created during installation. Enter your
password to begin.
2. Basic navigation
Windows 8 launches with its new
interface, all colourful tiles and touch-friendly apps. And if you're
using a tablet then it'll all be very straightforward: just swipe left
or right to scroll the screen, and tap any tile of interest.
On a regular desktop, though, you might alternatively spin the mouse wheel to scroll backwards and forwards.
And
you can also use the keyboard. Press the Home or End keys to jump from
one end of your Start screen to the other, for instance, then use the
cursor keys to select a particular tile, tapping Enter to select it.
Press the Windows key to return to the Start screen; right-click (or
swipe down on) apps you don't need and select Unpin to remove them; and
drag and drop the other tiles around to organise them as you like.
3. App groups
The
Start screen apps are initially displayed in a fairly random order, but
if you'd prefer a more organised life then it's easy to sort them into
custom groups.
You might drag People, Mail, Messaging and Calendar
over to the left-hand side, for instance, to form a separate 'People'
group. Click the 'minus' icon in the bottom right corner of the screen
to zoom out and you'll now find you can drag and drop the new group (or
any of the others) around as a block.
Right-click within the block
(while still zoomed out) and you'll also be able to give the group a
name, which - if you go on to add another 20 or 30 apps to your Start
screen - will make it much easier to find the tools you need.
4. Quick access menu
Right-click
in the bottom left corner (or hold down the Windows key and press X)
for a text-based menu that provides easy access to lots of useful
applets and features: Device Manager, Control Panel, Explorer, the
Search dialog and more.
5. Find your applications
The
Win+X menu is useful, but no substitute for the old Start menu as it
doesn't provide access to your applications. To find this, hold down the
Windows key and press Q or either right-click an empty part of the
Start screen or swipe your finger up from the bottom of the screen and
select 'All Apps' to reveal a scrolling list of all your installed
applications. Browse the various tiles to find what you need and click
the relevant app to launch it.
6. Easy access
Get more
If
there's an application you use all the time then you don't have to
access it via the search system. Pin it to the Start screen and it'll be
available at a click.
Start by typing part of the name of your
application. To access Control Panel, for instance, type 'Control'.
Right-click the 'Control Panel' tile on the Apps Search screen, and
click 'Pin to Start'. If you're using a touchscreen, press and hold the
icon, then flick down and select 'Pin to Start'.
Now press the
Windows key, scroll to the right and you'll see the Control Panel tile
at the far end. Drag and drop this over to the left somewhere if you'd
like it more easily accessible, then click the tile to open the desktop
along with the Control Panel window, and press the Windows key to return
you to the Start screen when you're done.
7. Shutting down
To
shut Windows 8 down, just move the mouse cursor to the bottom right
corner of the screen, click the Settings icon - or just hold down the
Windows key and press I - and you'll see a power button. Click this and
choose 'Shut Down' or 'Restart'.
Some of the tricks available in
previous versions of Windows still apply. Press Ctrl+Alt+Del, for
instance, click the power button in the bottom right-hand corner and
you'll be presented with the same 'Shut Down' and 'Restart' options.
And
if you're on the desktop, press Alt+F4 and you'll be able to choose
'Shut Down', 'Restart', 'Sign Out' or 'Switch User' options.
You can install the Windows 8 Consumer Preview on a USB flash drive and run it from there.
The performance of the system when booted from an USB attached device depends on the performance of USB port.
This post gives step-by-step instruction on how to setup Windows 8 Consumer Preview on a USB drive.
Since we are going to do low level system stuff you should
make sure that you have a current backup of the PC you are working on.
Preparing the USB drive
Connect the USB device to your PC
Open cmd.exe in administrator mode
Create the boot partition on the USB drive:
Go to folder c:\windows\system32
Run diskpart
Get the USB drive’s disk number: list disk
Select the USB drive as active drive: select disk <disk number>
Purge existing partions from the drive: clean
Create a new primary partition: create partition primary
Quick-format as bootable NTFS: format fs=ntfs quick
Set partition as active: active
Close diskpart: exit
Extract the image file for Windows 8 Consumer Preview from the ISO file
Mount the ISO file
If you are running Windows 8 you can mount it as virtual disk.
On Windows 7 you need the help of a third-party utility like MagicISO or you could burn the ISO on a disk.
Copy the image file
The image file image.wim can be found in the sources folder of the ISO image.
Create a new folder on your local hard drive (e.g. c:\ win8onusb) and copy the image.wim file to that folder.
Installing the image on the USB drive
Install the AIK
Get imagex.exe from the AIK
In C:\Program Files\Windows AIK\Tools you find three versions. Select the one that matches the architecture of the Windows image you plan to install.
E.g. when you want to install a 32-bit Windows 8 version get the version from x86 folder.
Copy imagex.exe to the folder (e.g. c:\win8onusb) which already has the image.wim file.
Install the image
Check which drive letter is assigned to the USB drive (e.g. g:).
On the command prompt cd to the folder containing the image.wim file (e.g. c:\win8onusb)
Run the following command to install the image: imagex.exe /apply install.wim 1 g:\ (replace g with the drive letter of your USB drive)
This will take some time…
Add the boot record
At the command prompt enter: bcdboot.exe g:\windows /s g: (replace g with the drive letter of your USB drive)
That’s it.
First boot
Make sure that your PC’s BIOS is setup to boot from USB.
In addition you might have to tweak the order of the hard disks listed in the BIOS, if the USB device is listed there.
During the first startup the PC hardware will be detected.
This might take some time. It will then reboot and present the screen requesting the product key.
ou can setup a wireless connection
between two routers only so that it will link a wireless network to a
wired network allowing you to bridge two networks with different
infrastructure. You can find wireless access points products that offer
either a "bridge" mode or a "repeater" mode. In this post I'm going to
explain three popular open source choices that can be used for setting
up a wireless bridge.
Sample setup
Consider the following network diagram:
Fig.01: Wireless client setup
You connect to the Internet using standalone ADSL2 modem with 202.54.1.1 public IP address.
SSID
set to nixcraft on wireless # 1 and an IP address set to 192.168.1.2.
This router is located in downstairs and connected to ADSL2 modem.
SSID
set to nixcraft on wireless # 2 and an IP address set to 192.168.1.1.
This router works in client bridge mode and located in upstairs.
All computers and devices connected to wireless router #1 and #2 can share files and other resources with each other.
Fig.02: Access point as a wireless bridge
Where,
This setup saves electricity and resources by removing standalone ADSL 2 modem.
You
connect to the Internet using combo ADSL2 modem plus wireless router
(AP) with 202.54.1.1 public IP address. This router is called wireless
#1 and SSID is set to nixcraft. This device has two IP address and it is
located in downstairs.
SSID set to nixcraft on wireless # 2 and
an IP address set to 192.168.1.1. This router works in client bridge
mode and located in upstairs.
All computers and devices connected to wireless router #1 and #2 can share files and other resources with each other.
Software (3rd party firmware)
You
can use the following software / firemware to get the addition features
which are not typically included in a manufacturer's router firmware
such as client mode wireless bridge. You can either setup a full WAP or
just bridge your LAN so that wireless devices can get access to all LAN
resources transparently.
DD-WRT :
Linux-based alternative OpenSource firmware for wireless routers. It
works for several routers, most notably the Linksys. It works great with
variety of wireless routers and embedded systems. This is recommend for
new users as it comes with easy to use web-gui.
Tomato
: Another simple and easy to use replacement firmware for Linksys'
WRT54G/GL/GS, Buffalo WHR-G54S/WHR-HP-G54, Asus and other Broadcom-based
routers. It features a new easy to use GUI, a new bandwidth usage
monitor, more advanced QOS and access restrictions, enables new wireless
features such as WDS and wireless client modes, raises the limits on
maximum connections for P2P, allows you to run your custom scripts or
telnet/ssh in and do all sorts of things like re-program the SES/AOSS
button, adds wireless site survey to see your wifi neighbors, and more.
This is recommend for new users as it comes with easy to use web-gui.
OpenWrt
: OpenWrt is not just firmware but it is often described as a complete
Linux distribution for embedded devices. Instead of trying to create a
single, static firmware, OpenWrt provides a fully writable filesystem
with package management. This frees you from the application selection
and configuration provided by the vendor and allows you to customize the
device through the use of packages to suit any application. This
firmware is recommend for advanced users only.
DIY option
- You can install Linux or FreeBSD/OpenBSD based operating systems and
create a full WAP or just a bridge. This option requires good
understanding of Unix, networks and embedded devices.
I strongly recommend DD-wrt for new users and openwrt for advanced Linux users.
Hardware
I've used the following devices in last couple of years for personal usage:
Linksys WRT 54 with DD-WRT firmware.
Dlink DIR-615 with DD-WRT firmware.
Asus RT 16 with Tomato firmware.
Soekris
net4801 with DIY option. You can use Debian/Ubuntu/CentOS Linux and
FreeBSD/OpeNBSD. This option is only recommended for advanced hardcore
unix users.
You can find list of supported router hardware by visiting the following pages:
Search tomato hardware database or read README file.
Example: Configuring Asus RT-16 as a wireless bridge
Let us see how to configure a wireless connection between two routers only as discussed earlier with tomato firmware.
Wireless # 1: ADSL2+router configuration
This is my ADSL 2 modem + wireless router (netgear N600) that connects to my ISP. This is my primary router and it is called wireless #1. Open a browser and type: http://192.168.1.2 Make sure LAN setup is as follows:
Fig.03: Netgear N600 (DGND3700) Static Lan IP Configuration For Wireless Bridge
Set the IP address of your router in dotted decimal notation to 192.168.1.2 (factory default: 192.168.0.1).
Also
set IP subnet mask to 255.255.255.0. Your router will automatically
calculate the subnet mask based on the IP address that you assign.
Unless you are implementing subnetting, use 255.255.255.0 as the subnet
mask (computed by the router).
1. Open Internet Explorer and click Tools
2. Click Internet Options and then click on the Content tab
3. Click the Enable button
4. Click on the Approved Sites tab
5. Enter facebook.com in the box
6. Click Never and then OK
7. In the appeared window enter and confirm your new password
8. Click on the General tab and make sure to select Users
can see websites that have no ratings
9. Click OK
How to block Facebook using the Hosts file
The location of the hosts file depends on your operation system. Windows XP, Vista and Windows 7 C:\WINDOWS\system32\drivers\etc\hosts Note! Make a backup of the hosts file and put it somewhere safe, in case you mess up.
1. Open the hosts file using Notepad or other plain text editor.
2. Copy the following:
# block facebook
127.0.0.1 login.facebook.com
127.0.0.1 www.facebook.com
127.0.0.1 blog.facebook.com
127.0.0.1 apps.facebook.com
3. Paste it into the Hosts file after 127.0.0.1 localhost
4. Save and close the Hosts file.
5. Reboot your computer to apply the changes.
6. Try to open Facebook in a browser.
Note! Pay attention that when you block Facebook using the Hosts file users can access Facebook through the HTTPS protocol.
Note! Pay attention that Google Chrome may ignore the Hosts file.
This
tutorial about installing an ip camera covers almost all of our ip
cameras,so you can use this tutorial to install any ip camera bought
from our website.
Three connection ways:
Installation in LAN.
This
is the most popular network access way. As long as there is a router,
using internet cable directly connect router to IP Camera, then IP
Camera can be connected to Internet as normal PC, as the following
picture shows:
PPoE Installation
Under
this condition, users need to set PPPoE dialing parameter in IP Camera:
input the username and password which ISP supplier�?offer, the users
permit to connect the IP Camera to Internet by dialing connects. As to
set the PPPoE dialing parameter, you can connect device to network
through the first way, then write parameter to the device, also through
following third way, direct process parameter written to device. The way
how to set PPPoE, please refer to 3.4.5.for detailed steps
IP Camera PC connection
This
method does not use frequently, when you process machine write
parameter or program shift, we suggest you adopt the first connect
network way, to process the modification of machine parameter.
Begin to setup
STEP 1 Use Finder
Open the disk, double click "F series" folder,and double click "software" folder,"DevFind" search bar icon will be found ,double click search bar, then appear the following interface:
If
the internet cable power connect is correct, it appears device styles,
name, and IP address in the device list, (if it doesn’t appear, please
confirm power & internet cable work normally). As the interface,
left side is the current computer configuration information; right side
is the selected device network configuration information. Default IP
camera address is 192.168.1.126, HTTP interface is 80.
Note:
1. Device information indicates IP camera information.
2.
When current computer is the stable IP, (none DHCP IP), the first time
use IP Camera, you could click auto set, to sync local Information to
the IP camera IP address, gateway and DNS
3.If it needs manual
modify camera name, HTTP interface, IP address, sub-net mask, gateway,
main DNS server, backup DNS server, etc. please click apply after
modification, enter IP camera username and password, click confirm is
OK.
4. Inner visit address is LAN visit address; outer visit address is WAN visit address.
5.
When IP camera connects to outer net by the first way, before outer net
visit IP camera, port forwarding is necessary in the senior router:
analog server set. e.g., IP address of one device in the LAN:
192.168.1.126, port is 80, so it’s necessary to open IP: 192.168.1.126
port 80(TCP) in router, besides, in the same LAN, different camera
should come with different port, to make sure there is no port
interference in LAN;
6. About port forwarding in the router, please refers to other chapter in router port forwarding set.
STEP 2 Logging and Active X Installation
Open
the disk, double click "F Series" file, and double click "Software"
file, "DevFind" "search bar icon will be found, double click search bar,
then appear the following interface:
If
the internet cable power connect is correct, it appears device styles,
name, and IP address in the device list, (if it doesn’t appear, please
confirm power & internet cable work normally).
As the
interface, left side is the current computer configuration information;
right side is the selected device network configuration information.
Default IP camera address is 192.168.1.126, HTTP interface is 80.
Note:
1. Device information indicates IP camera information.
2.
When current computer is the stable IP, (none DHCP IP), the first time
use IP Camera, you could click auto set, to sync local Information to
the IP camera IP address, gateway and DNS
3.If it needs manual
modify camera name, HTTP interface, IP address, sub-net mask, gateway,
main DNS server, backup DNS server, etc. please click apply after
modification, enter IP camera username and password, click confirm is
OK.
4. Inner visit address is LAN visit address; outer visit address is WAN visit address.
5.
When IP camera connects to outer net by the first way, before outer net
visit IP camera, port forwarding is necessary in the senior router:
analog server set. e.g., IP address of one device in the LAN:
192.168.1.126, port is 80, so it’s necessary to open IP: 192.168.1.126
port 80(TCP) in router, besides, in the same LAN, different camera
should come with different port, to make sure there is no port
interference in LAN;
6. About port forwarding in the router, please refers to other chapter in router port forwarding set. STEP 3 Operation Keys
Enter device, on left side displays monitor image, right side is control used for operations:
Equipment Status When login name or password is wrong, it will show the following hint:
Administrator Operation Click Sign in, a pop-up will show
Operation
Image mirror indicates a reverse image
Resolution, mode, brightness, contrast default setting are:
320*240,50HZ,6,4,mode is mainly for the adjustment of Light strength,
please adjust to 60HZ when light is poor or in dark.
There are 3 browse modes in IE mode: visitor, operator,
administrator, the authority of administrator is the highest, log in
different authorities, the operation will be different. Regarding to 3
user authorities, please refer to 3.4.4. Equipment User Administration.


 1:29 PM


 Posted in:


 Static Lan IP Configuration For Wireless Bridge")


