Launch the Nero Kwik Media™ application. The application should be installed and the burning functions should be activated as described in the tha article that focuses on installing the Nero® Burning ROM free version.
Insert a blank CD or DVD into your optical drive.
In the “Burn & Copy Disc” section, click on the “Burn a data disc” link.
Click on the “Add” button at the top navigation bar.
On your computer, locate the file or folder you wish to burn and click on the “Add” button.
Repeat steps 4 and 5 until you add all the data.
Click on the “Burn” button located in the bottom right corner.
When the burning process finishes, click the “OK” button.
Close the application. Congratulations! You have burned your CD or DVD in Windows®!
1. Open your optical drive drawer. On the front of the
computer (or side of your laptop), there will be a small "drawer," with a
rectangular button to the lower right. This is your CD-burning device
(It might be a CD or it might be a DVD, which can burn both). If you
don't see this, your computer doesn't have the capability of burning a
CD directly. However, an external CD or DVD burner can easily be hooked
up through the USB slot.
2. Get a recordable CD disc. There are two types of CDs that you can use.
A CD-R (Compact Disc-Recordable) can be burned once, and can not be
erased. This type disc is usually used for permanent storage. For
example; a music CD, a picture CD, or any other type of data that you
want to keep permanently.
A CD-RW (Compact Disc Re-Writable) is a rewritable optical disc
format. This type of disc can be burned, erased, and then burned again.
This type disc is usually used for temporary data storage.
3. Decide on the type of CD you plan to burn. There are many different types of CDs that can be burned and how you proceed depends on which type you are going to burn:
Music. This is the type of CD that is normally burned for use in a home or automobile CD player.
Data. This type of CD is most often used to store files that can be
used by a computer, and is similar to a standard hard disk. Use it to
store writing docs, spreadsheets, databases, and any other file type.
Note that while you can store music files on a data CD, you cannot use
it in a standard home or automobile CD player.
MP3. This is a data CD containing only .mp3 compressed music files.
Because it is actually a standard data CD, only CD players that
specifically support .mp3 playback will be able to play the music on
this CD. The advantage is that you can about five times as many .mp3s on
a data CD as you can on a music CD.
Disk image. A disk image file is a file that contains an exact copy
of a disk. The most common type of disk image is an .ISO image
(International Standards Organisation) , which simply means an exact
copy of the original disc, stored on your hard drive. One can then burn a
CD from the .ISO image and create a usable CD.
4. Decide on what software you will use to burn your CD.
There are many different programs that are designed to burn CDs. Some
are built into the computer's operating system, while others are
individual programs. These programs range from very simple to very
complex. Some of these are free, while others have to be purchased. As
this varies by manufacturer, it's best to check the documentation that
came with your computer to get the details from the user's guide.
5. Burn your CD.
Once you've figured out that you can burn a disc, and that you've got
the software to do it, it's time to get down to the actual burning. The
actual steps will vary depending on what software you use, but the
general process goes like this:
Open your CD drive drawer. Press on the small rectangular button on the lower right of the drive, on the front of your computer.
Place the CD-R into the tray, face up.
Press the drawer to close it.
Launch your CD-burning software.
Follow the on-screen instructions to add content to the CD-burning software.
Click the "burn" button, and wait while the computer does its CD-burning thing.
Method Two Burning a Music CD With iTunes (Mac and PC)
1. Create a playlist. From the File menu, select New>Playlist or type Command-N (Mac) or Control-N (PC). 2. Name your playlist. Then drag the songs you want to add to your CD to the playlist area.
3. Sort your playlist. From the Sort menu at the top of
the playlist's songs, choose the type of sort you want to perform. You
can choose an automatic sort order, or you can arrange the songs
manually.
When you're finished populating and sorting your playlist, click the
blue Done button shown in the top right of the Playlist window.
4. Insert a blank disc into your drive. Click on the gear icon at the bottom left of the playlist, and select Burn Playlist to Disc.
Alternately, you can select Burn Playlist to Disc from the File menu.
5. Adjust your settings. In the resulting window, set your burn speed and disc format.
Preferred speed: by default, iTunes will use the fastest speed the
burner can handle. If you have problems with the burn, try selecting a
slower speed here.
Disc format: Burn an audio CD, MP3 CD, DVD, or data CD.
Gap between songs: sets an audio gap between each song of the duration you select.
Use Sound Check. This analyzes all the tracks you've selected, and
adjusts the volume of each track so that they all are of the same
apparent volume. This is especially handy if you're burning a disc for
your car.
Include CD Text: Enable this if your CD player can display track information.
6. Click on "Burn." The playlist will be burned onto the CD. When you're notified of completion, remove your CD and enjoy!
Method Three: Burning a Data CD on a PC
Insert a blank CD into the CD/DVD drive. In the resulting dialog box, click Burn files to data disc.
Name the disc in the Burn a Disc dialog box.
If you need a disc that will play in computers with an older version
of Windows, or in media devices such as CD and DVD players that can
read digital music and video files, click Show formatting options.
Click the Next button.
Your disc will be formatted for burning using the default LFS (Live
File System) format. When finished formatting, an empty disc folder will
open.
Add content. Into the empty disc folder, drag the files you wish to burn.
You can drag the files onto the disc icon, or into the disc folder. The files are copied as you drag them.
Click Burn to Disc.
If you chose the Mastered format option, you will need to burn your
files to disc. From the toolbar, click Burn to disc. When the process is
complete, the drawer will open, and you can use your new CD.
Method Four: Burning a Data CD on a Mac
Determine if you have an optical drive on your Mac.
Many of the new models require an external optical drive connected to
the Lightning port. If you're using a tower, press the CD Open/Close key
on your keyboard (above the Delete key—an upward-pointing arrow with a
thin line below it), and the drive drawer should open up. If you have a
drive, it will be able to burn a CD.
Still not sure? From the Apple menu, choose About This Mac. Click
More Info to open System Profiler, then click on System Report.
Under the Hardware list, click on Disc Burning. If you see a drive
there, and in the CD-Write: row it says -R, -RW, then you can burn CDs.
Create a Data CD.
Place a blank disc on the tray, and close the drive either by pressing
the front face, or by pressing the Open/Close key. If you see a dialog
pop up, choose Open Finder from the pop-up menu, and select "Make this
action the default" if this is how you will usually burn blank CDs.
The disc will appear on your desktop.
Double click the disc icon.
This will open a window that you can drag files and folders into. This
will not remove the files from your computer, but will only copy them
onto the disc.
Organize your files on the CD.
Arrange and rename the files as you want them to appear when you insert
the burned CD. Once the disc is burned, the location and names of the
files cannot be changed.
Burn the disc. From the File menu, select Burn [discname], and then follow the instructions.
The registry on a computer is the area that controls and stores all of
the processing information for the hardware and software stored on the
system. In order to manually access the registry, you need to type the
code "Regedit" into the "Run" option of Windows. Like other areas of the
computer, the registry can become infected with a virus. If this is the
case, you need to remove the virus as quickly as possible before it
damages other content on the system
Click on the "Start" button, followed by "Run." This opens a small menu window.
Type in "Regedit" and click "OK." This opens Microsoft Window's registry.
Open the "HEKY_LOCAL_MACHINE" folder to look for any viruses in the
registry. This is typically where the virus installs itself on the
system.
Select the file once. To see the installation date of the file,
right-click it and select "Preferences." If the file's installation date
seems to match the date when you started experiencing trouble on the
computer, it might be the virus you are looking for. Click "OK" to close
the "Preferences" window.
Click the virus file once and press the "Delete" button. You are asked
if you are sure you want to remove the file. Click "Yes," and the file
is removed.
Microsoft Command Prompt "attrib" is a very useful tool to check if
your hard drives even your flashdisks have been infected by a virus.
You
will know if a Malware is inside your hard drive just by looking at the
attributes of each files and the file that has the attributes of +s +h
+r
The function of attrib is to set and remove file attributes (read-only, archive, system and hidden).
Launch attrib
To start attrib
Go to Start Menu > Run
Type cmd (cmd stands for command prompt)
Press Enter key
The Command Prompt will appear showing us where is our location in the directory.
command prompt showing the current location in the directory
Using attrib
To use attrib
Go to the root directory first by typing cd\(because this is always the target of Malware / Virus)
2. Type attrib and press Enter key
after typing attrib, all the attributes of all the files (excluding folders) will be shown
In this example, I have two files that are considered as malware.
Note that there are two files which I outlined in red (SilentSoftech.exe and autorun.inf). Since you cannot see this file nor delete it (because the attributes that was set on these files are +s +h +r)
+s - meaning it is a system file (which also means that you cannot delete it just by using the delete command)
+h - means it is hidden (so you cannot delete it)
+r - means it is a read only file ( which also means that you cannot delete it just by using the delete command)
Now we need to set the attributes of autorun.inf to -s -h -r (so that we can manually delete it)
Type attrib -s -h -r autorun.inf ( be sure to include -s -h -r because you cannot change the attributes using only -s or -h or -r alone)
Type attrib again to check if your changes have been commited
If the autorun.inf file has no more attributes, you can now delete it by typing del autorun.inf
Since SilentSoftech.exe is a malware you can remove its attributes by doing step 1 and step 3(just change the filename) ex. attrib -s -h -r silentsoftech.exe
a) I typed the attrib command with the -s -h -r setting b) the
result after I pressed enter - autorun.inf has no attributes left
There you have it!!!!
NOTE : when autorun.inf keeps coming back even if you already deleted it, be sure to check your Task Manager by pressing CTRL + ALT + DELETE ( a virus is still running as a process thats why you cannot delete it. KILL the process first by selecting it and clicking End Process. NOTE:
You can also apply the attrib -s -h -r command to all the partition of
your computer, drive D: drive E: drive F: (all of your drives). For
example. for drive D, just type "D:" (minus the double quote) then you can see that your current drive is D.. type there the command "attrib -s -h -r *.exe" for exe files and "attrib -s -h -r *.inf" and then delete the file by "del autorun.inf".
Windows 7 password recovery is a breeze if you share your
computer with an administrative user. You could ask the administrative
user to log on to Windows 7 with his username and password and perform
the following steps:
Open Windows 7 Start Menu, and click Control Panel.
In the Control Panel, click Add or remove user accounts.
Select the account for which you have lost the password.
Click on Remove the password or Change the password; and then you can remove or change the forgotten or lost password.
Method 2: Use Windows 7 Password Reset Disk
The above password remove/change method is the easiest and
quickest way of changing the password that you have forgotten. This
method should work for most users, but in case it doesn't work or you
don't have any other Administrative account on Windows 7 to perform the
remove/change password task, then you can use a password reset disk to
reset your password.
Windows 7 allows you to create a password reset disk that you
can use to reset your forgotten password. However, the preliminary
requirement of using this method is that you must have created a
password reset disk beforehand. If you do not have the disk, you can not
use this method!
However, if you already have a password reset disk, you can follow these simple steps to reset your password:
When you enter a wrong password on Windows 7 logon screen, a
message will appear that "The username or password is incorrect". Click
on the OK button, and you're back to the Windows 7 logon screen.
Plug the password reset disk (USB flash drive) into your computer, and then click on Reset password…
When the Password Reset Wizard opens, click Next.
In the next page, select your disk from the drop-down menu, and click Next.
Now you can enter a new password. This password will replace
the old password, and everything else about your user account will
remain unchanged.
Click Finish to close the Password Reset Wizard.
Method 3: Recover Windows 7 Password with Ophcrack
If you have no other administrative account or a password
reset disk to recover your Windows 7 password, you have an option of
using a third-party password recovery program - Ophcrack, one of the
best free Windows password recovery programs available. It is fast and
easy enough for anyone with a basic knowledge of Windows.
With Ophcrack, you do not need access to your Windows
account to be able to recover the forgotten passwords. You just need to
download the ISO image from Ophcrack's website, burn it to a disc and
boot your system from that disc.
When Ophcrack starts, it gathers information about all
the Windows 7 user accounts, and begins to recover the passwords for
each account, automatically. The software can take from a few seconds to
a few minutes to guess (crack) the password depending on the number of
user accounts and the complexity of the password.
Method 4: Use Windows 7 Installation Disc
If none of the above methods work for you, you can use
your Windows 7 installation CD/DVD to recover your Windows 7 password.
The Windows 7 installation disc can not only install the operating
system on your computer but also restores the system to a previous
state. If you have created a system backup image before you set your
Windows 7 password, the Windows 7 installation disc can help you restore
to a state when no password was set.
To restore your Windows 7 to a previous state with a Windows 7 installation disc, here are the steps you will need to take:
Insert the installation CD/DVD into the optical drive of your computer.
Turn on (or restart) your computer, and boot from the CD/DVD.
When the Windows 7 setup starts, choose your language setting, and click Next.
Click Repair your computer.
Select Restore your computer using a system image that you created earlier.
Click Next.
Now your system will be restored to a previous state, and you
will no longer be asked for a password on Windows logon. However, the
weak point of using this method is that you will also lose your
documents and settings that you created after creating the backup image.
Method 5: Recover Windows 7 Password by Third-party Software
Download the self-extracting Zip file of Reset Windows Password package.
Uncompress the package, there is a ISO image: ResetWindowsPwd.iso. Burn it onto a CD/DVD or USB flash drive.
Boot your locked computer from the newly burned CD/DVD or USB flash drive.
Wait until the boot process is finished. When a window pops up with all your Windows accounts, select the target one and click Reset button to remove the forgotten password.
It is annoying when you lose your password. But, with the
Windows 7 password recovery methods above, you can recover your password
and regain access to your Windows 7 operating system easily.
Method 6: Reset Your Forgotten Password from Safe Mode
Safe Mode is a special way for Windows to load when there is a
system-critical problem that interferes with the normal operation of
Windows. Here, we would like to recommend the way on how to reset the
forgotten password for Win 7 from Safe Mode.
Once you have entered into Safe Mode with , you can reset the forgotten password with the following steps:
Step 1: Log in as Administrator by entering the administrator password in the "Password" field
Step 2: Click the "Start" button, and open "Local Users and Groups" by typing "lusrmgr.msc" in "Search" box
Step 3: On the coming Local Users and Groups Window, click Local Users and Groups ->Users in order.
Step 4: Right-click the account that you need to reset the password for, and then click Set Password
Step 5: Type and confirm the new password
Step 6: Restart your computer and login with the new password
Note: If you take this method in use, the precise is that you have got another available adminstrative account and password already.
If you lost Windows 7 password and still cannot log on your computer
with the above options, you need to have a learn installation on your
computer. It is the last choice for most PC users as it may overwrite
much of the information on your computer. Just insert the Windows 7 boot
disk into your computer's CD-ROM drive and restart it. Once the
computer is running, follow the onscreen instructions to boot from disk
and to reinstall Windows 7.
Windows 8 is rife with features and behaviors that conspire to perplex
even the most experienced PC users. Not all of them are bad, per se, but
few of them are immediately intuitive. Making matters worse, the OS was
primarily designed for touch control, and as a result, many mouse and
keyboard commands feel like tacked-on afterthoughts.
But help is on the way.
We've assembled a list of our favorite Windows 8 shortcuts, tricks, and
workarounds. Many focus on making the most of the OS on a traditional
desktop PC, so if you're interested in touch gestures, please check out our article
that focuses directly on the Windows 8 touch experience. Now let's
start our journey of discovery with a look at easy-to-use (though often
tough to remember!) Windows 8 hotkey commands.
Employ the hottest hotkeys we know
In these key combinations, hold down the Windows key (normally located
between Alt and Ctrl) and another key, as described on this list.
Press the Windows key to enter the tiled Start screen.
The Windows key + M minimizes everything that's showing on the desktop.
The Windows key + E opens Explorer for quick access to folders.
On the Start screen, press the Windows key + D to instantly get to the desktop.
The Windows key + Tab opens a list of currently running programs.
The Windows key + Print Screen takes a screenshot and saves it in a Screenshots folder nested in your Pictures folder.
To take a screenshot on a Windows 8 tablet, simultaneously press the Windows button and the volume-down button on the tablet chassis.
The Windows key + Q opens a global search menu. Type what you're looking for and where you would like to look.
The Windows key + W opens a search in your system settings to quickly locate and change system properties.
The Windows key + F opens a file and folder search.
The Windows key + Pause opens the system properties page to show you a quick rundown of your specs.
The Windows key + "," (that's the comma sign!) makes all current
windows transparent, giving you a peek at the desktop as long as you
hold down the Windows key.
The Windows key + "." (the period) snaps a window to the right or left side (toggling each time you press ".").
The Windows key + R prompts the Run command—useful for quickly launching apps and other routines with a command prompt.
The Windows key + X opens the Quick Access Menu, exposing system
functionality such as the Command Prompt, Disk Management, File
Explorer, Run, and more. Alternatively, you can right-click on the
bottom right corner of the screen to spawn the Quick Access Menu.
The Windows key + I opens the settings menu, giving you quick access
to the Control Panel, Personalization, and your Power button, among
other features.
The Windows key + O locks orientation on devices with an accelerometer.
Zoom in tight
See all your tiles and groups at once with semantic zoom.
The Start Screen is full of nice, big, chunky tiles that represent all
your apps. The tiles are easy to see in small groups, but what if you
have hundreds of apps installed? Most will be hidden from view, unless
you want to do a lot of scrolling. Enter the new semantic zoom feature.
If you’re using a touch display, squeeze the Start screen with two
fingers to receive a bird’s eye view of your entire screen contents. And
the feature is also available to mouse and keyboard users: Simply hold
down the Ctrl button, and use your mouse wheel to zoom in and out.
Categorize your apps
Start screen customization for the organized.
Your Start screen can become a cluttered mess if you collect too many
apps and other elements that have been pinned to the screen as tiles, so
take advantage of built-in organization tools that let you divide
everything into labeled groups.
First, drag all the tiles you want to assign to a single group to the
far right-hand side of your Start screen in vacant territory; the OS
should sequester the tiles together. Once you're satisfied with your
assembly, use semantic zoom (described above) to get a bird's eye view
of your desktop. Now right-click the group (or simply drag down on it),
and select the "Name group" option on the left of the bar that appears
below. Type in the name, and enjoy your newly organized Start screen!
Close an application
Closing an app sounds simple enough, but you'll quickly notice
that close buttons are hard to find in Windows 8. That's because
Microsoft encourages us to run apps in the background where they'll take
up minimal resources, but still be accessible at any time.
Nonetheless, if you insist on being rebellious, you can close an app by
dragging it with your mouse or finger from the top of the screen all the
way down to the bottom. As you drag, the app will miminize into a
thumbnail, and when you reach the bottom, it will disappear from
view. Alternatively, you can still close apps via Alt + F4 and through
the Task Manager.
Use centralized, contextual search
Search for anything in any app from one place.
The Search function located on the Charms bar is packed with power,
letting you search the directories of not only your Windows 8 machine,
but also the greater Windows ecosystem. Simply choose the bucket of data
you want to sift through—it could be all your installed apps, your
system settings, your files, your mail messages, or even an external
service like the Windows Store or Bing Maps—type in a keyword, and hit
Enter. The Search function will then return the results, perfectly
contextualized for the database you’ve addressed
Oh, and how's this for cool? You don't even need to hit the Charms bar
to access Search. From the Start screen, simply start typing, and you'll
be quickly whisked to the text-entry field for search queries. Try it.
It works!
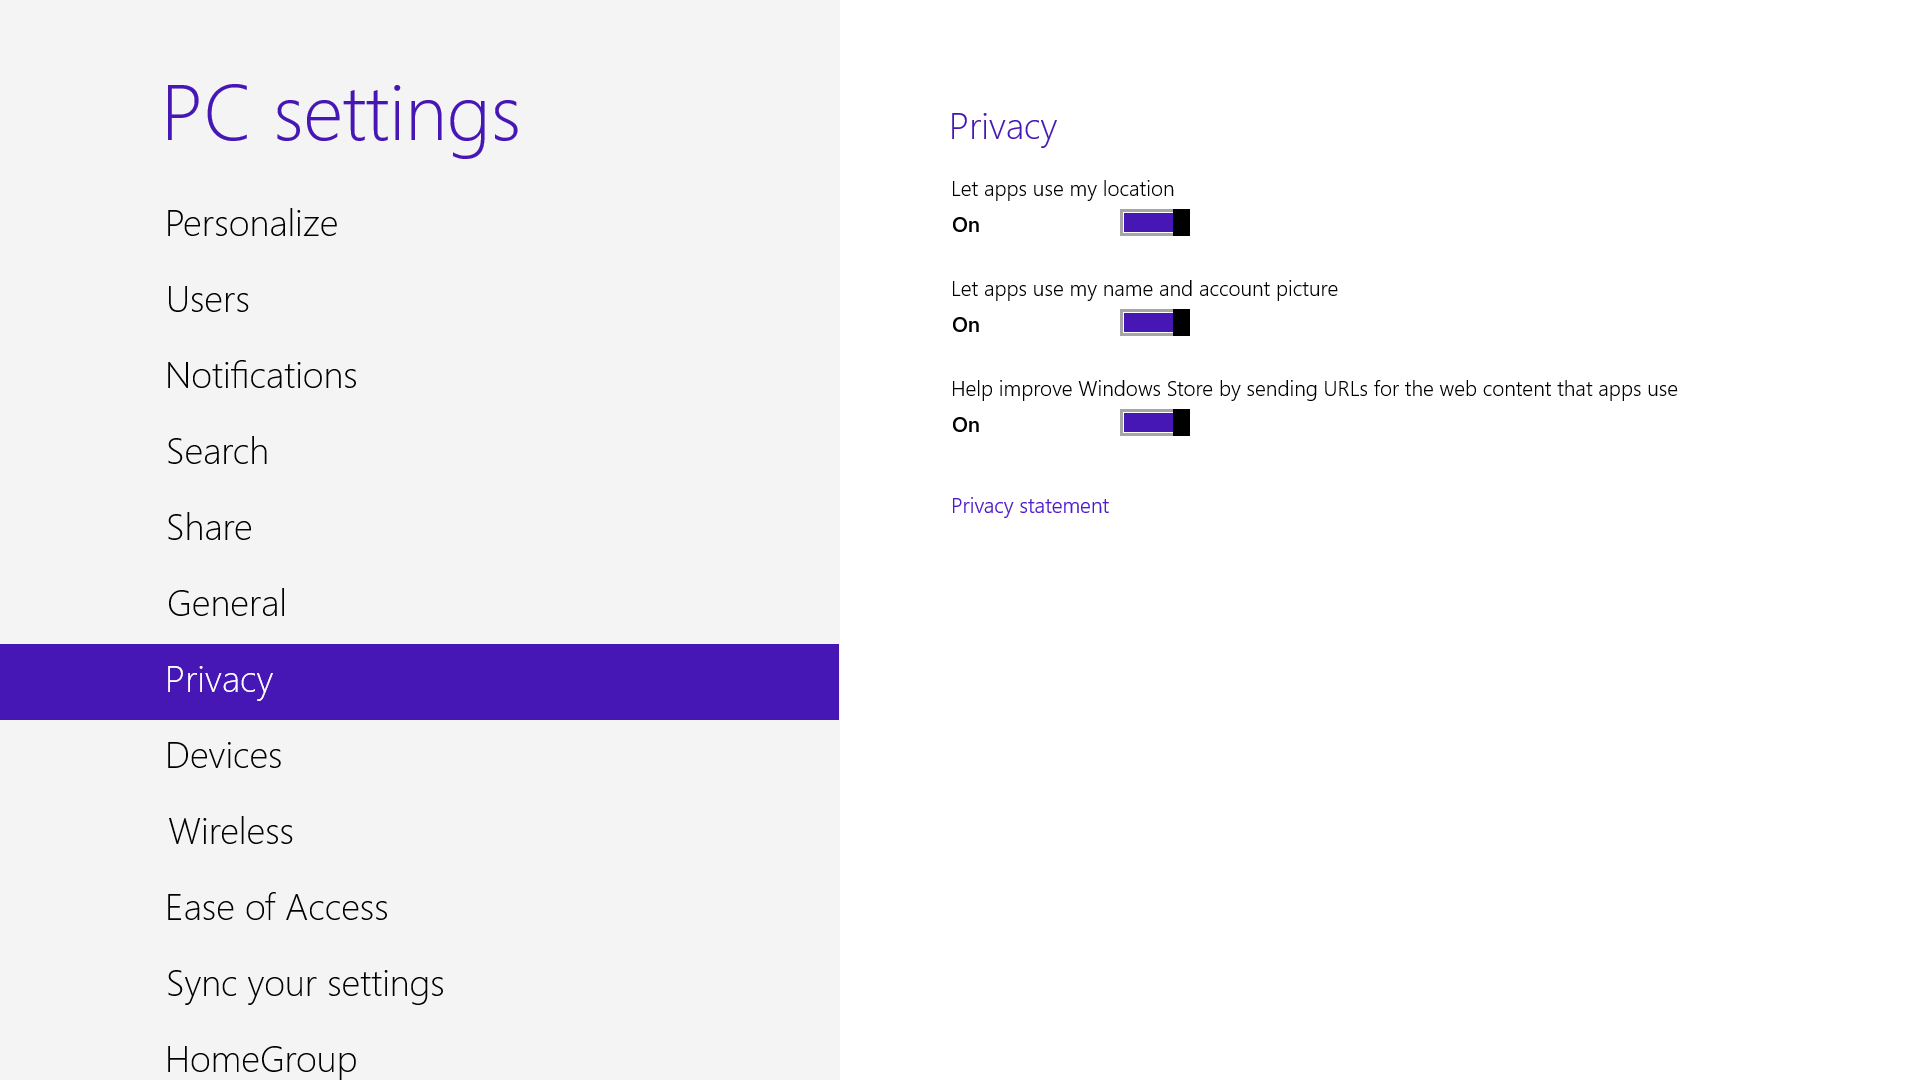
Adjust privacy settings
Customize your privacy settings to your liking.
A lot of apps tap into very personal information by default. Indeed,
your pictures, location, and name are liberally woven throughout the
system, and like many users you may not be comfortable trusting your
machine with that much sensitive data. To adjust the settings, press the
Windows key + I, and go to Change PC Settings. Select the Privacy
option, and personalize the settings for your personal data there.
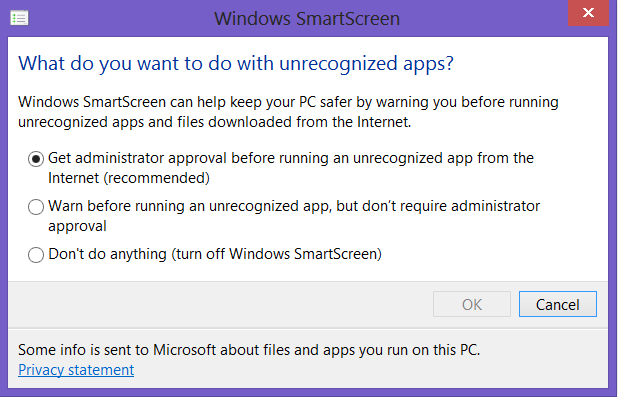
Adjust SmartScreen settings
Choose your own level of safety with SmartScreen.
SmartScreen warns you before running an unrecognized app or file from
the Internet. While it's helpful to be aware of a file's source,
constant warnings can also get a little annoying. By default, you need
an administrator's permission, but this can easily be adjusted to just a
warning or no indication at all. Using the magic search function
described above, type "security" at the Start screen and find the "Check
security status" in the Settings tab. From this area, you can adjust
various security settings, including the Windows SmartScreen.
Bring up the Quick Access Menu
The secret Start button for power users is hidden at the bottom-left.
Right-clicking on the lower left of the screen—whether you’re in the
Windows 8 Start screen or in the desktop—will bring up the Quick Access
Menu, which enables a direct line to many key system management chores,
including Disk Management, Task Manager, Device Manager, and Control
Panel.
Use Windows 8 apps and your desktop simultaneously
Because the Windows 8 experience is split between new Windows 8 Store
apps and old-school desktop apps, the operating system is prone to some
strange behaviors. Case in point: When running a multimonitor setup,
Windows 8 apps will consume your main screen, leaving your secondary
screen running the desktop. This arrangement would seem to
allow full-screen multitasking among both types of apps—a modern app on
the left side, a desktop app on the right side—but this isn’t the case.
Indeed, as soon as you begin using the desktop on your secondary screen,
the new-style Windows 8 app disappears, and your primary screen begins
running the desktop.
But here’s a workaround. On your primary screen, use the new Windows 8
split-screen “snapping” function to run the desktop and a new Windows 8
Store app together. The desktop can take up the left-hand sliver, while
the Windows 8 app consumes the majority of the screen. Now use your second
display for a full desktop view. In this arrangement, you can fully
multitask between new-style apps and desktop apps, and both windows will
be large enough to be useful.
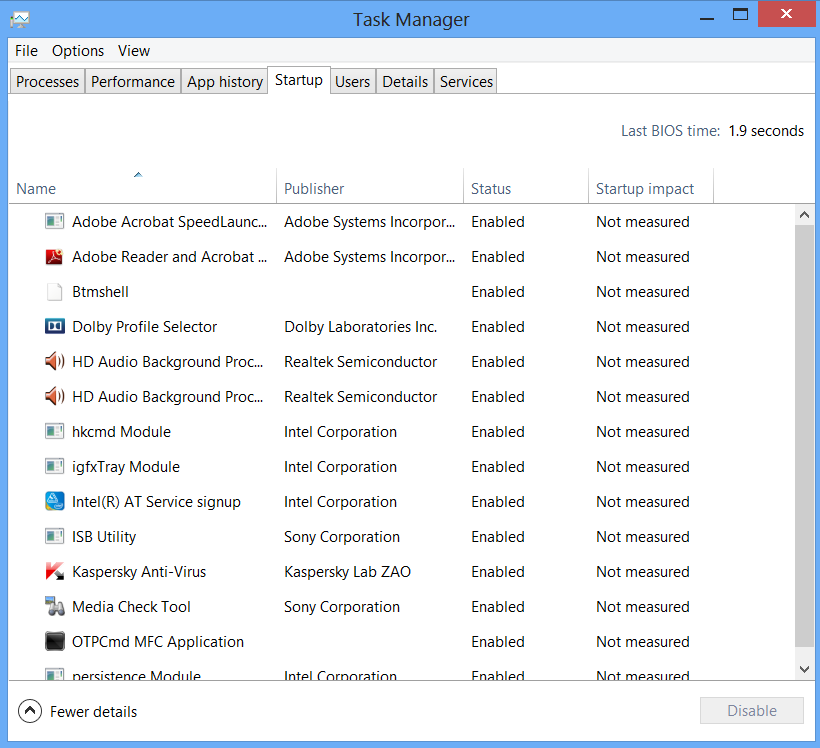
Go to Task Manager for Startup items
Task manager is more useful than ever.
You no longer have to run the MSConfig program to change startup items.
Startup items now show up in a tab on Task Manager. Simply press Ctrl +
Alt + Del and select Task Manager. Click the "More details" tab at the
bottom and find the Startup tab at the top.
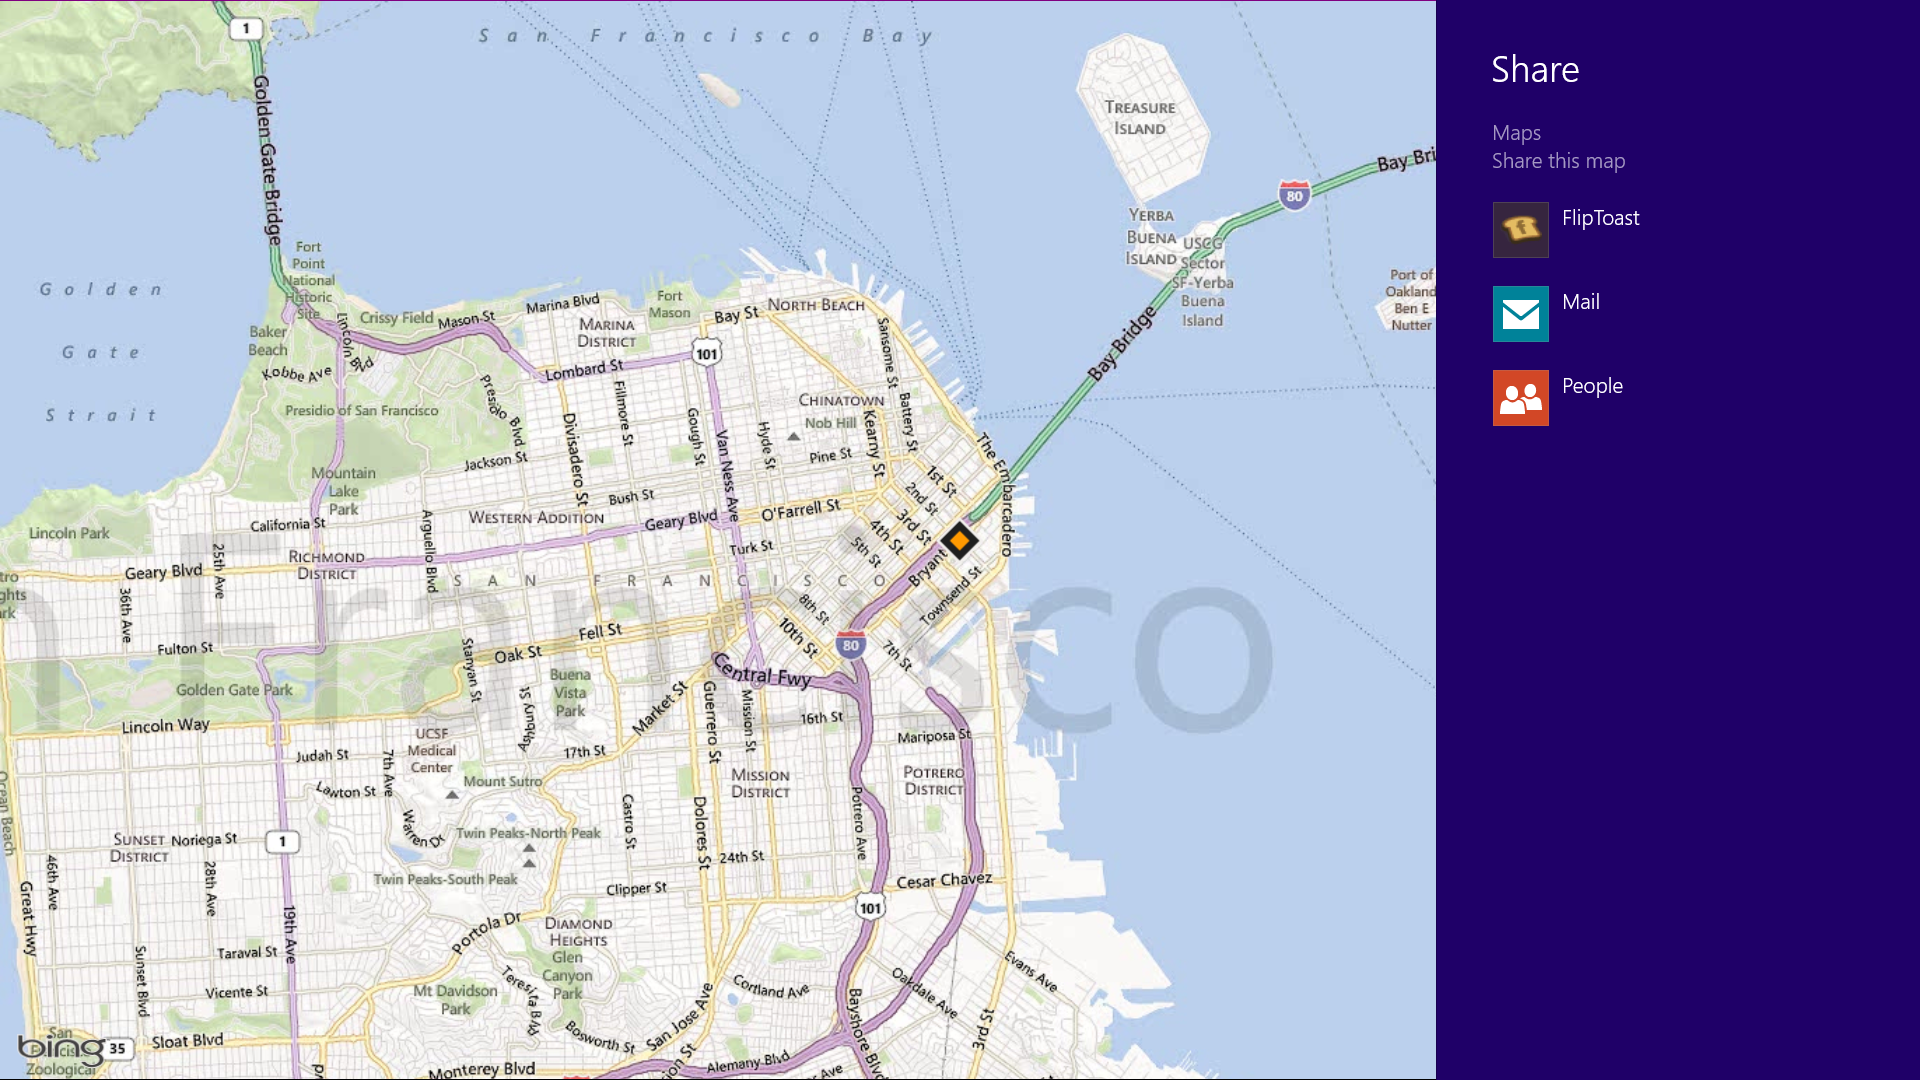
Share and share alike
Play with the Share charm in every app.
Windows 8 is Microsoft’s first social-media-aware PC operating system.
Using the Share button located on the Charms bar, you can pick any
number of elements from your Windows 8 Store apps—say, a location from
your Maps app, a news story from the Finance app, or a even a contact
from your People app—and then distribute that item to friends via other
Windows 8 programs.
Perhaps most conveniently, you can quickly share a photo via email or
Twitter, or to your own SkyDrive or Windows Phone. The Share button is
contextual, and the more you use it, the more you’ll discover which apps
share with each other, and which don’t. (Hint: None of your desktop
apps offer sharing opportunities through the Charms menu.)
Create a picture password
A fun way to protect your system.
Using a picture password is a fun way keep your device secure while not
having to remember a complex password. To enable it, press the Windows
key + I to get to the settings charm. Click "Change PC settings" at the
bottom right, and go to the Users tab. Under "Sign-in options" will be
the "Create a picture password" button. This will give you the option to
choose any picture, and then define three gestures anywhere on the
image. Your gestures can be circles, swipes and clicks.
For example, to set a picture password for the image above, you could
click on the highest palm tree, draw a circle around the island, and
then swipe down from the lens flare in the upper right. Just beware: The
direction of each gesture matters! After confirming it a couple times,
your picture password will be set.
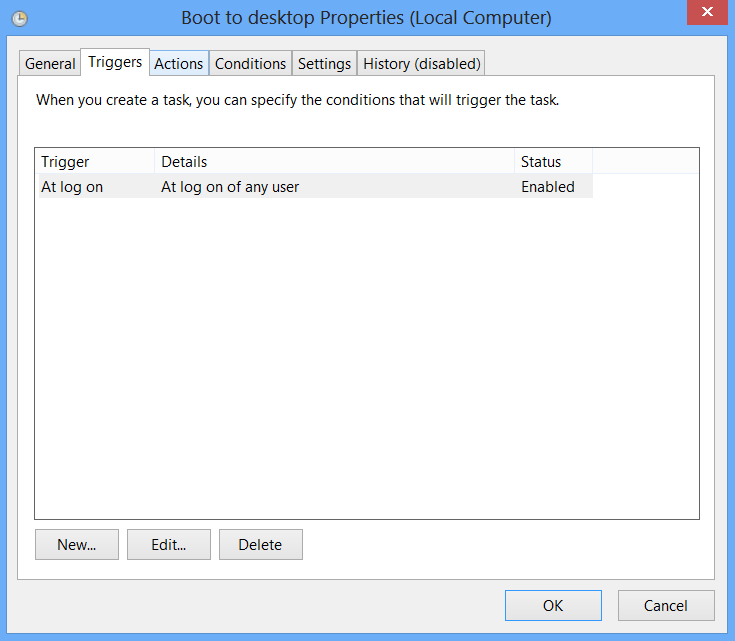
Boot to the desktop without an app
Skip the Start screen and get right to the Desktop.
One of biggest complaints about Windows 8 is that it boots straight to
the Start screen—an annoyance for many committed desktop users. The Start8 utility
helps you avoid this indignity (among other cool features), but you can
actually boot straight to the desktop without installing anything
extra.
Go to the start screen and type in "schedule" to search for Schedule Task in Settings. Click on Task Scheduler Library to the left, and select Create Task. Name your task something like "Boot to desktop." Now select the Triggers tab, choose New, and use the drop-down box to select starting the task "At log on." Click OK and go to the Actions tab, choose New, and enter "explorer" for the Program/Script value.
Press OK, save the task, and restart to test it out!
Log in without a username or password
To speed up the log-in process, you may want to disable the username and
password log-in screen. You can do so by opening the Run window (press
the Windows key + R) and typing in "netplwiz" to access the User
Accounts dialog box. Uncheck the box near the top that says "Users must
enter a user name and password to use this computer." Click OK, and enter the username and password one last time to confirm your choice, and you are all set for easy access to your system.
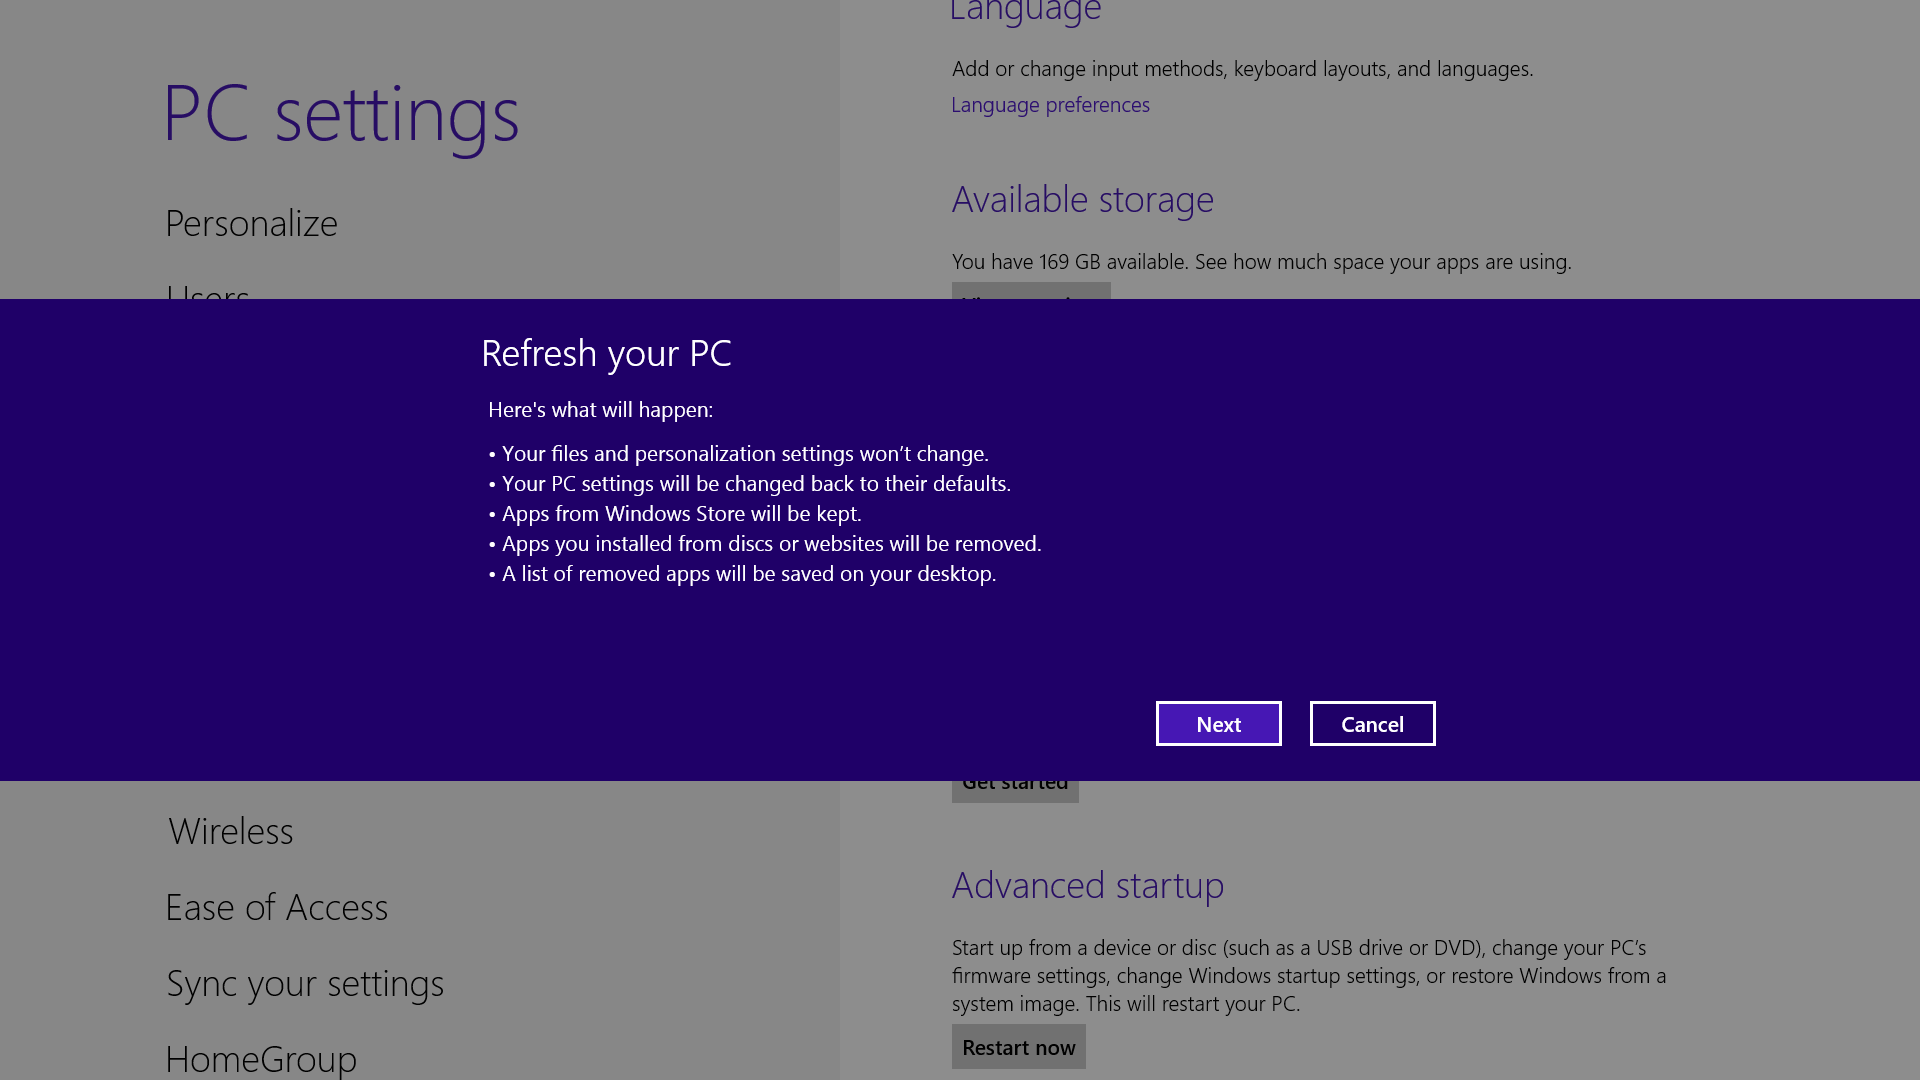
Refresh your PC
Enjoy a fresh PC without losing everything.
If your system is feeling a little sluggish, it may be time for a
refresh. In the past we would have to find our copy of Windows 7, back
up all of our data, and perform a fresh install to enjoy that
back-to-factory-fresh feeling. But now Windows 8 allows you to perform a
fresh install from within Windows without losing any data.
In order to perform the refresh, go to Settings and click the Change PC Settings tab near the bottom. Select the General
tab and find the "Refresh your PC without affecting your files" section
near the middle (you may also select "Remove everything and reinstall
Windows" to get the true factory settings treatment). Select "Get
started" and press "Refresh." After a few minutes the PC will restart,
and you will have a fresh copy of Windows 8.
Start in Safe Mode
Safe Mode is a great way to get into your system when something won't
allow you to start up normally. Troubleshooting becomes a breeze when
corrupted drivers and files aren't loaded that prevents a system from
functioning. It used to be as easy as pressing F8 when the system starts
up, but doing so with Windows 8 will take you to Automatic Repair Mode.
The trick to getting back to good old fashioned Safe Mode? Hold down
the Shift key and press F8 while booting up.
This takes you to the Recovery mode. Select "advanced options," then
"troubleshoot," then the "advanced options" again (there are a lot of
advanced options). Select Windows Startup Settings and finally the Restart button. This will reboot the computer and give you the option to boot into Safe Mode.
If you need to get into Safe Mode from within Windows, open the dialog box (the Windows key + R) and type "msconfig" (no quote marks). Select the Boot tab and check the Safe boot box. The system will continually boot into Safe Mode until you go back and uncheck the box.
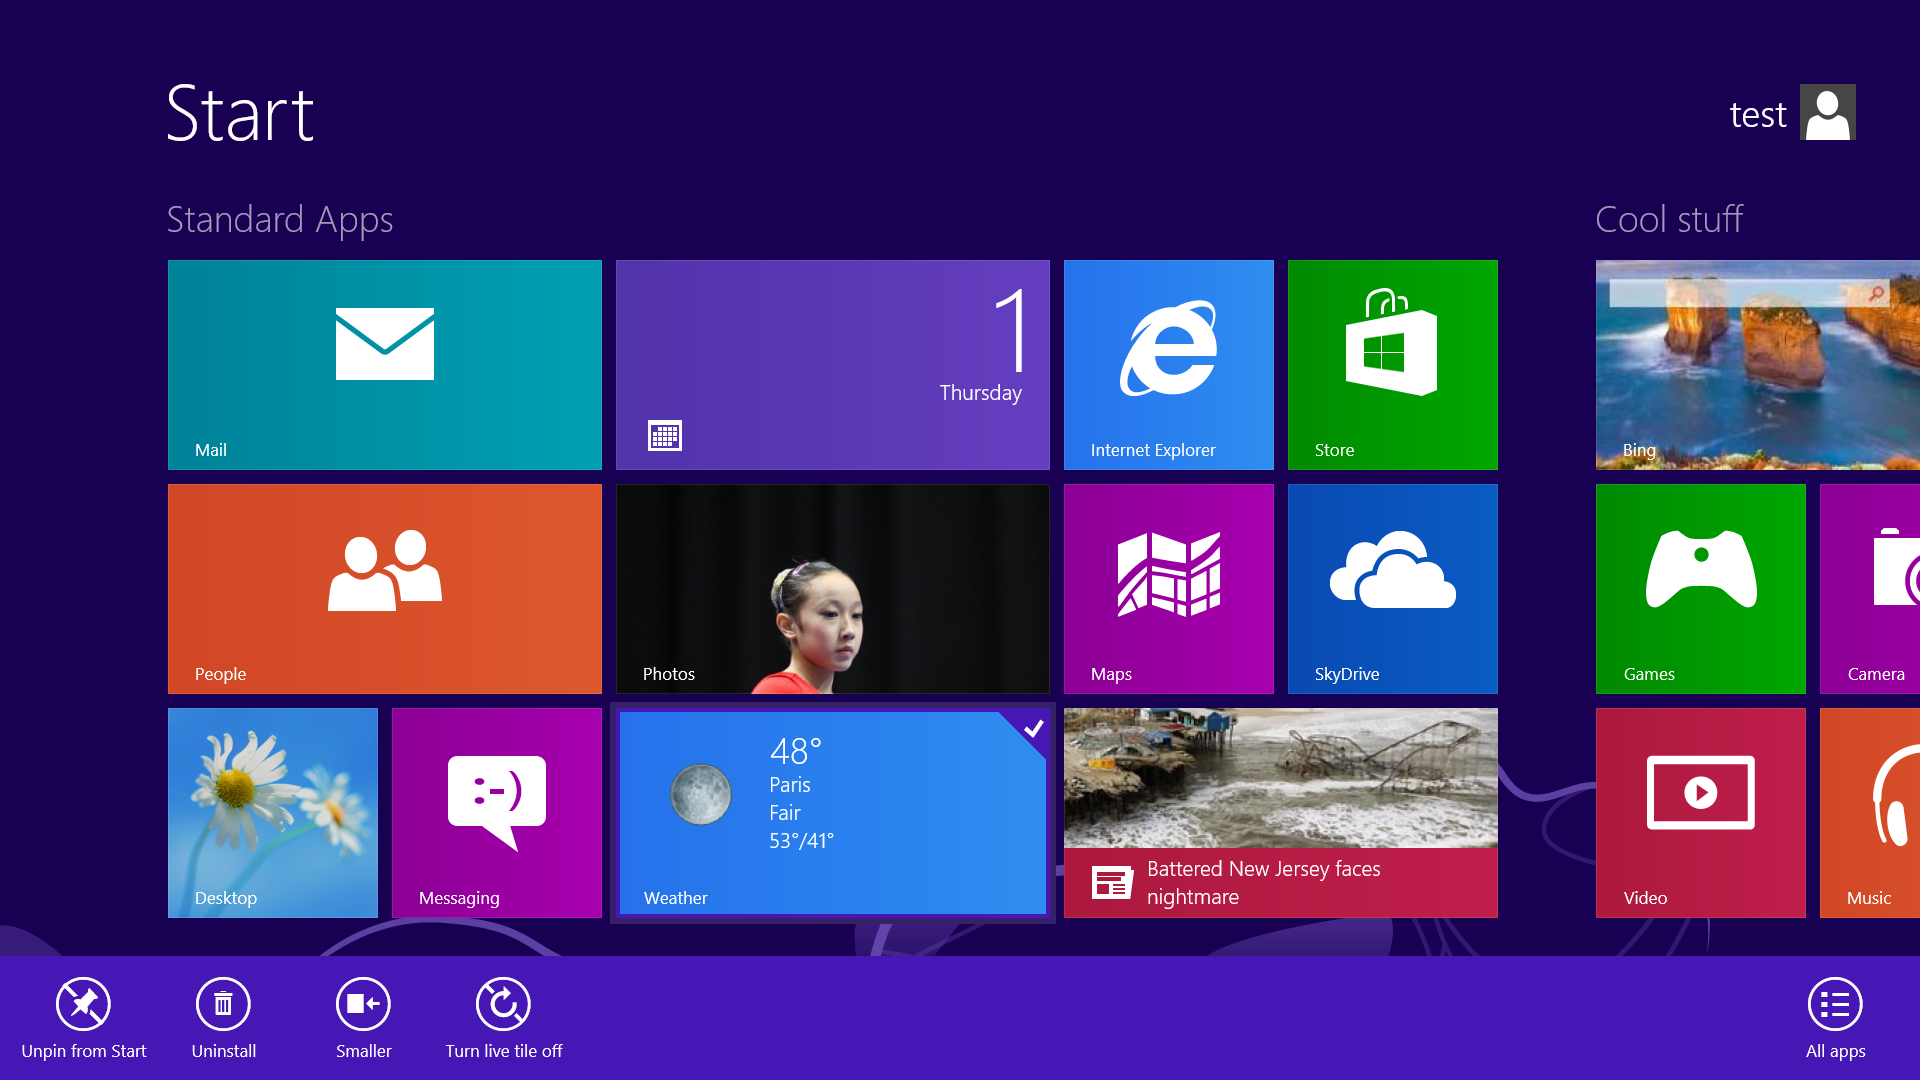
Turn Live Tiles on and off
Use the Live tile option to customize what you want to see.
When looking at the plethora of tiles on your Start screen, the view can
get stagnant, despite all the pretty colors.This is where Live Tiles
come in. They offer real-time data right on your Start screen, and you
don't need to open any apps. For example, the Weather tile will show you
the current conditions, and Mail will show you the subject of the
latest message you've received.
You can customize which apps are live and which aren't by right-clicking
on the tiles. A settings bar on the bottom will pop up with an option
to turn the Live Tile on or off. Simply select the preferred option, and
you're all set. Note, however, that not all apps have a live, real-time
data-streaming option.
Find the Windows games folder
Currently, the games folder used in Windows 7 isn’t present in Windows
8. Fear not; if you install any current-generation PC game that would
regularly save to this folder, the folder is automatically created. For a
quick way to find it, right-click on the game icon on the Start screen
and choose “Open file location” at the bottom.
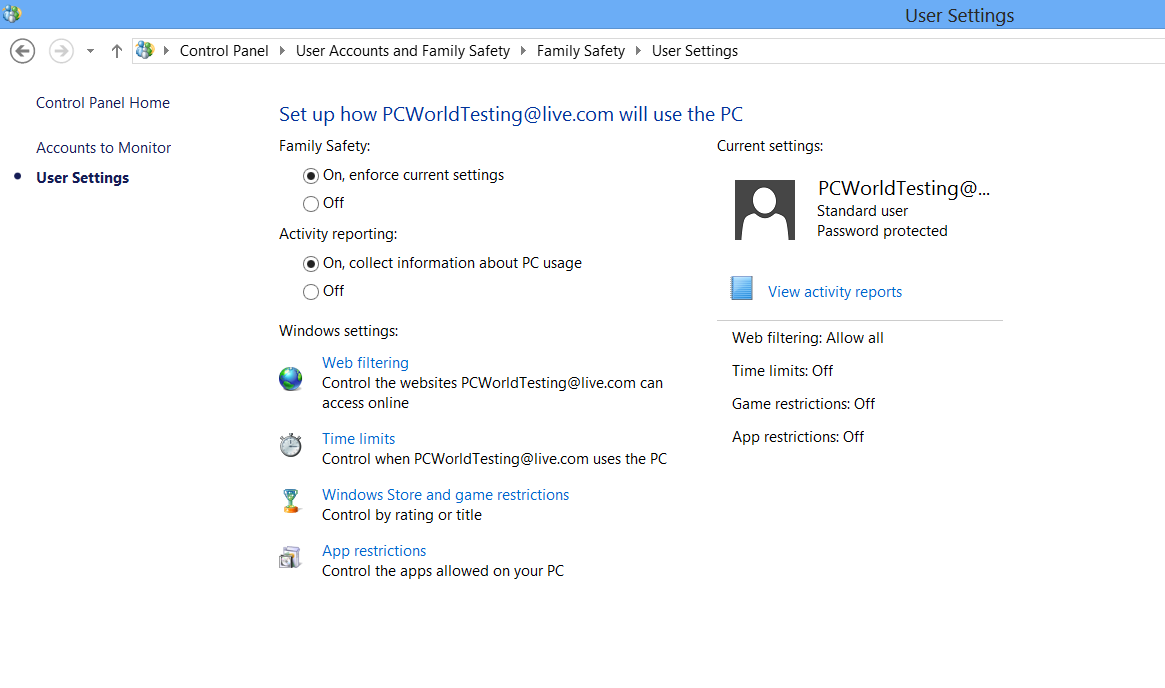
Activate Family Safety
Let your kids play without having to worry.Want
to avoid some nasty surprises on your credit card? Create a separate,
standard account on the device for your kids (Family Safety can't be
applied to an administrator account). You can activate Family Safety by
going to the Control Panel, User Accounts, and Family Safety,
and selecting the account you would like to apply it to. From these
settings you can get reports on the account's activity; set a level of
Web filtering; set time limits; and enforce Windows Store, game, and app
restrictions.
Shut down with one click
Easy to create button to shut down.
Windows 8 hides the Power button in the Settings menu, forcing a
multistep process just to shut down one's PC. But thanks to a crafty
shortcut trick, you can pin a Shutdown button right onto the bottom of
your desktop. Here's how.
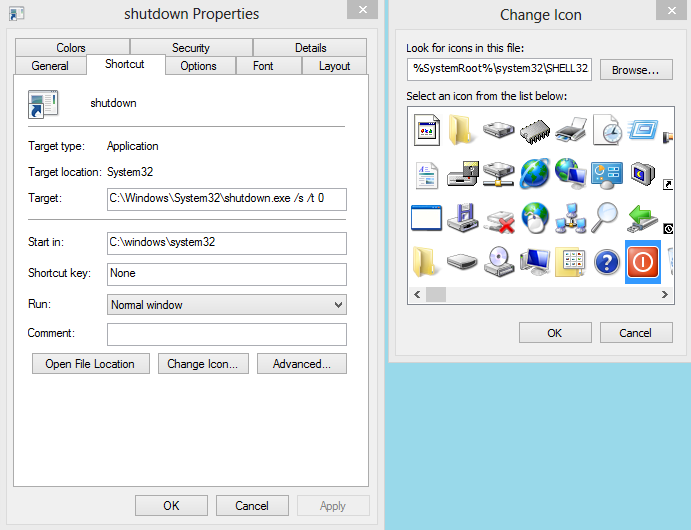
Create a shortcut on your desktop (right-click, go to New, then Shortcut). Enter "shutdown /s /t 0" (with no quotes, and, yes, that's a zero not an "O") as the location of the item, and press Next. Now name the shortcut (prefereably "Shutdown") and press Finish.
Right-click the shortcut, and navigate to Properties. Choose Change Icon in the Shortcut tab, and then OK
to leave the warning box. Choose an icon of your choice from the list.
In the screenshot above, you'll see we chose a Power button.
Right-click the shortcut again, and select Pin to Start. You can place the icon on your Start screen wherever it's convenient. Clicking it will instantly shut down your computer.
Every time you format and reinstall your PC, you have to activate
Windows again, which can sometimes be a pain once you’ve done it too
many times. Here’s how to backup and then restore the activation status. Note: we aren’t going to cover how to reinstall Windows,
since you should know how to do that already. This article just covers
backing up and restoring your activation.
Introduction
Advanced Token Manager easily allows you to back up all the
information that Windows uses to check the validity of you copy of
Windows. Collectively called a Token, this information can be backed up
to an external storage medium. Once you have formatted you can import
the Token and your Windows will be genuine again.
Backing Up
Once you have grabbed your copy of Advanced Token Manager from here, you can extract the zip file and then run the executable file.
When the advanced token manager launches, you will see the BIG Backup
Activation button. Click it to begin backing up your token. All the
“BBB” characters are just masking the real product key, don’t worry that
is not your real product key.
Once you click the Backup Activation button, we expect that 99% of
you will be prompted with this message. Unless some of you are ultra
geeky and using KMS at home, you will get this message. You can just
click yes to continue.
Once activation is finished being backed up, you will see a folder
called “Windows Activation Backup” in the same folder that you launched
the token manager from, this contains the backup.
Now we have reloaded Windows on the same PC, as you can see it is not activated.
Now I can run the advanced token manager, this time it will say Restore instead of Backup.
Once you click Restore you will be prompted to make sure you want to do this, click the next button to start the restoration.
Once it has completed a success message will appear.
If you go check your validity in the System Settings, you should have the genuine badge back.
The advanced token manager can also support Office Activation and works on all versions of Windows 7.
BIOS is an abbreviation of the phrase (basic input output system)
when you boot your computer The BIOS starts to engage what’s called
“Post” where it starts examines each computer components and if it
happens that BIOS found some it alerts you depending on the severity of
this error like
shutting the computer down
or releasing the sounds of rings
Also Each Brand have it’s own signal meaning and to check it you can by the company’s official website .
For more Information about Bios and how it works : BIOS
Usually updating a program or operating is important and useful . But
when it comes to BIOS it may not make your computer faster but Actually
sometimes it can get you some new errors and bugs .
so we conclude that we should update BIOS only when needed .
When The BIOS should be updated and when should not !
When we should not update the BIOS
The BIOS is not some sort of a huge program that comes with his
updates some new features or fix some Bugs . The Case of updating The
BIOS comes only when you want to put some new some new device and your
motherboard doesn’t support
Updating your BIOS is not easy as you thing because
you’ll need to work in the Dos environment
you’ll need a 100% exact match for your computer and his component
you must make sure that you won’t have a Separation of electricity
otherwise you’re computer will be ‘ bricked ‘ and you might need a new
motherboard
Note: there is some Brands that have the ability to store a backup before you update BIOS
When You should do an update For BIOS
Despite the many dangers of updating BIOS, this update can be done in only two situations:
In case you are experiencing errors in your system, the BIOS update
may help you remove them by finding version compatible with the
components of your computer.
Most of the Old motherboards doesn’t support some of the news
devices .for example you have a motherboard that produced in the year
2008 and you want to mount A processor Core I3 the motherboard won”t
recognize it until you update BIOS
Windows 8 is finally here, and if you're used to previous versions of
Windows then you're going to notice that quite a bit has changed. In
fact, Windows has seen the biggest changes since the jump from Windows
3.1 to Windows 95.
Out goes the Start menu, in comes the new
touch-oriented Start screen, new apps, new interface conventions - even
experienced PC users may be left feeling a little lost.
Don't
despair, though, help is at hand with the following Windows 8 tutorial.
We've been investigating every part of Windows 8, uncovering many of its
most important tips and tricks, so read our guide and you'll soon be
equipped to get the most out of Microsoft's latest release.
1. Lock screen
Windows 8 opens on its lock screen, which looks pretty but unfortunately displays no clues about what to do next.
It's
all very straightforward, though. Just tap the space bar, spin the
mouse wheel or swipe upwards on a touch screen to reveal a regular login
screen with the user name you created during installation. Enter your
password to begin.
2. Basic navigation
Windows 8 launches with its new
interface, all colourful tiles and touch-friendly apps. And if you're
using a tablet then it'll all be very straightforward: just swipe left
or right to scroll the screen, and tap any tile of interest.
On a regular desktop, though, you might alternatively spin the mouse wheel to scroll backwards and forwards.
And
you can also use the keyboard. Press the Home or End keys to jump from
one end of your Start screen to the other, for instance, then use the
cursor keys to select a particular tile, tapping Enter to select it.
Press the Windows key to return to the Start screen; right-click (or
swipe down on) apps you don't need and select Unpin to remove them; and
drag and drop the other tiles around to organise them as you like.
3. App groups
The
Start screen apps are initially displayed in a fairly random order, but
if you'd prefer a more organised life then it's easy to sort them into
custom groups.
You might drag People, Mail, Messaging and Calendar
over to the left-hand side, for instance, to form a separate 'People'
group. Click the 'minus' icon in the bottom right corner of the screen
to zoom out and you'll now find you can drag and drop the new group (or
any of the others) around as a block.
Right-click within the block
(while still zoomed out) and you'll also be able to give the group a
name, which - if you go on to add another 20 or 30 apps to your Start
screen - will make it much easier to find the tools you need.
4. Quick access menu
Right-click
in the bottom left corner (or hold down the Windows key and press X)
for a text-based menu that provides easy access to lots of useful
applets and features: Device Manager, Control Panel, Explorer, the
Search dialog and more.
5. Find your applications
The
Win+X menu is useful, but no substitute for the old Start menu as it
doesn't provide access to your applications. To find this, hold down the
Windows key and press Q or either right-click an empty part of the
Start screen or swipe your finger up from the bottom of the screen and
select 'All Apps' to reveal a scrolling list of all your installed
applications. Browse the various tiles to find what you need and click
the relevant app to launch it.
6. Easy access
Get more
If
there's an application you use all the time then you don't have to
access it via the search system. Pin it to the Start screen and it'll be
available at a click.
Start by typing part of the name of your
application. To access Control Panel, for instance, type 'Control'.
Right-click the 'Control Panel' tile on the Apps Search screen, and
click 'Pin to Start'. If you're using a touchscreen, press and hold the
icon, then flick down and select 'Pin to Start'.
Now press the
Windows key, scroll to the right and you'll see the Control Panel tile
at the far end. Drag and drop this over to the left somewhere if you'd
like it more easily accessible, then click the tile to open the desktop
along with the Control Panel window, and press the Windows key to return
you to the Start screen when you're done.
7. Shutting down
To
shut Windows 8 down, just move the mouse cursor to the bottom right
corner of the screen, click the Settings icon - or just hold down the
Windows key and press I - and you'll see a power button. Click this and
choose 'Shut Down' or 'Restart'.
Some of the tricks available in
previous versions of Windows still apply. Press Ctrl+Alt+Del, for
instance, click the power button in the bottom right-hand corner and
you'll be presented with the same 'Shut Down' and 'Restart' options.
And
if you're on the desktop, press Alt+F4 and you'll be able to choose
'Shut Down', 'Restart', 'Sign Out' or 'Switch User' options.
You can install the Windows 8 Consumer Preview on a USB flash drive and run it from there.
The performance of the system when booted from an USB attached device depends on the performance of USB port.
This post gives step-by-step instruction on how to setup Windows 8 Consumer Preview on a USB drive.
Since we are going to do low level system stuff you should
make sure that you have a current backup of the PC you are working on.
Preparing the USB drive
Connect the USB device to your PC
Open cmd.exe in administrator mode
Create the boot partition on the USB drive:
Go to folder c:\windows\system32
Run diskpart
Get the USB drive’s disk number: list disk
Select the USB drive as active drive: select disk <disk number>
Purge existing partions from the drive: clean
Create a new primary partition: create partition primary
Quick-format as bootable NTFS: format fs=ntfs quick
Set partition as active: active
Close diskpart: exit
Extract the image file for Windows 8 Consumer Preview from the ISO file
Mount the ISO file
If you are running Windows 8 you can mount it as virtual disk.
On Windows 7 you need the help of a third-party utility like MagicISO or you could burn the ISO on a disk.
Copy the image file
The image file image.wim can be found in the sources folder of the ISO image.
Create a new folder on your local hard drive (e.g. c:\ win8onusb) and copy the image.wim file to that folder.
Installing the image on the USB drive
Install the AIK
Get imagex.exe from the AIK
In C:\Program Files\Windows AIK\Tools you find three versions. Select the one that matches the architecture of the Windows image you plan to install.
E.g. when you want to install a 32-bit Windows 8 version get the version from x86 folder.
Copy imagex.exe to the folder (e.g. c:\win8onusb) which already has the image.wim file.
Install the image
Check which drive letter is assigned to the USB drive (e.g. g:).
On the command prompt cd to the folder containing the image.wim file (e.g. c:\win8onusb)
Run the following command to install the image: imagex.exe /apply install.wim 1 g:\ (replace g with the drive letter of your USB drive)
This will take some time…
Add the boot record
At the command prompt enter: bcdboot.exe g:\windows /s g: (replace g with the drive letter of your USB drive)
That’s it.
First boot
Make sure that your PC’s BIOS is setup to boot from USB.
In addition you might have to tweak the order of the hard disks listed in the BIOS, if the USB device is listed there.
During the first startup the PC hardware will be detected.
This might take some time. It will then reboot and present the screen requesting the product key.
In some computing situations, you might need to create a WiFi hotspot
quickly so other wireless devices can use an Internet connection. Today
we take a look at Connectify which easily turns your Windows 7 machine
into an instant WiFi hotspot.
You might be at a location where there is only one Ethernet connection available (hotel room, office or meeting room etc.)
and you need to share the Internet connection with other people or
devices. Connectify is a free utility which is light on system resources
and makes it easy for you to set up your Windows 7 machine as a secure
WiFi hotspot. Note: Connectify only works with Windows 7 Home and above, Starter is not supported. Connectify
Installation is quick and easy, and once complete, you can access Connectify from the icon in the Taskbar.
Under settings, type in a name for the WiFi network, a password to
access it, then decide the type of internet connection you want to
share. It allows LAN, VirtualBox Host-Only, Wireless Network Connection,
and no Internet sharing. When you’re ready, click on the Start Hotspot button.
Now you’ll see it running and can begin connecting your other wireless computers and/or devices.
Now that Connectify is running on the Windows 7 laptop, In this
example we go over to an XP laptop and connect it. Open up Wireless
Networks and you’ll see the new hotspot we just created that you can
connect to.
You’ll be prompted to enter in the Network Key (password) you set in Connectify twice, then click on Connect.
Wait for a moment while a network address is acquired…
Here you can see the XP machine is connected to the Geek-fi network we created on the Windows 7 machine.
When you go back to the Windows 7 machine you can see the device(s)
connected. It also keeps track of devices that were previously connected
as well.
Right click on the Connectify icon in the tray to get different options for running it.
In our tests, the signal strength and connection speed was adequate,
but may be a bit slower than your used to. Results will vary based on
the type of hardware you have sending and receiving the signal. Overall
though, if you need to create a Hotspot in a pinch, Connectify is more
than capable. If you’re looking for an easy way to share your Windows 7
wireless connection with other devices, and want it to be secure,
Connectify get’s the job done. Download Connectify


 11:10 AM

 Posted in:


![sshot-2010-01-31-[21-54-44]](https://lh3.googleusercontent.com/blogger_img_proxy/AEn0k_vOJHUeUc_oQBE2l4aueDbEZTOz8MRP7AmL-RTWTKj3Qv-mLFCms23dWlqREbErTjgWi6RjlCAcYFxyAEPwFje-8K7N8nzkV9HdVNDGNgEs4VGnsvaEm_ufICePIgEypiZzp0rGGckfpkQ9iIooGw=s0-d "sshot-2010-01-31-[21-54-44]")
![sshot-2010-01-31-[00-21-21]](https://lh3.googleusercontent.com/blogger_img_proxy/AEn0k_t5fMYZ95lxly3d8i1yQ6fypotmk_r77UDxgsp0R6_Mm-k0bGcs63gNQOsLceGqAThrWx6EoOvOwJ7EKHB3Eqg9VPE07rf6li2DlTvfBGUn6ABiRjPocgpsIP5g7P_suj_qjHTjNNQUgR7EyxpngQ=s0-d "sshot-2010-01-31-[00-21-21]")


